Remediating PDFs for accessibility
Why we should remediate PDFs for accessibility
Our website governance policy commits us to creating accessible digital materials for all external-facing and student-facing content. (See the website accessibility standard.) But beyond that, digital access and educational access are human rights.
PDFs are one of the most commonly shared file formats. When they are necessary, remediating the accessibility of PDFs helps ensure that all students, including those who use screen readers, Braille displays, voice control and other assistive technologies, can access and engage with learning materials.
If you are only providing one format for your content, and you can choose the format, it's best to provide something more universally accessible such as HTML, Word, or for forms, Microsoft Forms.
If you are providing multiple formats, you may wish to focus on the accessibility of the HTML, Word, or PowerPoint version. Many users of assistive technologies will not even attempt to open a PDF.
These remediation instructions are most useful in situations where the PDF format is unavoidable. For example, some publishers only accept .pdf files, and won't allow you to upload alternative formats alongside it.
Creating PDFs
Starting from source files
Creating an accessible PDF begins with creating an accessible source document, such as a Microsoft Word document or PowerPoint presentation. Accessibility issues that exist in the source file will often carry through into the exported PDF, so when creating a PDF from a source file, it’s important to ensure the accessibility issues have been addressed there first before exporting it into a PDF format.
Keep the layout simple when creating content for PDF. A simple reading order is better than a complex one. Content should be read logically from top to bottom and left to right unless there is a specific reason for a different order.
For further information, refer to core accessibility skills as well as the accessibility guides for Microsoft Word and Microsoft PowerPoint.
Unfortunately, the process of exporting to PDF still frequently strips useful information like heading styles, reading order and alt texts.
Starting from scanned pages
Scanned PDFs are one of the most common accessibility barriers. A scanned document is often just an image of text rather than actual selectable text. Screen readers cannot reliably read image-based text.
If a PDF has been created from a scan, there are some steps you can take to address this:
- Use Optical Character Recognition (OCR) to convert images to text.
- Review the OCR output for errors.
- Add tags and document structure. (More about this in following sections.)
- Run an Accessibility Checker or PDF accessibility tool.
Where possible, create PDFs directly from the original digital document rather than scanning printed materials.
Using accessibility tools
The University of Melbourne provides Nitro PDF Pro as its primary PDF software for all staff and students. Instructions on creating and editing accessible PDFs instructions are contained in this guide.
Nitro PDF Pro is available for Windows and Mac:
Nitro PDF Pro for Windows includes accessibility features designed to help create documents that meet accessibility standards. Nitro PDF Pro for Mac currently has limited accessibility remediation capabilities.
Using accessibility checkers (with caution)
Some PDF software applications like Adobe Acrobat Pro have inbuilt accessibility checkers to check accessibility issues all at once. However, not all PDF software applications do. For example, Nitro PDF Pro and Apple Previewdo not.
Accessibility checkers send your data to a cloud service, so be thoughtful about what you upload. If your document does not contain personal, sensitive, or confidential data, you may like to use Adobe’s checker or PUC, a free web-based PDF Usability Checker This can be useful for flyers or reports you intend to distribute publicly.
Document titles
A descriptive document title is one of the simplest and most important accessibility requirements in a PDF.
The document title helps screen reader users identify a document and distinguish it from other open files. The title should clearly describe the document's purpose rather than using a generic filename, such as:
- Document1.pdf
- Week1.pdf
- LectureNotes.pdf
Instead, use descriptive titles such as:
- Week 3 Lecture Notes: Introduction to Genetics
- CHEM10003 Laboratory Safety Guide
- Assessment 2 Instructions
Document language
Screen readers use the document language to determine pronunciation and reading behaviour.
In Nitro PDF Pro:
- Open File
- Select Document Properties
- Open Accessibility
- Select the document language
- Save changes.
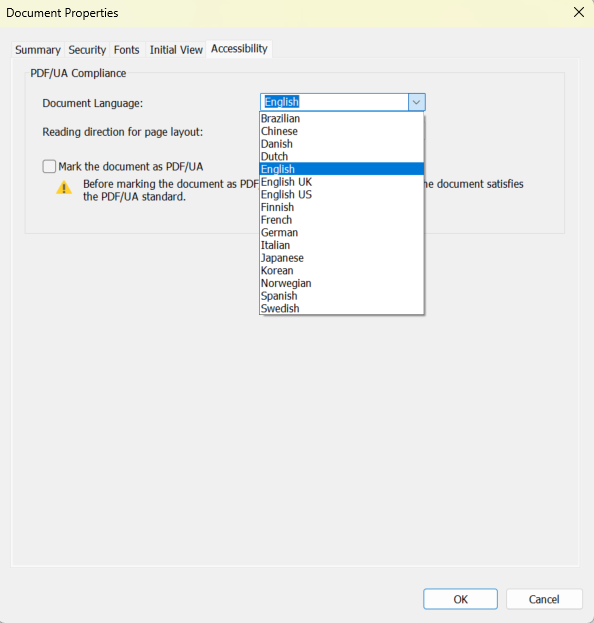
The document language can be set to English from the dropdown menu in document properties.
Document structure and tags
PDF accessibility relies heavily on something called document 'tags'. Tags provide the structural information needed by assistive technologies, including:
- Headings
- Paragraphs
- Lists
- Tables
- Images
- Links.
Without tags, a PDF may appear visually correct but be impossible for assistive technologies to interpret.
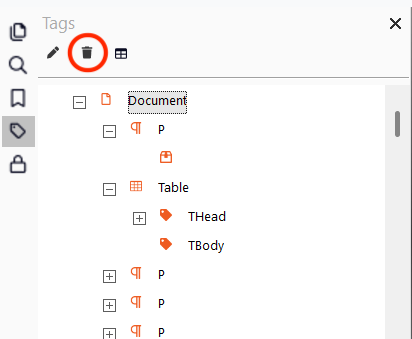
In Nitro PDF Pro, you can open the Tags panel by selecting the Tags icon in the left sidebar. By selecting parent tags in the list (those with a plus symbol beside them) you can view child tags beneath them.
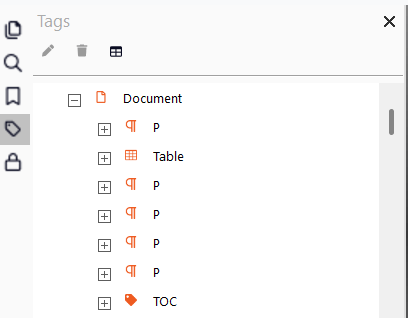
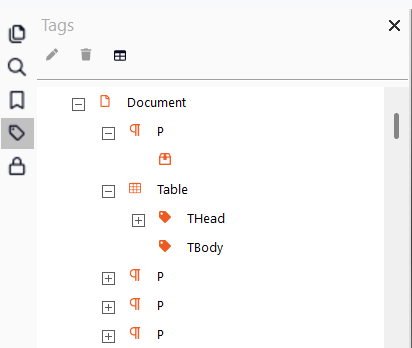
Accessible PDFs should include:
- A single Heading 1 for the document title
- A logical heading hierarchy (Heading 1, Heading 2, Heading 3)
- Tagged lists
- Tagged tables
- Tagged images.
PDFs created from properly structured Microsoft Word documents generally produce better tag structures than PDFs created from scanned documents.
Auto-tags
If this sounds onerous to you, you're not alone! Luckily, accessibility tools can get you started with auto-tagging. In Nitro PDF Pro for Windows:
- Open the Accessibility ribbon.
- Select Auto Tag.
- Review the generated tags.
Auto-tagging provides a starting point, but should not be considered the final step. Headings, lists, tables and reading order should be reviewed manually.

Adobe Acrobat Pro also provides an auto-tag function.
Reading order
After running auto-tags, it's time to fix the reading order, which determines the sequence in which content is read by screen readers.
For sighted users, content placement on the page usually makes the order obvious. Screen readers, however, rely on the PDF's tags rather than visual appearance.
This is a great reason for simple reading order in the source document. Common reading order problems include:
- Sidebars being read before the main content
- Headers and footers interrupting paragraphs
- Multi-column layouts being read incorrectly
- Images being read in the wrong location.
Nitro PDF Pro has features available to allow you to review and correct the reading order of a PDF. To correct the order:
- Select the Tags icon in the left-hand navigation pane. The Tags panel will display the document's structure and reading order.
- Select tags one at a time in the Tags panel. Nitro highlights the associated content in the document with a red outline.
- Compare the highlighted content with the order you would expect a screen reader to follow.
- To move content, select the tag you want to move then drag the tag to a new location within the Tags tree.
- Release the mouse button when the dotted insertion line appears in the desired location.
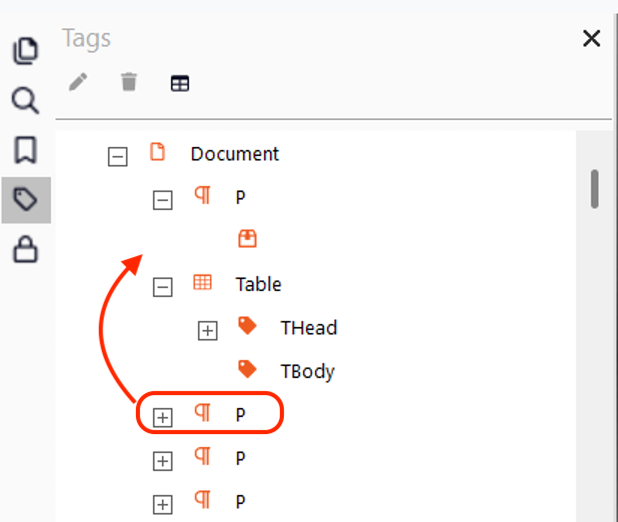
You can also delete a tag by selecting the tag you would like to delete, and then click the Delete (bin) icon. This will not delete the content from the PDF. It will only delete the tag.
Alt texts
Even when you have added alt texts in the source document, the PDF export process might remove them. To create, edit or review alt text in Nitro PDF Pro, follow these instructions:
- Select the Tags icon in the left-hand navigation pane.
- Expand the document structure tree if necessary.
- Look for tags labelled Figure (in Nitro PDF Pro, images are typically identified with Figure tags).
- Select each Figure tag to identify the corresponding image within the document.
- To review existing descriptions, open the tag properties for each figure. Here you should see the alt text if it’s provided. If it does not have an alt text, make sure to include it. You can copy-paste alt texts from the source document if you have it.
Not all images require alt text. Decorative images, such as borders, decorative icons, background images and non-informative stock photos should be treated as 'artifacts' so that screen readers do not announce them unnecessarily. Nitro PDF Pro includes artifact management functionality within its accessibility features.
Many generative AI tools – such as Ally in the LMS or the University of Melbourne SparkAI tool – can create alt text drafts for you if you paste in an image. For detailed advice on writing alt texts, see the core accessibility skills guide.
What accessibility tools cannot do
Currently, there are not any accessibility tools that can detect:
- Whether a document title is correct
- Whether a document language is correct
- Whether the heading hierarchy makes sense
- Whether the reading order is correct
- Whether an alt text is meaningful.
Additionally, accessibility tools do not help you meet the WCAG AA criterion Reflow.
Checklist: accessible PDFs
Before releasing a PDF, check that:
- The document has a meaningful title
- The document language has been set
- The reading order is correct
- Headings are marked up correctly
- Any tables have header rows marked up
- Decorative images been marked as decorative
- All other images have alt text
- The document is not locked for security. (This blocks assistive technology.)
PDF accessibility tools can speed up the process.
Taking these steps helps ensure PDFs are accessible to the widest possible audience and supports an inclusive learning environment for all students.
Resources
General guidance
- Policy: University of Melbourne standards for web accessibility (University policy under MPF1392)
- Guide: Core accessibility skills
- Hub: Disability inclusion resources – links to resources for staff and students with disabilities, as well as accessibility information.
The problem with PDFs
- University guidance: PDF Accessibility
- Video: The Truth about PDFs (includes captions and audio-described track).