LMS subject design
Looking to enhance the design of your LMS subject? These examples and resources will show you what’s possible.
How to navigate and manage the LMS
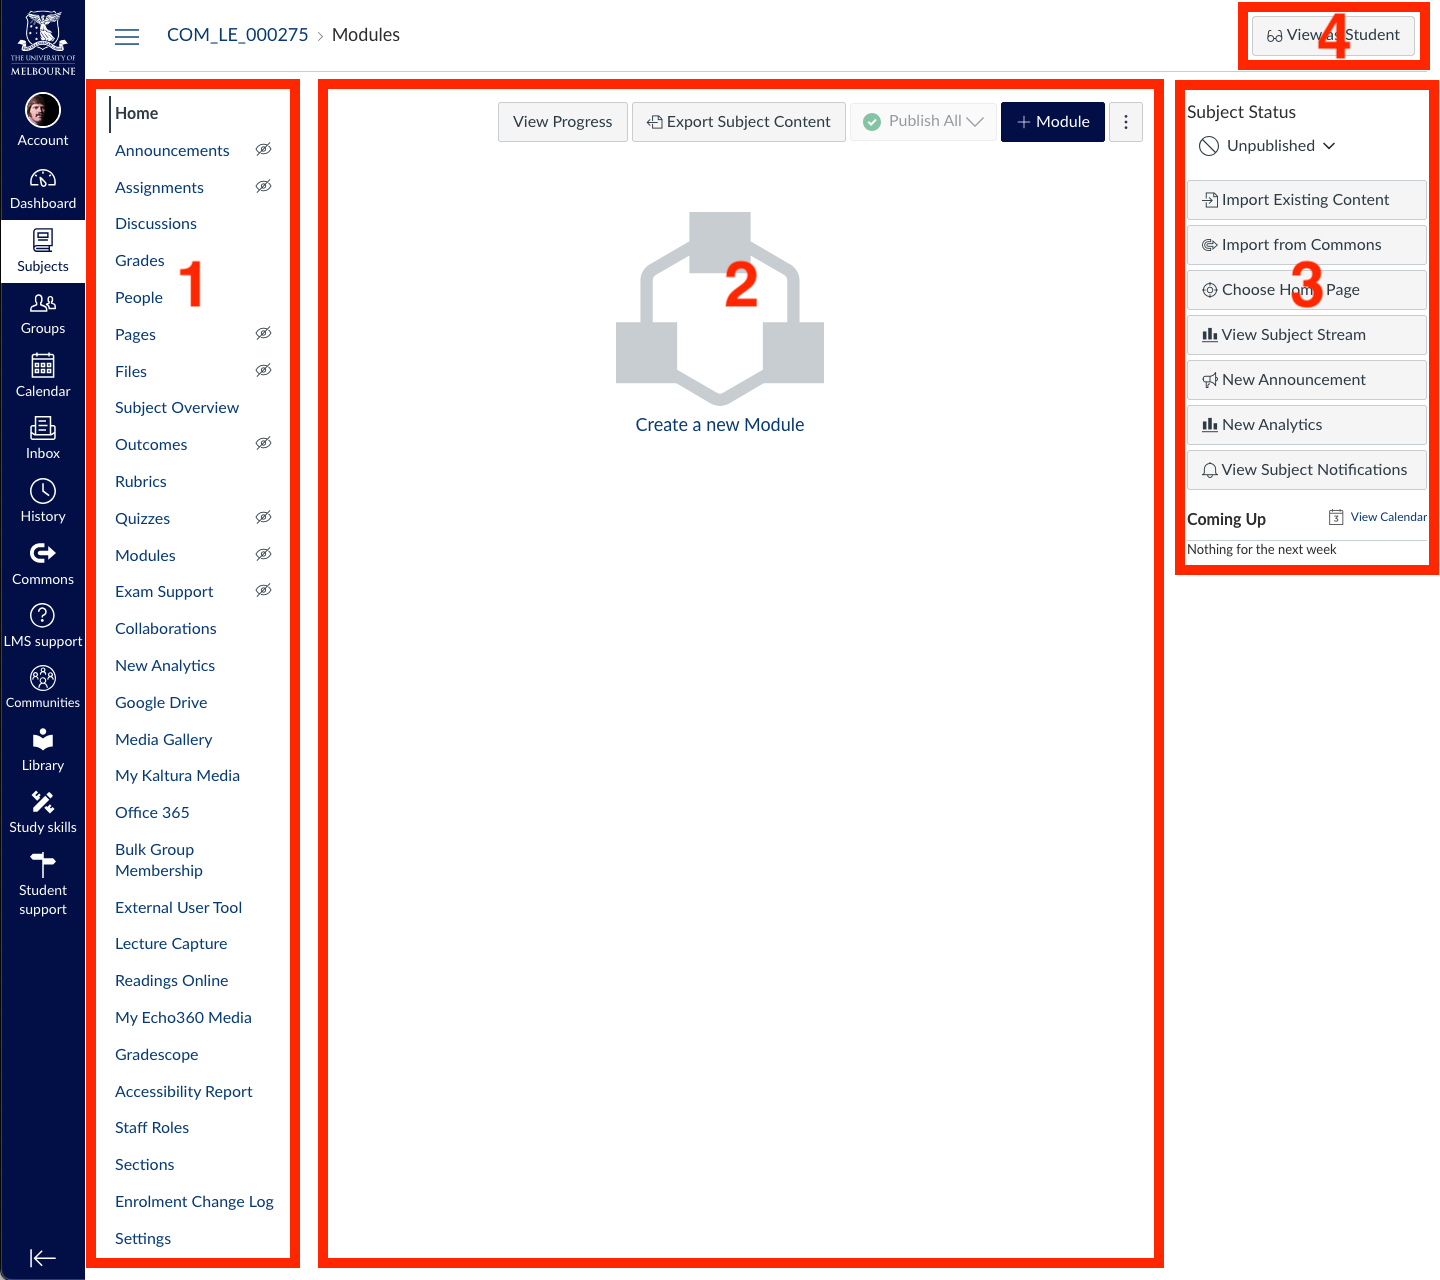
Let's start by understanding the basic LMS navigation and how to customise or manage it. Once your subject shell is set up, the Home page will appear as shown in the image below. It includes the following key sections:
- Subject navigation menu.
- Content area.
- Sidebar.
- Student view button.
Take some time to familiarise yourself with these sections. You can also customise the subject navigation menu by keeping only the essential links visible to students and hiding the rest. Additionally, there is an option to import content from an existing subject, making it easier to set up your course efficiently.
Tips for setting up subject navigation
- We suggest that you do not reorder the subject navigation menu, as students prefer a consistent subject navigation menu experience across subjects
- Hide from students unused subject navigation menu items to provide a clearer and simpler student experience, for example if Gradescope is not used in your subject, you can hide the Gradescope menu link.
This page was last updated on 17 Apr 2026.
Please report any errors on this page to our website maintainers
How to design your home page
What is a home page?
A Canvas LMS homepage can be thought of in a similar way to homepage of a website. Many websites have home pages - some are quite detailed, and are designed in such a way to help you conveniently access all of its contents. Others, are quite simple, and are intentionally designed that way to provide the user with an introduction, to set a tone or set an impression.
Whatever way you choose to go about designing your home page, you want to make sure it is intuitive and easy to follow. A well-designed homepage helps to improve the quality and appeal of your LMS subject.
Setting up a home page
The first step is to select a home page type.
- Click Home in the subject navigation menu.
- Click Choose Home Page in the sidebar menu.
You will then see the following options:
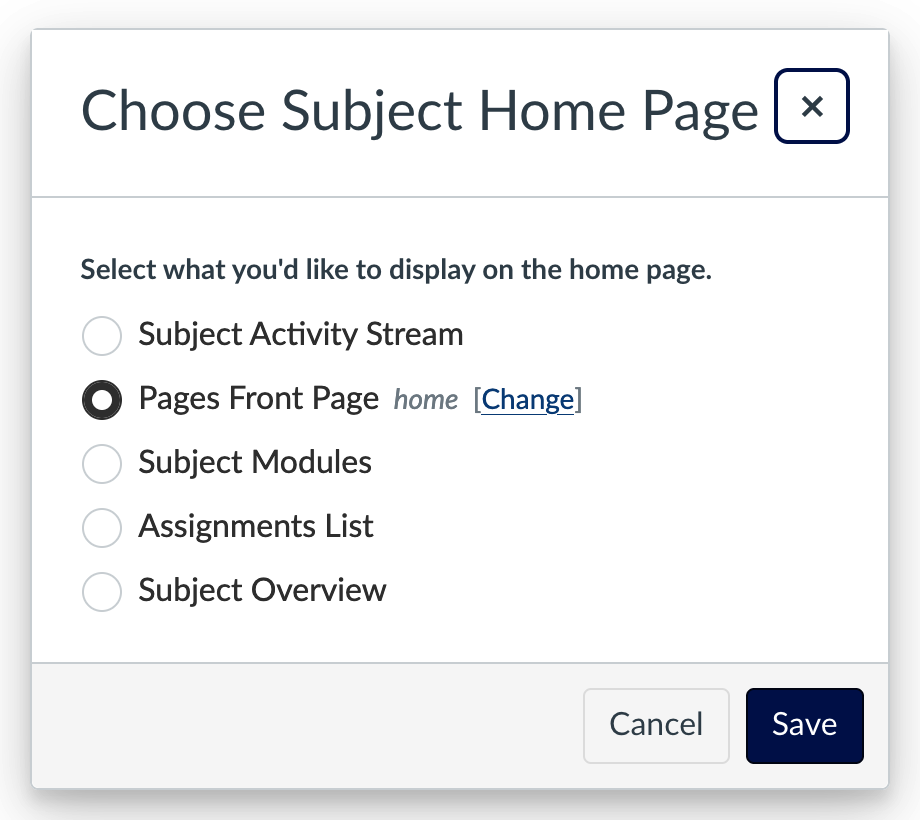
- We recommend you select Pages Front Page as your home page type.
- Click Save.
Note: In some cases, your Canvas subject shell might be entirely new, requiring you to create a page and set it as the home page. To do this, click on the "Page" link in the navigation bar, then select "Add Page" from the top-right corner. Name the page "Home page" and follow the steps outlined above.
Designing a subject home page
Downloadable template designs
We have a number of downloadable home page templates which you can easily add and edit for your subject.
Some example home page designs
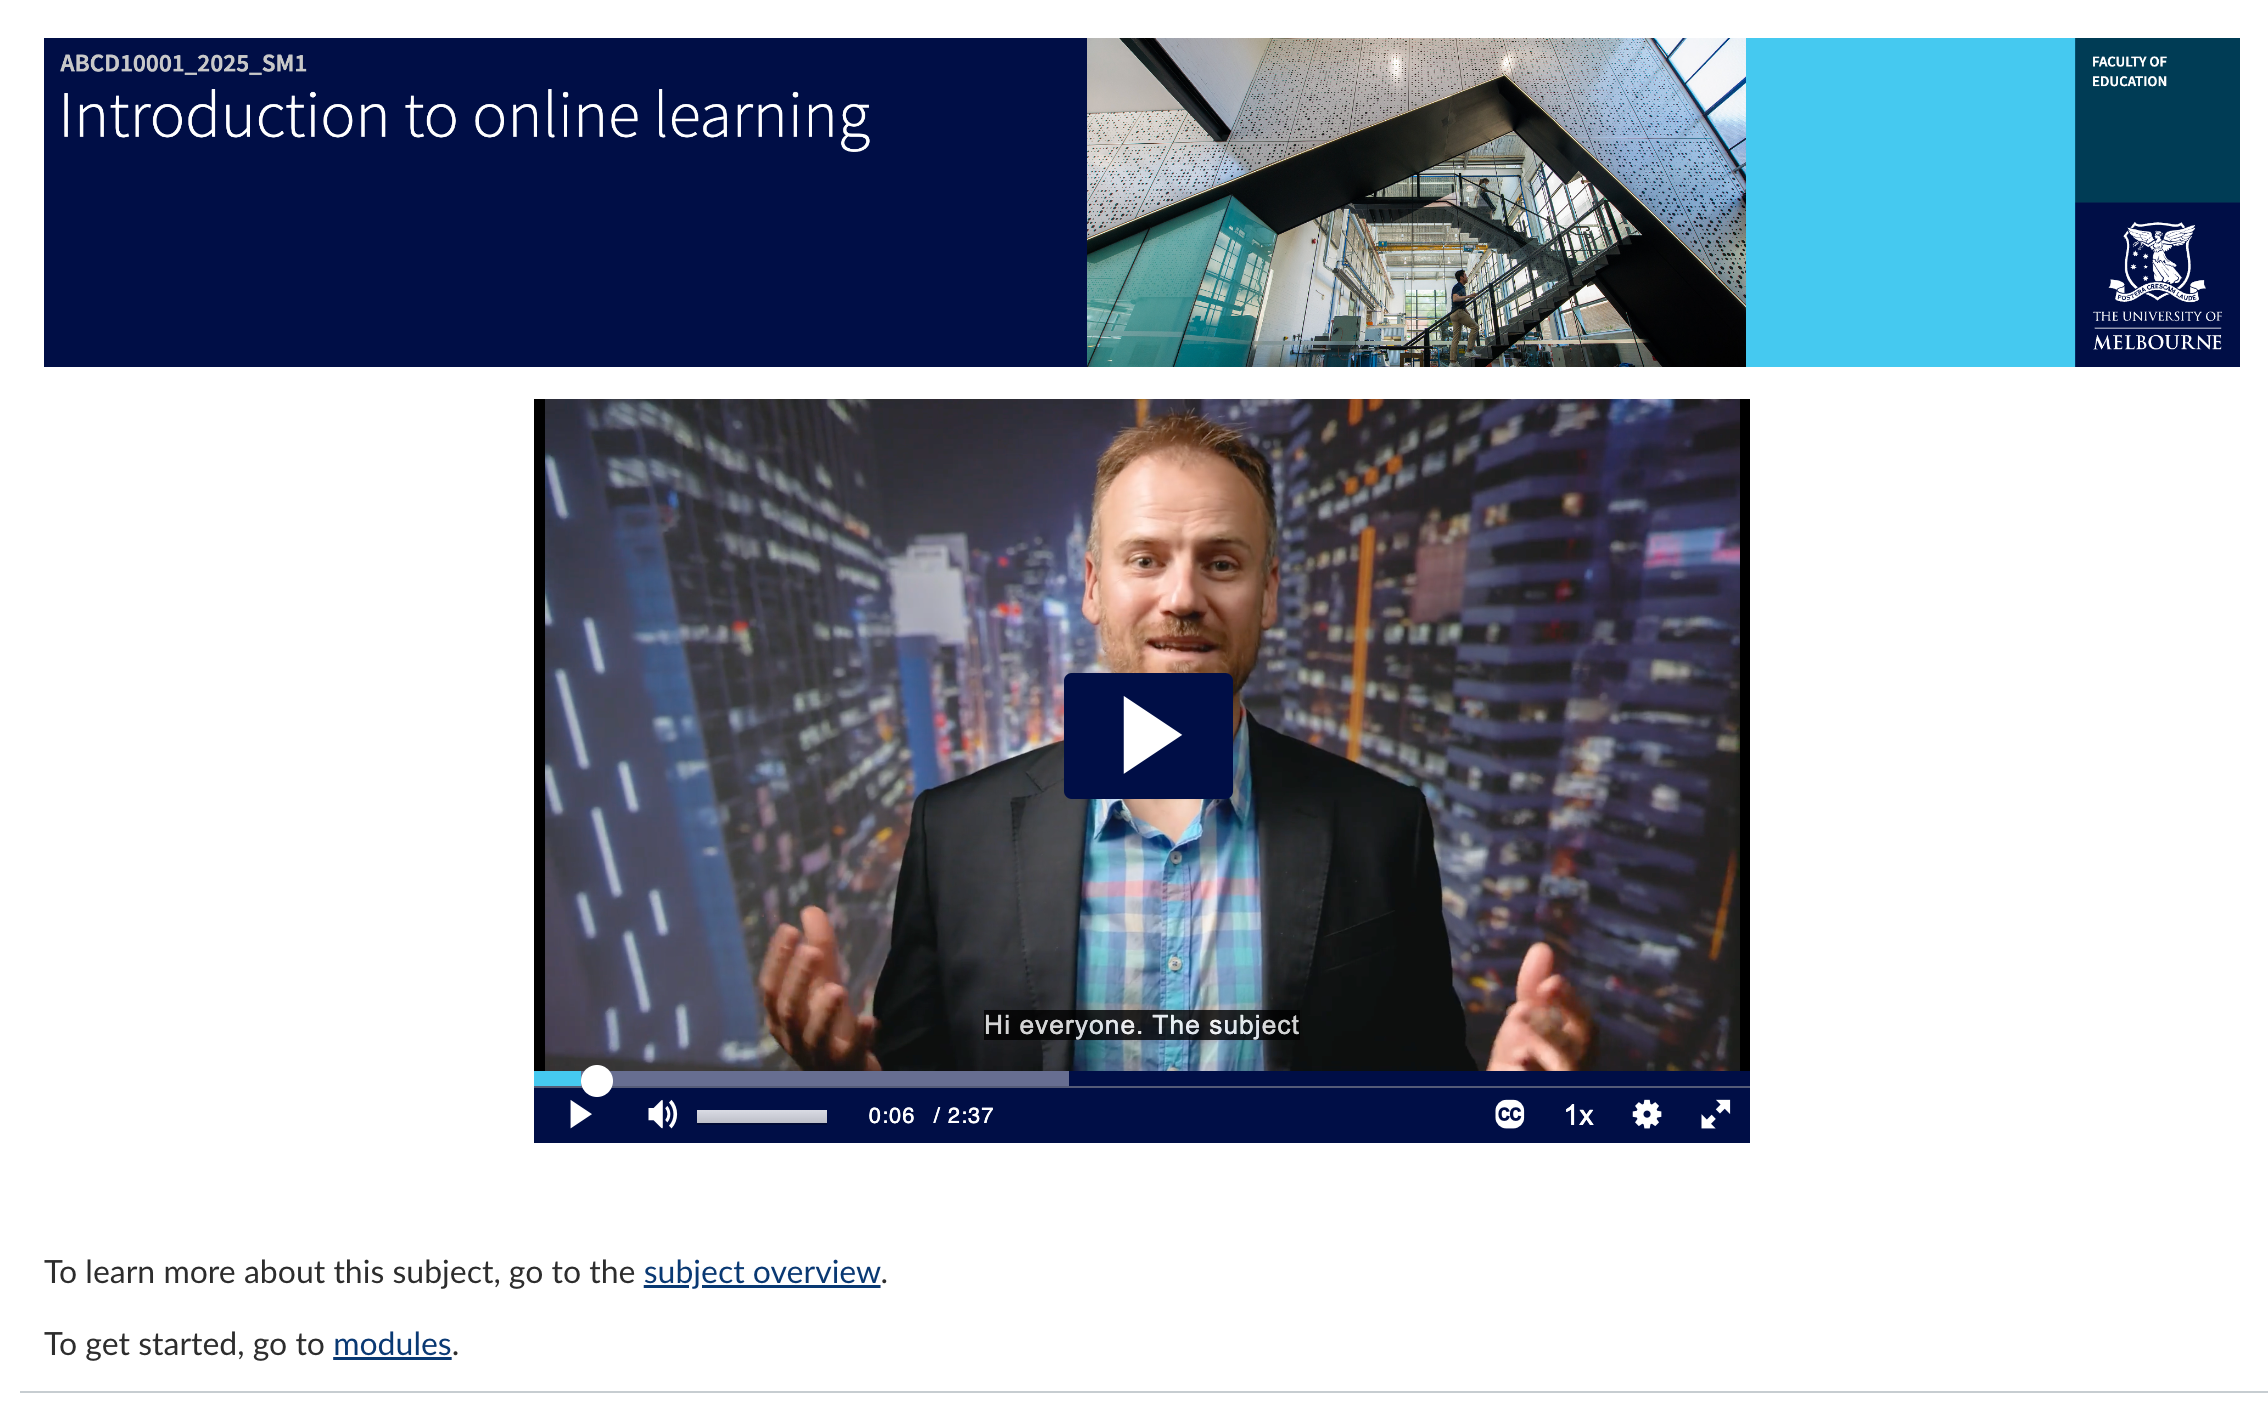
Example 1
This short and simple home page example uses:
- The subject banner tool.
- A short video welcoming students to the subject.
- Some text informing students where to go next.
Example 2
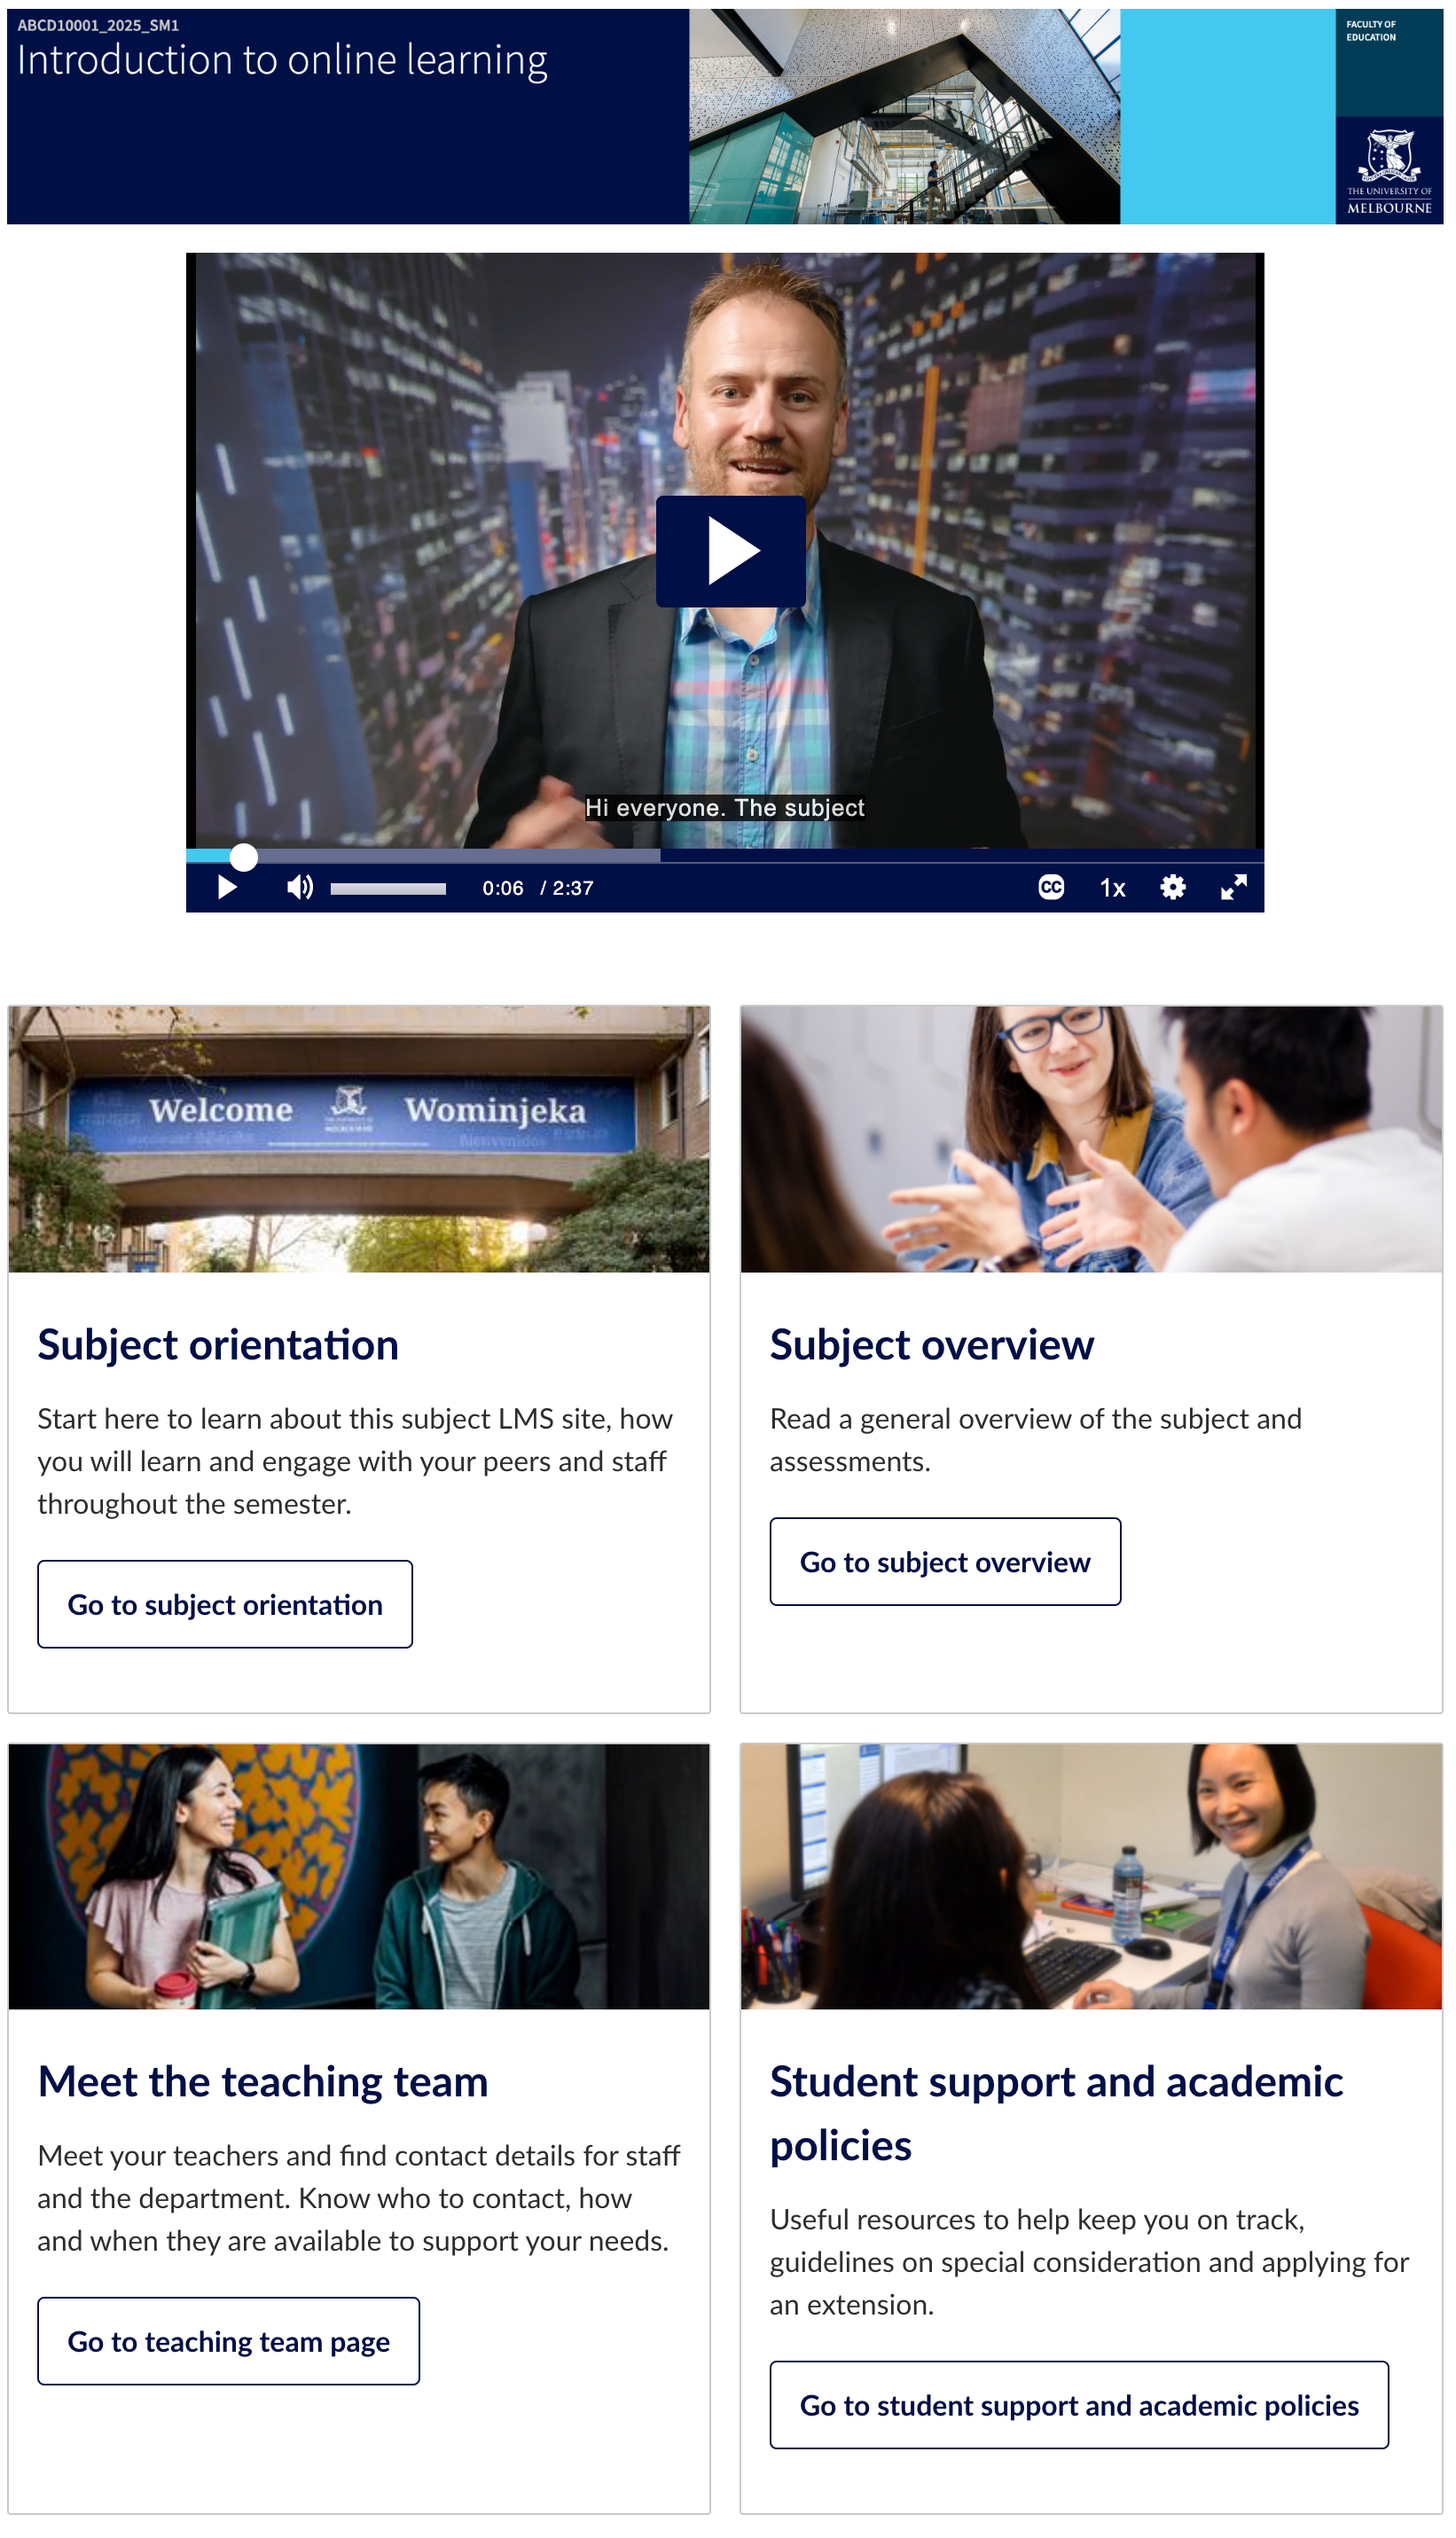
In this example, the welcome video is followed by tiles that link to information pages and modules, including:
- The subject overview page
- A staff information page
- A student support information page
- A subject orientation module.
Example 3
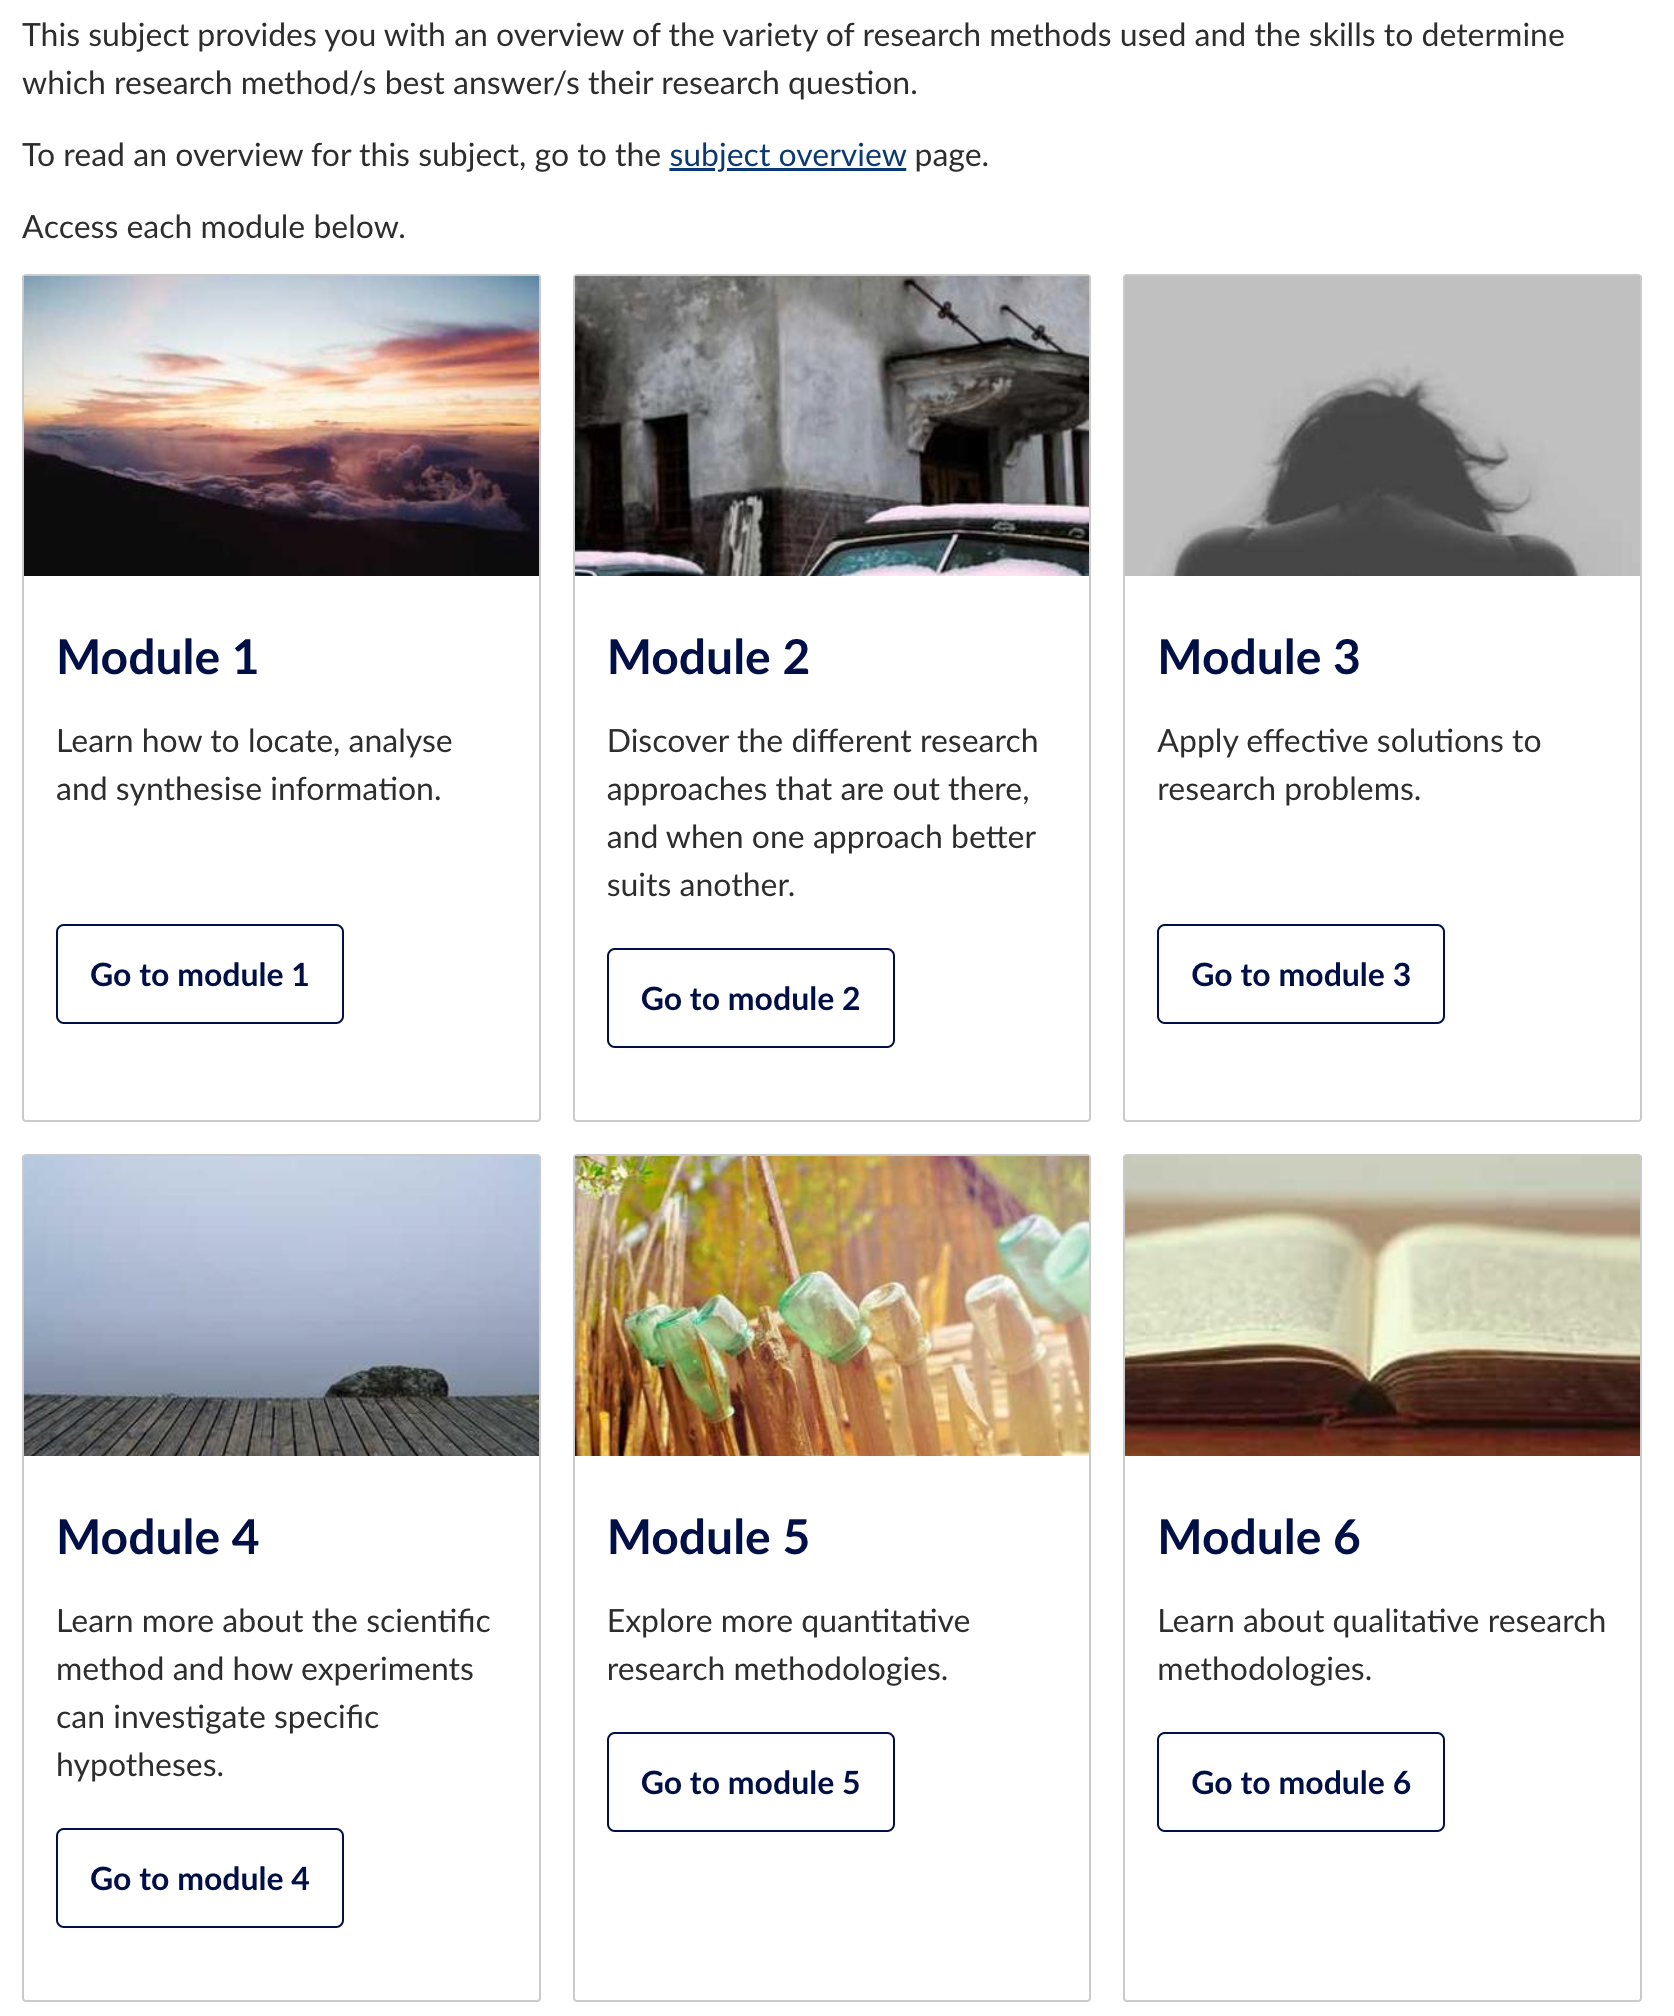
In this example, the homepage includes tiles that link to each module in the subject.
Tips for making a LMS homepage
- Welcome your students into your subject. You can embed a short 'welcome video' which helps build your own sense of presence in the subject. Or, you could include some introductory text.
- Keep the length of text on a page short. Be concise and straight to the point.
- Use heading levels (for example, heading level 2) to separate content on a page. This is important for your students with accessibility needs.
- Avoid duplication. If you have an overview of your assessments the subject overview, you don't need to have it on another page as well. Remember, you can always link to other areas in your subject.
- Make sure the path that students need to take to reach their learning materials is clear. In the example of a simple home page above, you can see how it says 'to learn more about this subject, go to Subject overview' and 'to get started go to modules'. You could also discuss this in an introductory video.
Staff resources
- How do I use the subject (Course) home page as an instructor.
- Downloadable templates that easily implement home page templates
- Banner tool
- To add tiles to your LMS site, see adding tiles to an LMS page with HTML
- Framework for building or improving an LMS site
- Checklist: Launching your LMS subject
- DIY video production guide
This page was last updated on 16 Apr 2026.
Please report any errors on this page to our website maintainers
How to design your subject overview
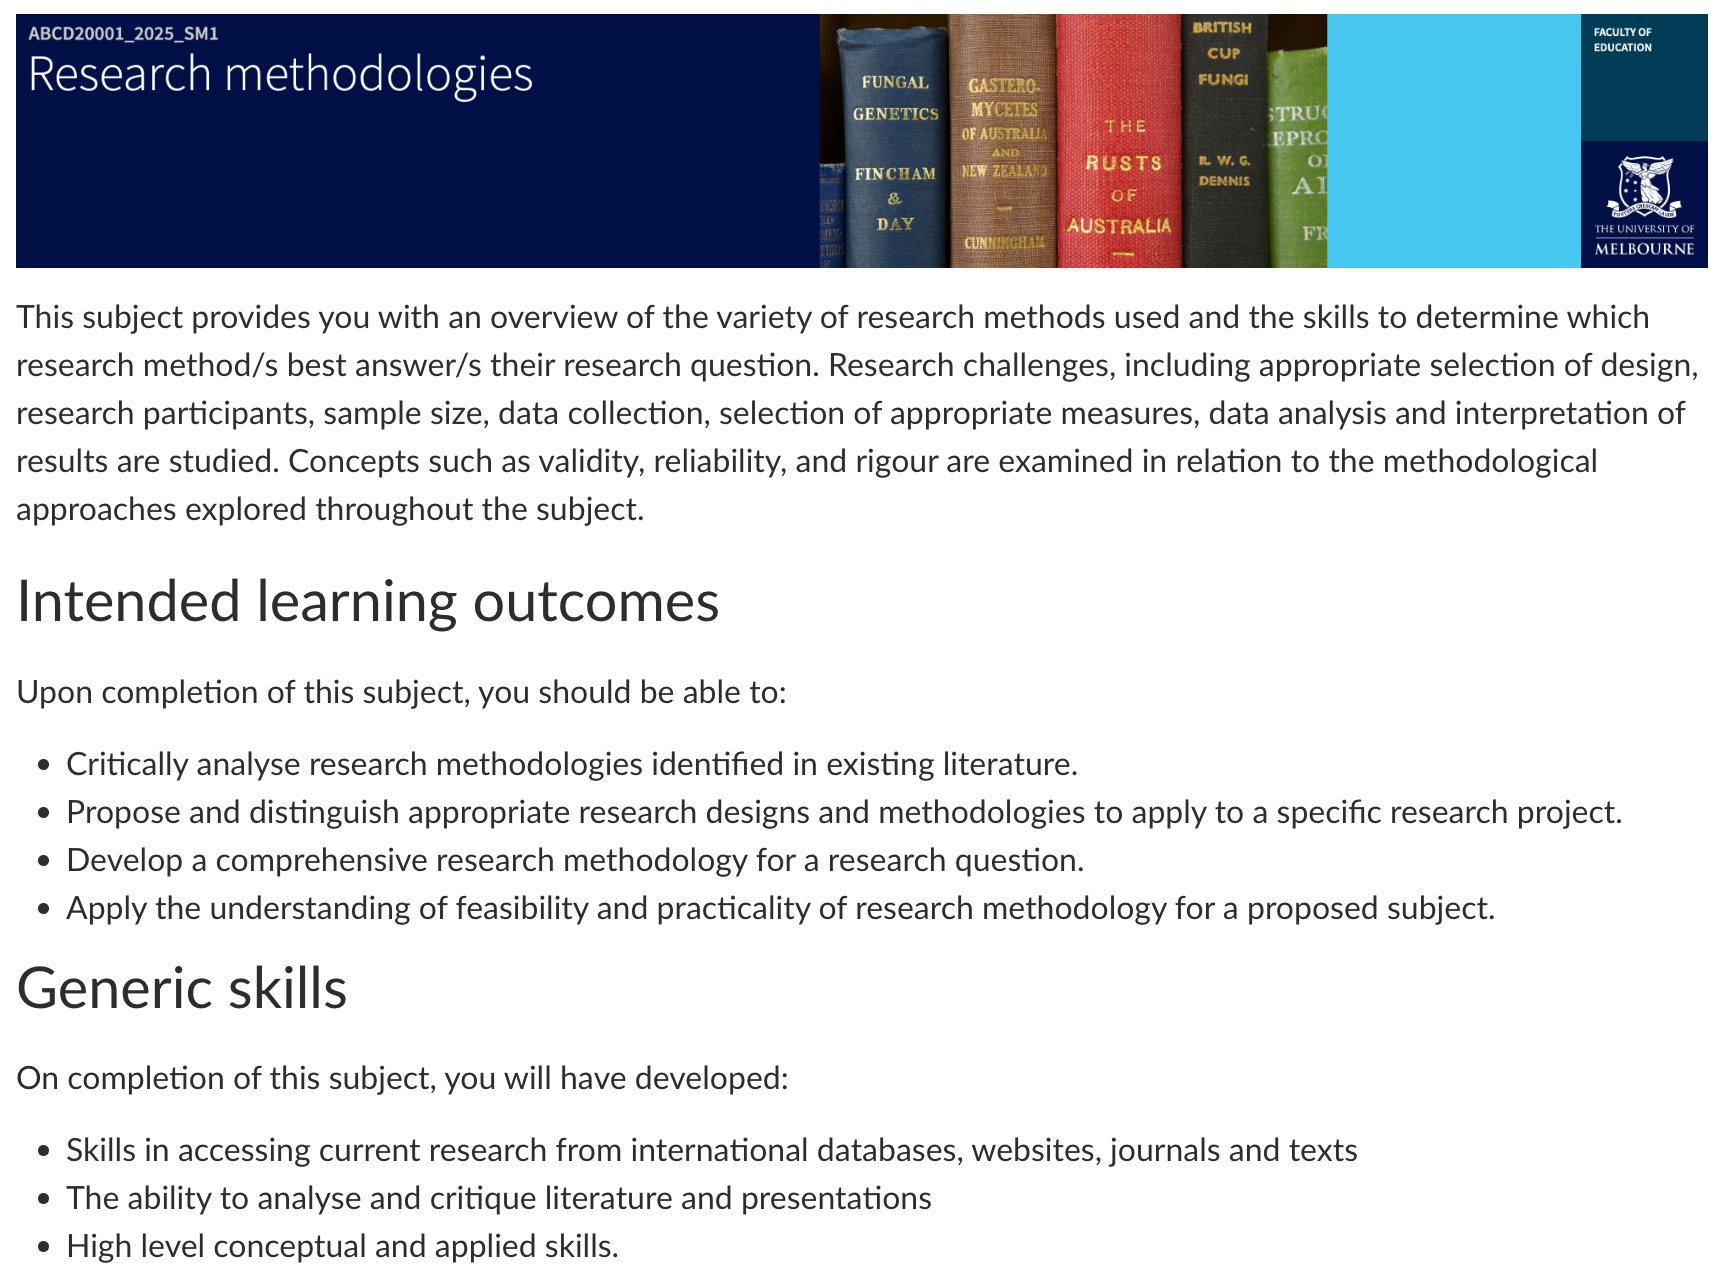
The Subject Overview page can sometimes be overlooked, but should serve as a reference page for all the higher-level details which you can add from the subject handbook. This includes:
- A brief description of the subject
- Intended learning outcomes
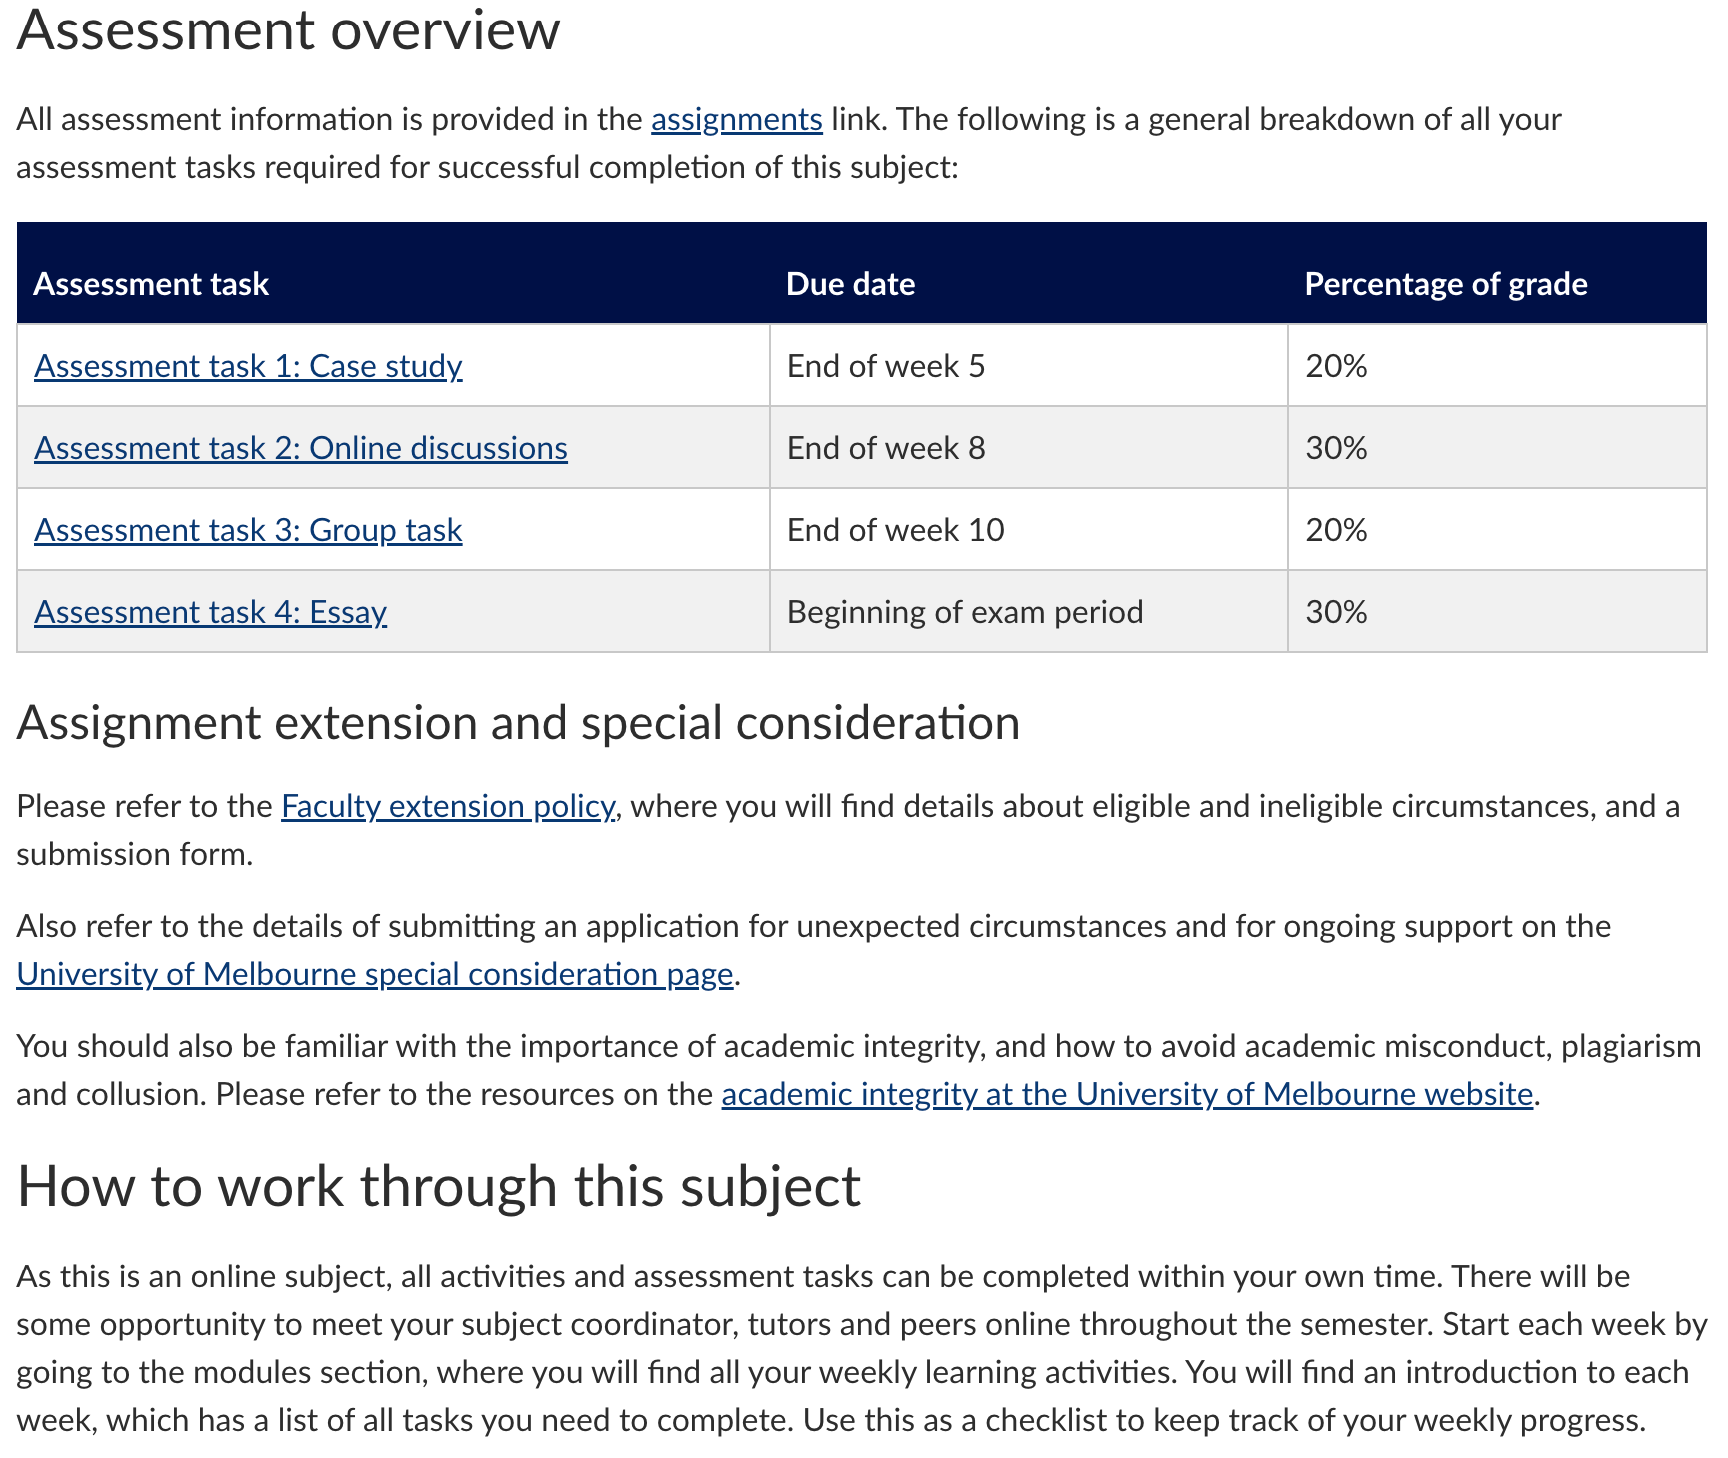
- Assessment information.
In the example below, students gain an overview of the subject through handbook information and can identify the number of assignments, their weightings, and the due dates for each assessment task. Students can click on each assessment task to view detailed information. Additionally, they receive guidance on how to navigate the subject based on different modalities.
Tips for making a Subject Overview
- Ensure information is clear and uncluttered
- Avoid duplication of information in other parts of the LMS site
- Use heading levels (for example, heading level 2) to separate content on a page. This is important for your students with accessibility needs.
- Ensure the naming and setup of your Assignment groups on the Assignments pages is set-up correctly and assignments groups weighting adds up to 100% so this information display correctly in the 'Assignments are weighted by group' section on the right
- Ensure all your assignments have due dates and only the relevant assignments are published so the Subject Summary contains the correct information and doesn’t confuse students
Staff resources
- Banner tool
- Borders have been used to separate sections of content in the examples above. See separating content on an LMS page with HTML
- How do I use the Subject Overview (Syllabus)?
This page was last updated on 17 Apr 2026.
Please report any errors on this page to our website maintainers
How to design subject modules
Students generally use the subject navigation menu and modules section to navigate through a subject. There are also several approaches you can take when setting up your modules. Some examples are shown below.
Method 1: Create a module for each week
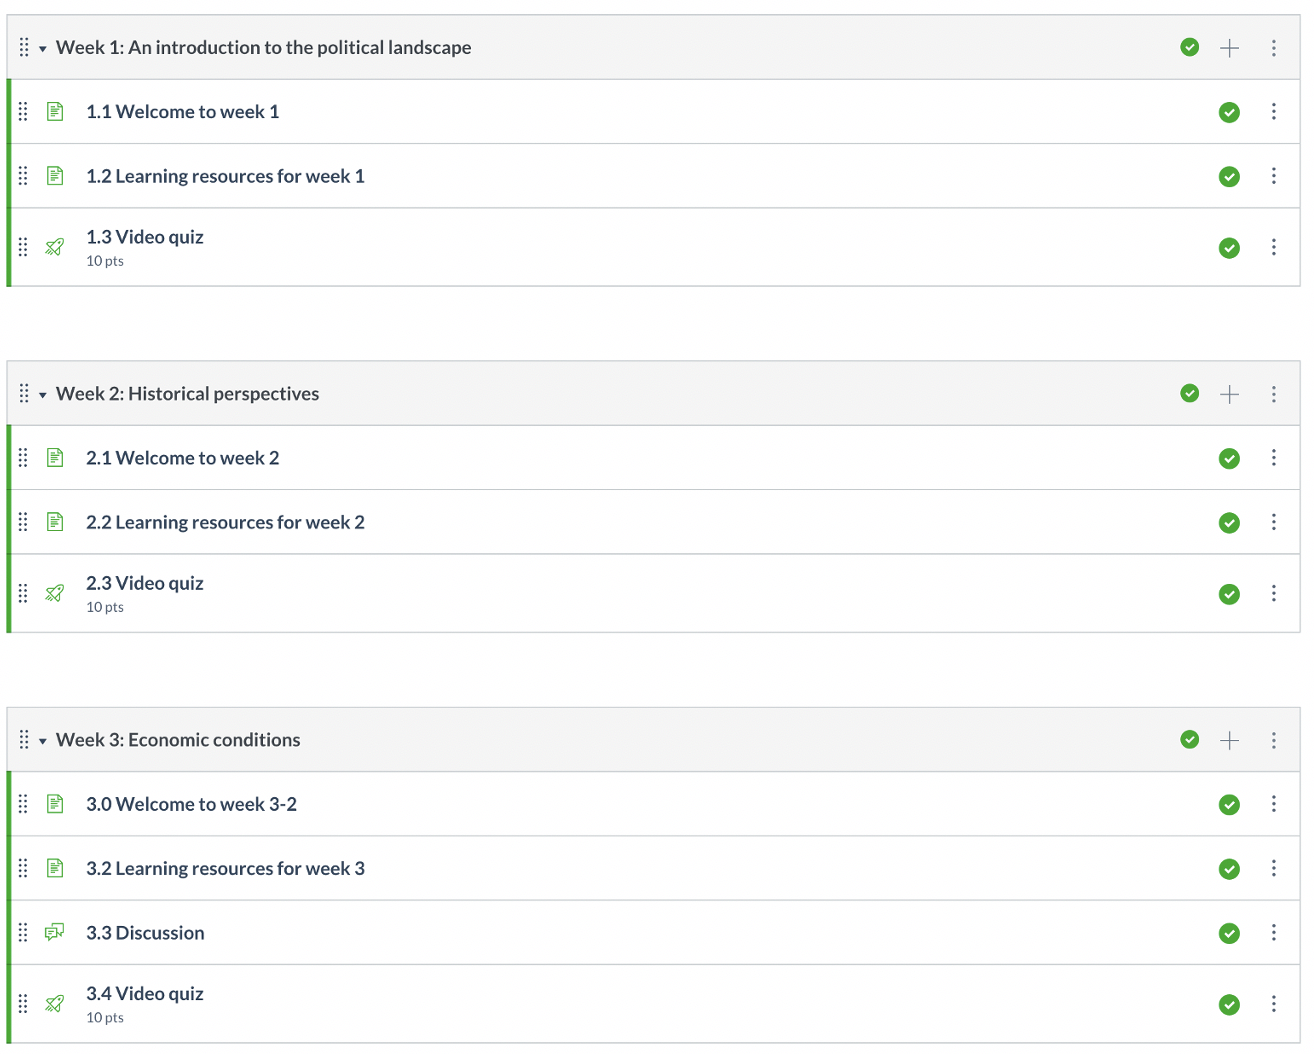
You could create a module for each week, then add within each of your modules all the learning activities and resources that belong to each week. In the example below, you'll see a consistent title has been applied to every module with links to everything students need for that week. Notice as well that each item has a numerical title (1.1, 1.2 etc), which can further help students understand the sequence in which you would like them to view each item.
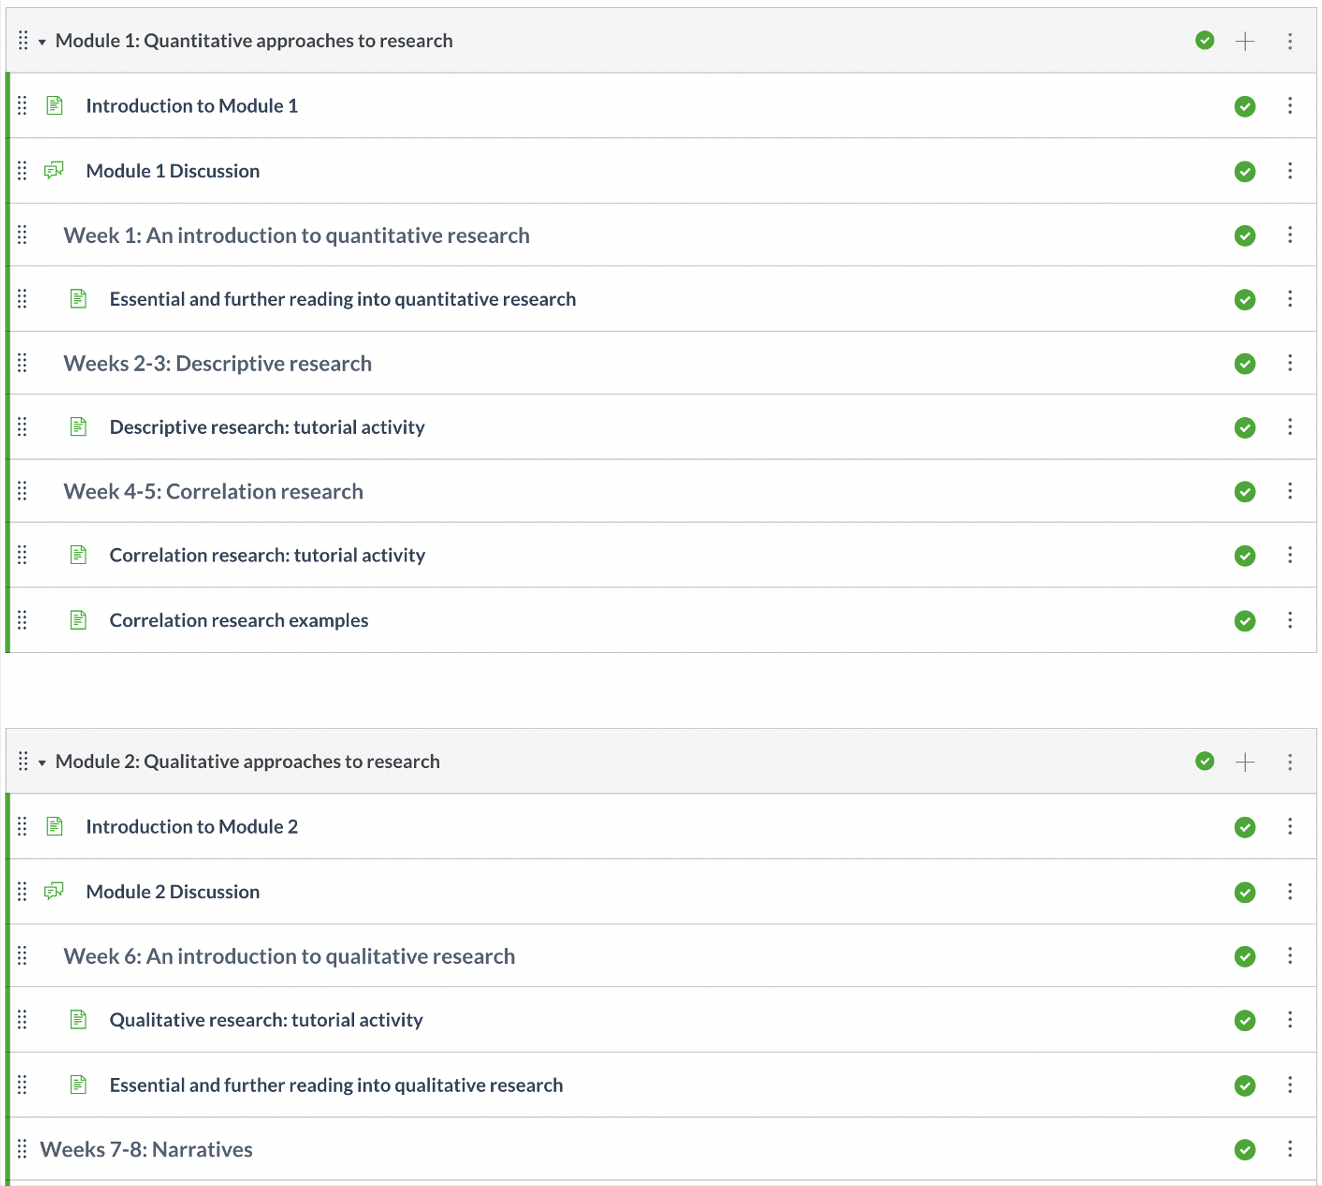
Method 2: Create modules for each key theme
Alternatively, you could create a module for each key theme in your subject. In the example below, you see there are three key themes that span over several weeks. A text header has also been used to illustrate sub themes. Notice also how references to weeks have been incorporated into the titles.
Tips for creating modules and setting up subject navigation
- Label and organise modules by week or topic
- Design modules so they provide a logical pathway through your subject, not as a resource bank
- Provide context or a narrative so students can understand the module journey through your subject
- For complex subjects use the module text headers feature to help organise your modules
- Use pages in modules to ‘declutter’ your modules
- Number modules and pages within modules to help students identify which page belongs to which week.
This page was last updated on 17 Apr 2026.
Please report any errors on this page to our website maintainers
How to design a student support module
It is important that your subject includes links to student support and any other important information that will help students know who and where they turn to when they have a question or would like further information. There are three levels of student support to consider - the subject level, the Faculty/school level, and the University-wide level.
Subject level support
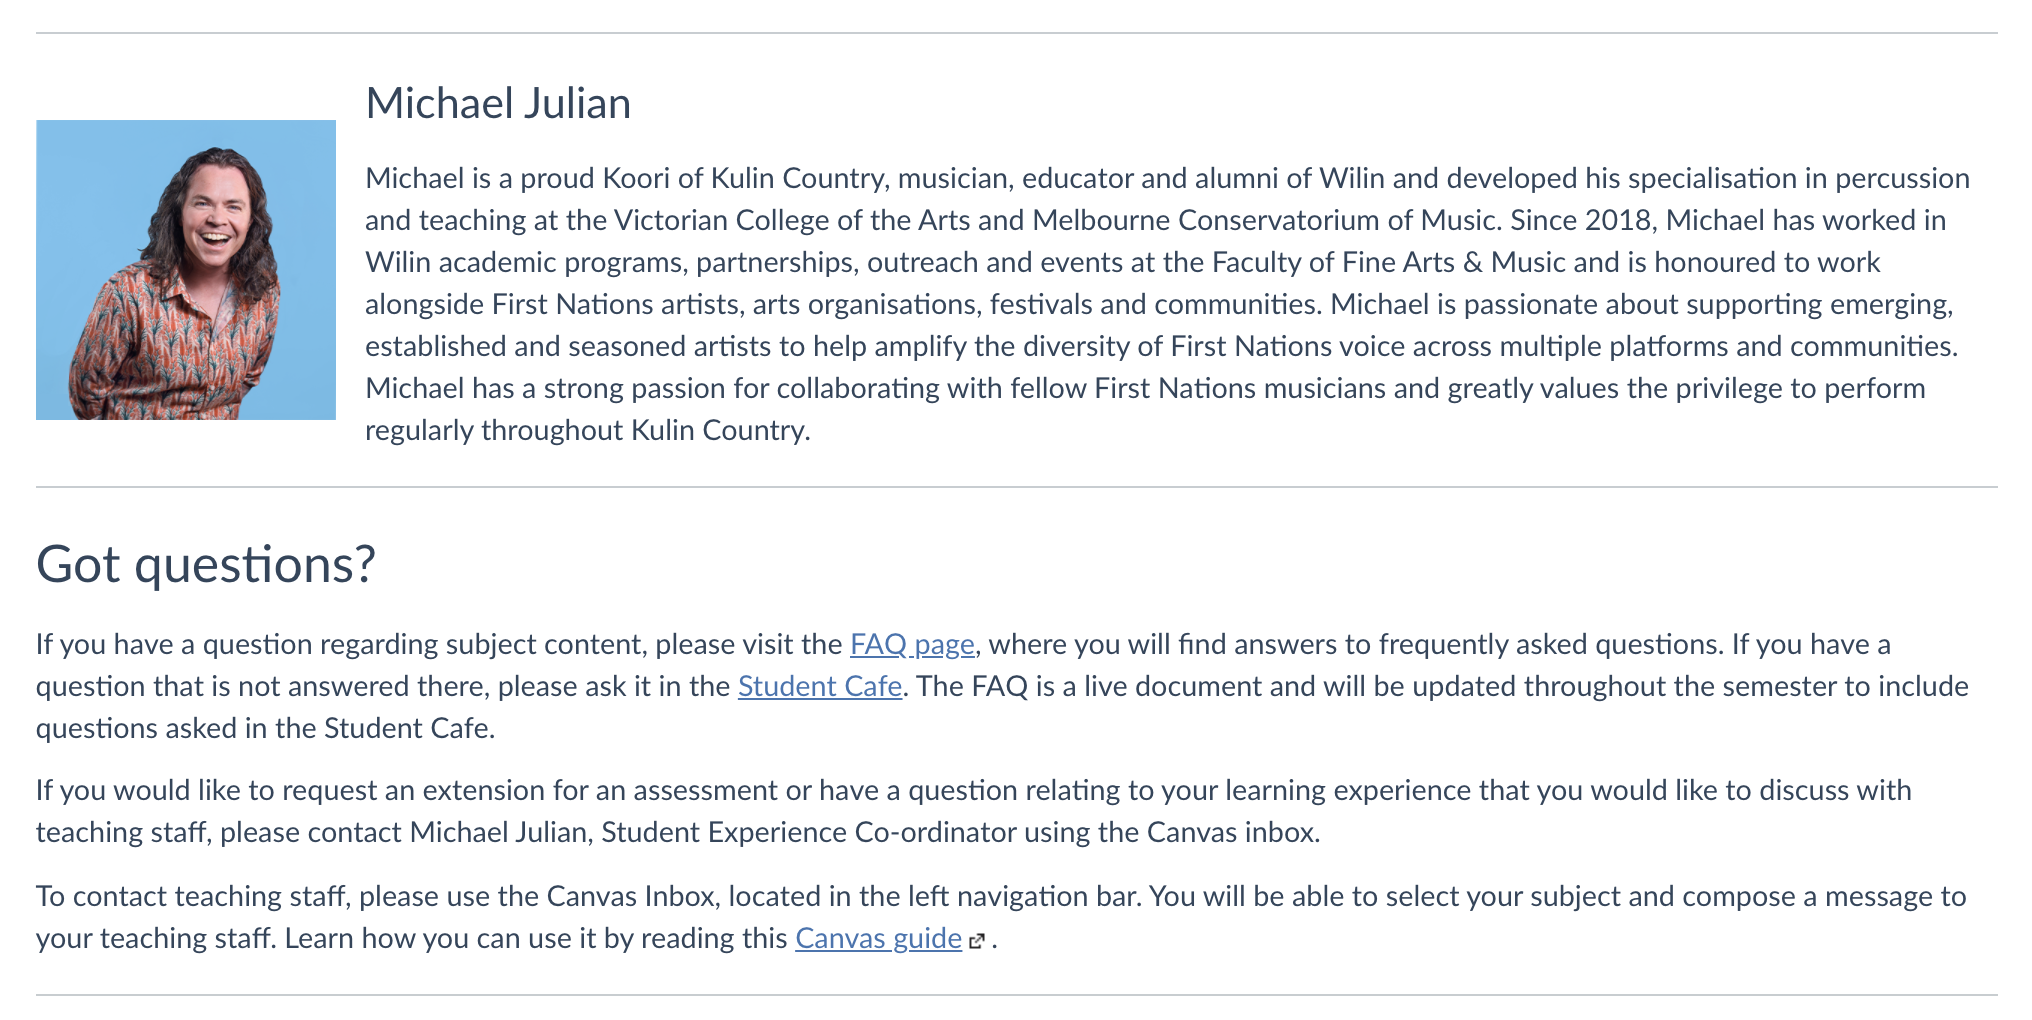
- Teaching staff information
- Communication protocols for queries
- An orientation of the subject where students are familiarised with the subject structure, and asked to complete a few short activities to evaluate their current knowledge and skills prior to engaging with their first week.
- Links for guides for the relevant educational technologies used in the subject.
Faculty/school level support
- Any school or faculty support or information that will aid students
- Please consult with your Faculty/School for advice on any local requirements.
University-wide level support
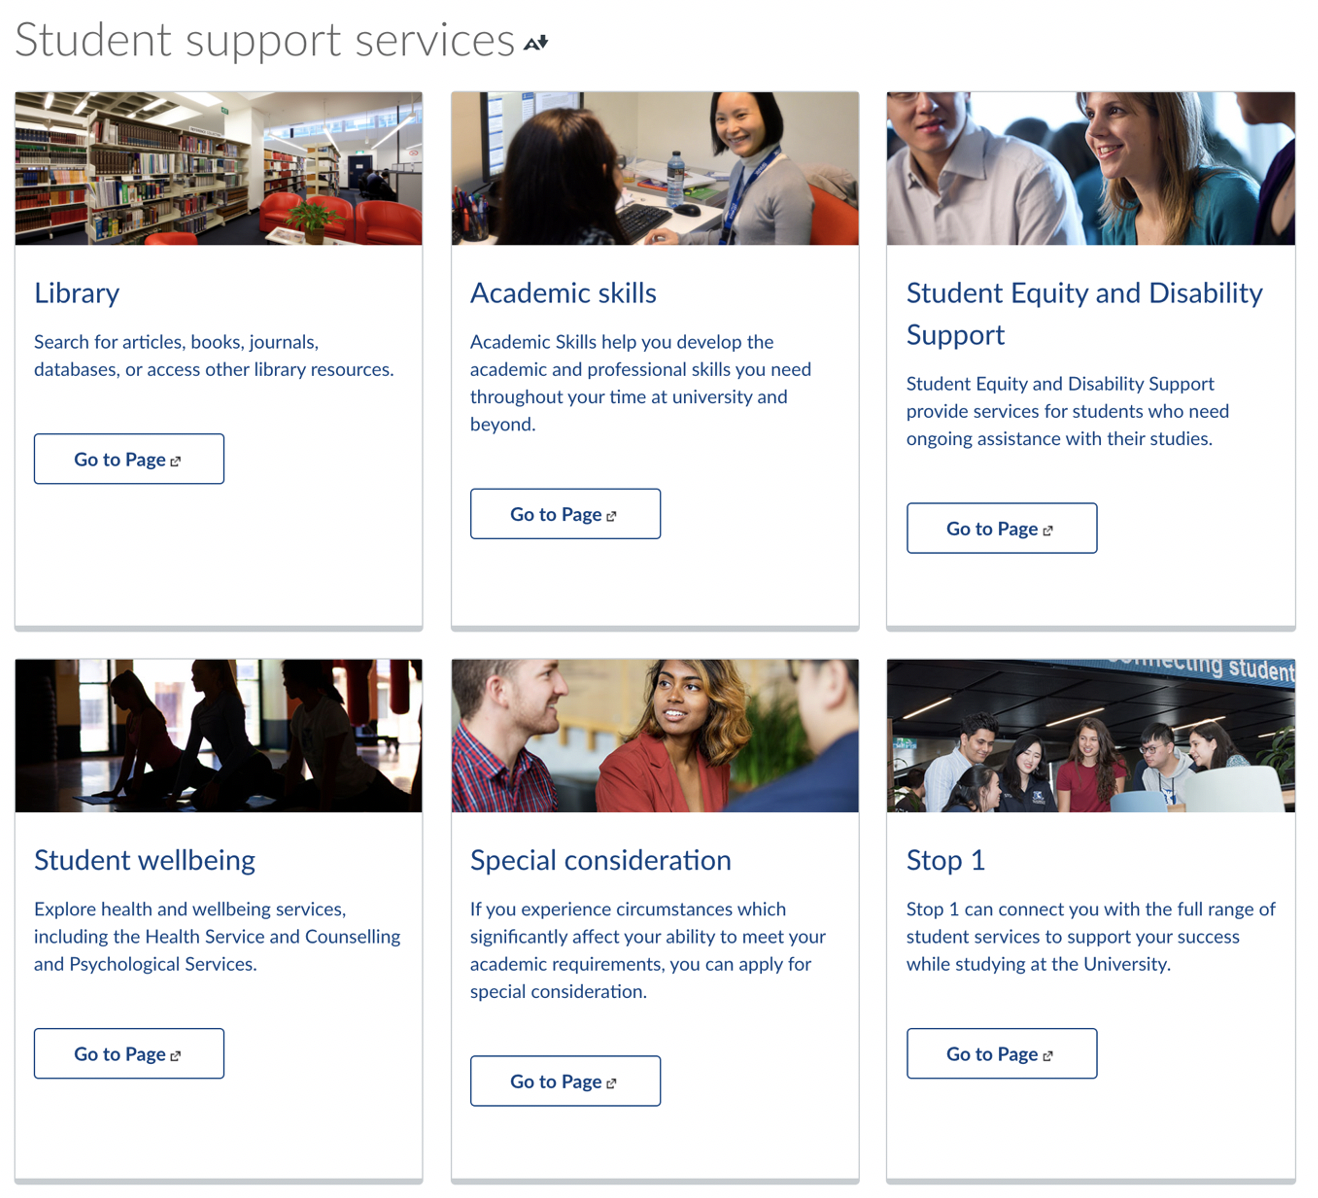
- Links to the University wide support services for students.
In the example below, you can see what a subject support information module may look like.

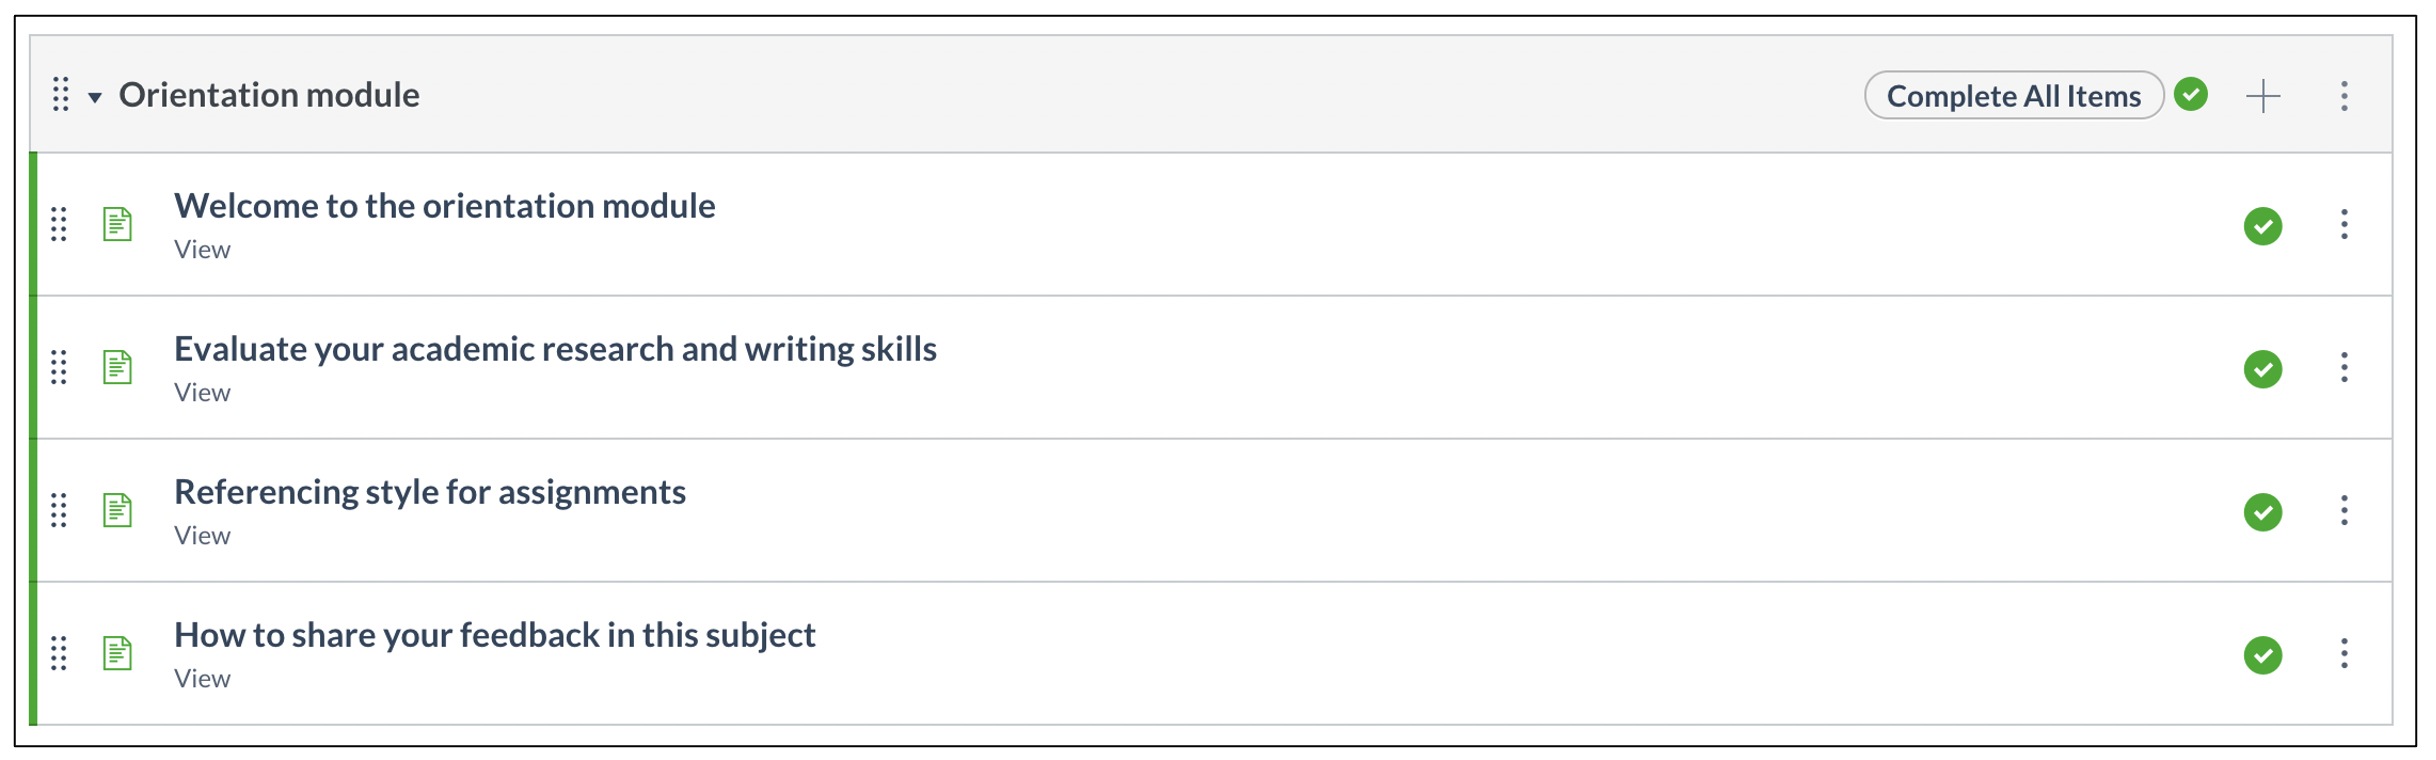
It may also be beneficial to include an orientation module. In the example orientation module below, students become familiar with the subject structure, and asked to complete a few short activities to evaluate their current knowledge and skills prior to engaging with their first week.
Tips for making a student support module
- Provide information on teaching staff and communication protocols
- Provide a clear channel for student queries about subject content, learning activities and assessment
- Consider creating a Q&A discussion board where students can ask questions about the subject in general
- Consider including links to support and guides for the educational technologies in your subject
- Include advice on student support services which links students to the services they may need to refer to. Student support services to share with your students:
- Other central information to consider sharing with your students
- Academic integrity
- Student learning surveys (SLS)
- Exams
- Class timetable
- Student IT
- LMS guides for students
- Link to subject details in the Handbook
Staff resources
- Downloadable templates that easily implement the suggestions on this page
- Framework for building or improving an LMS site.
This page was last updated on 17 Apr 2026.
Please report any errors on this page to our website maintainers
How to design an LMS page
How you go about designing your pages in the LMS depends on how you structure your modules and what online learning activities and resources you wish to present to students. We will present a few examples that may give you some ideas.
Example 1: Introduction to a week/module
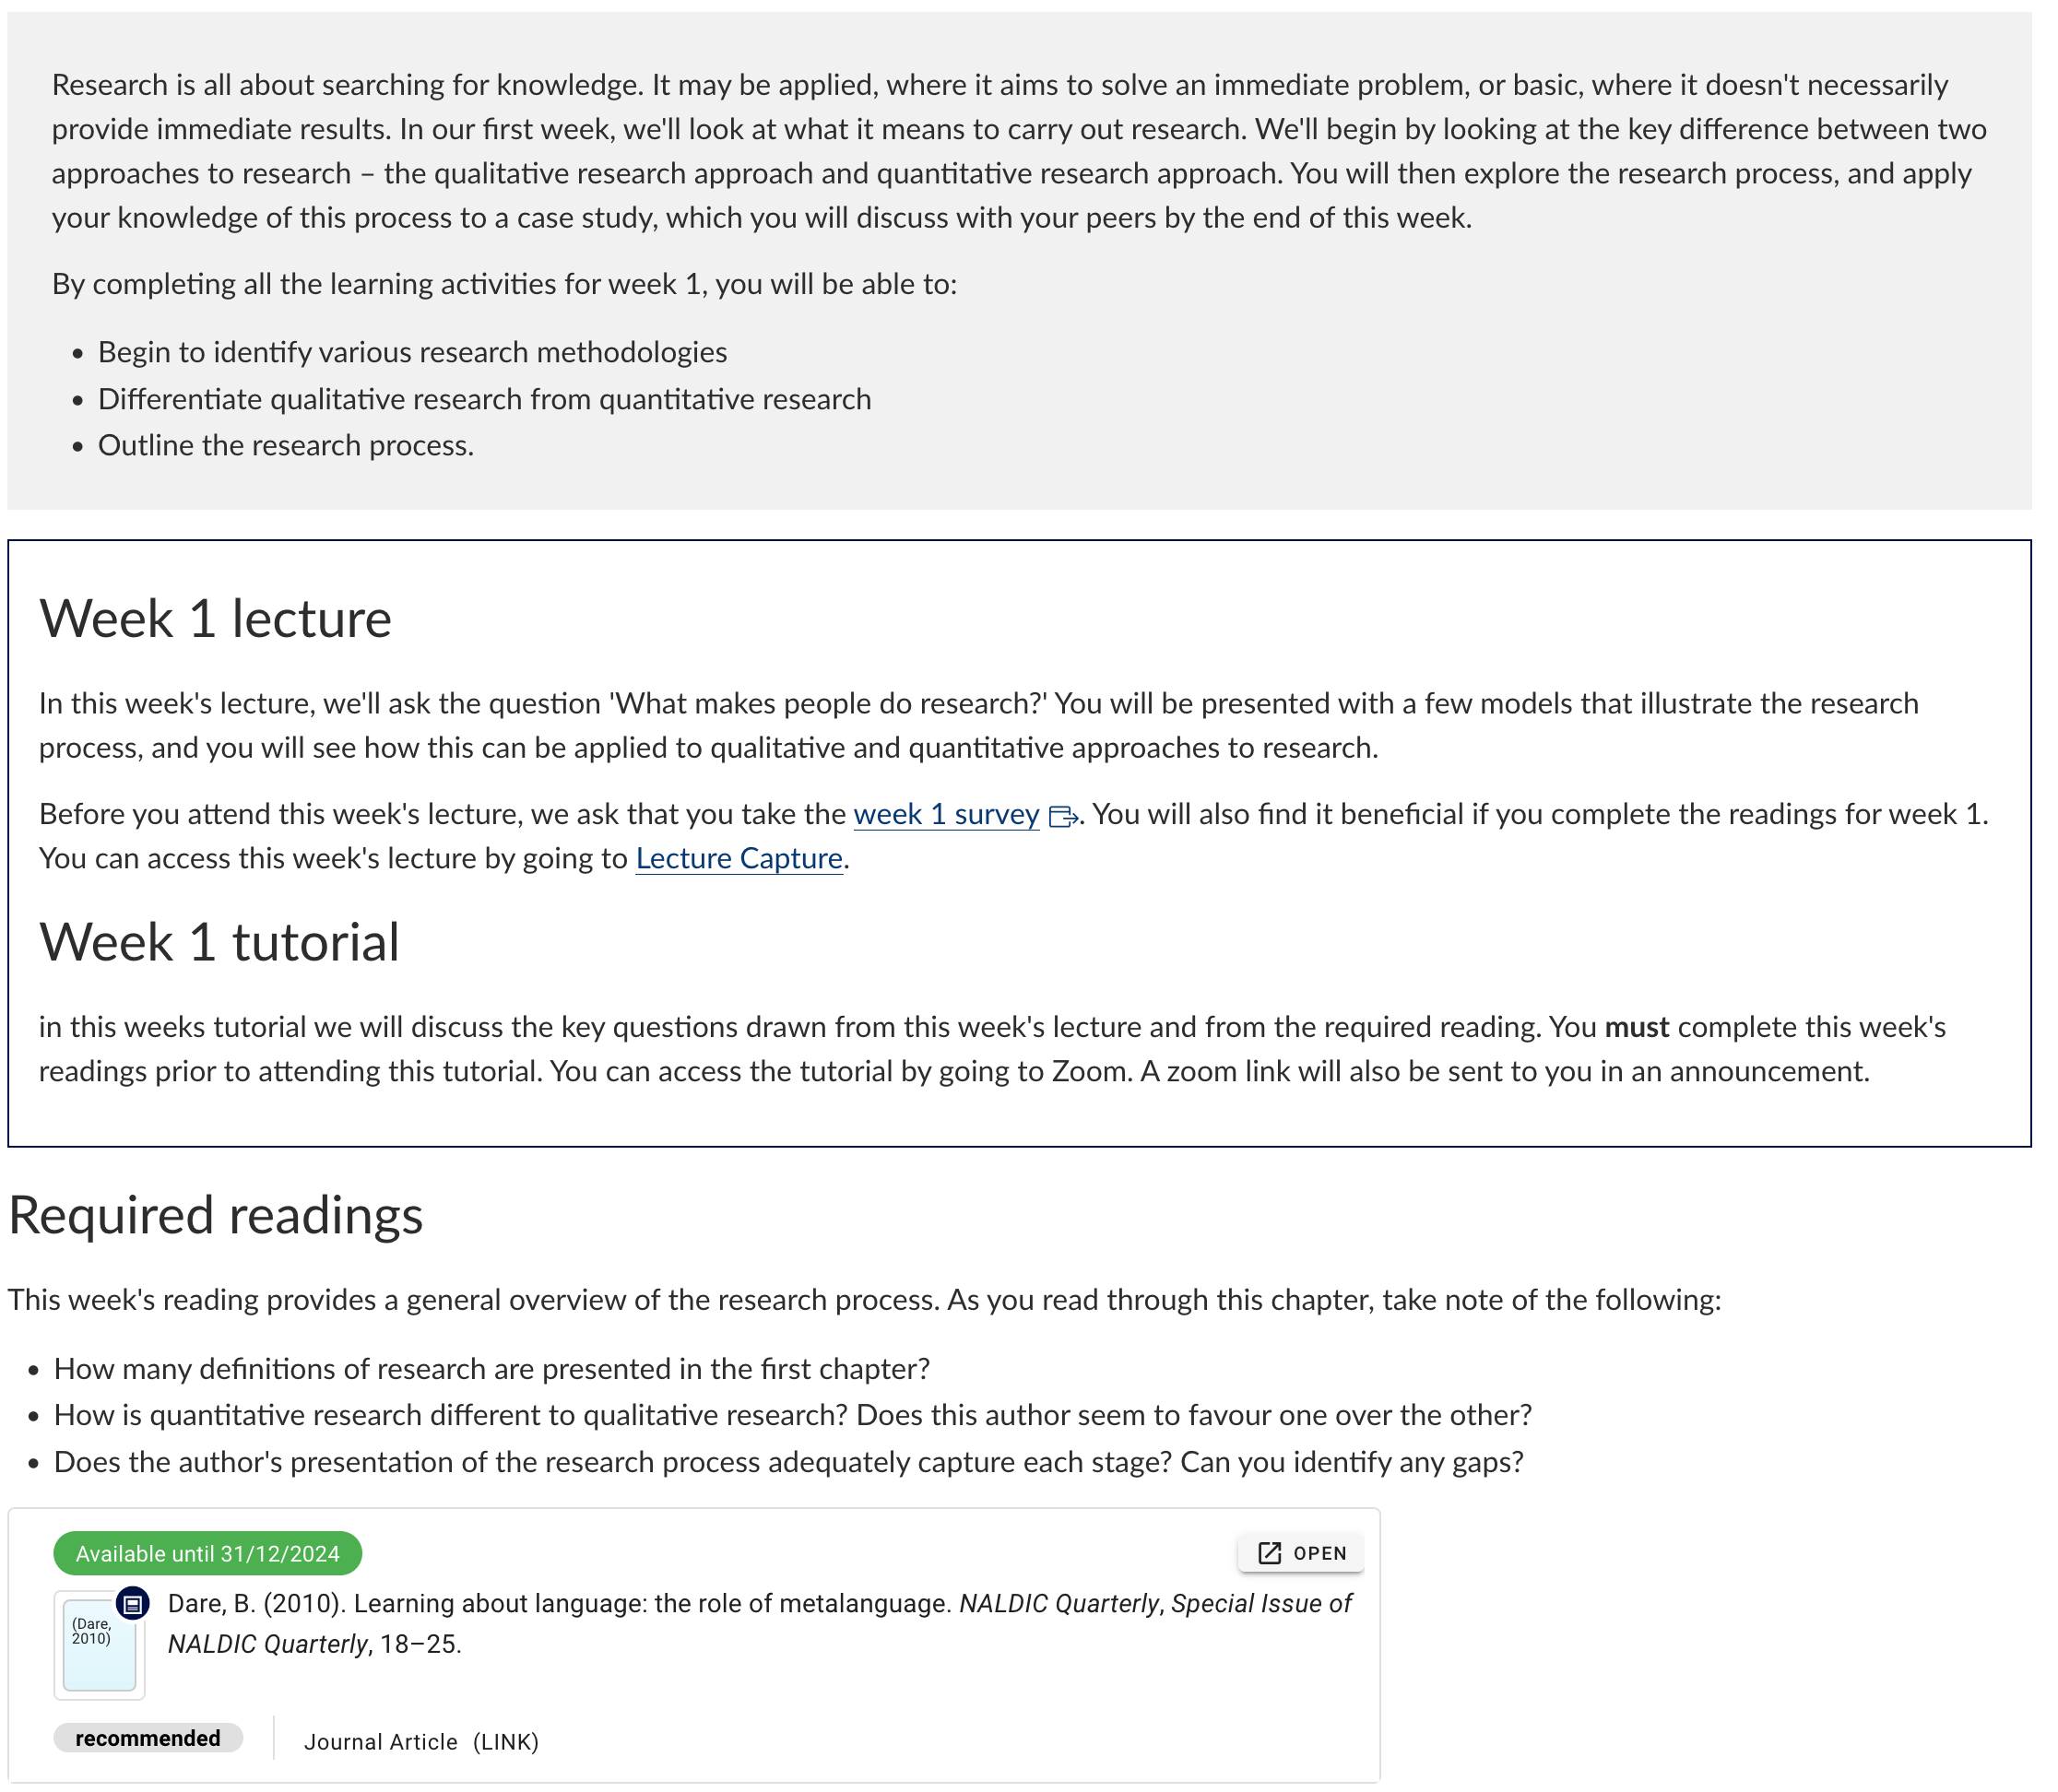
In the example below, students are introduced to the learning activities for each module or week. These pages would appear at the beginning of each module/week. A brief introduction is provided, following by weekly learning outcomes, and a brief description of the learning activities. In this case, that includes weekly lectures and tutorials and required readings. Notice how a link to each activity is accompanied with a brief description. This can be useful for informing students about what they need to do prior to attending any synchronous sessions, such as an online tutorial, workshop or webinar. Also notice the individual link to the Readings Online reading.
Example 2: Activity pages
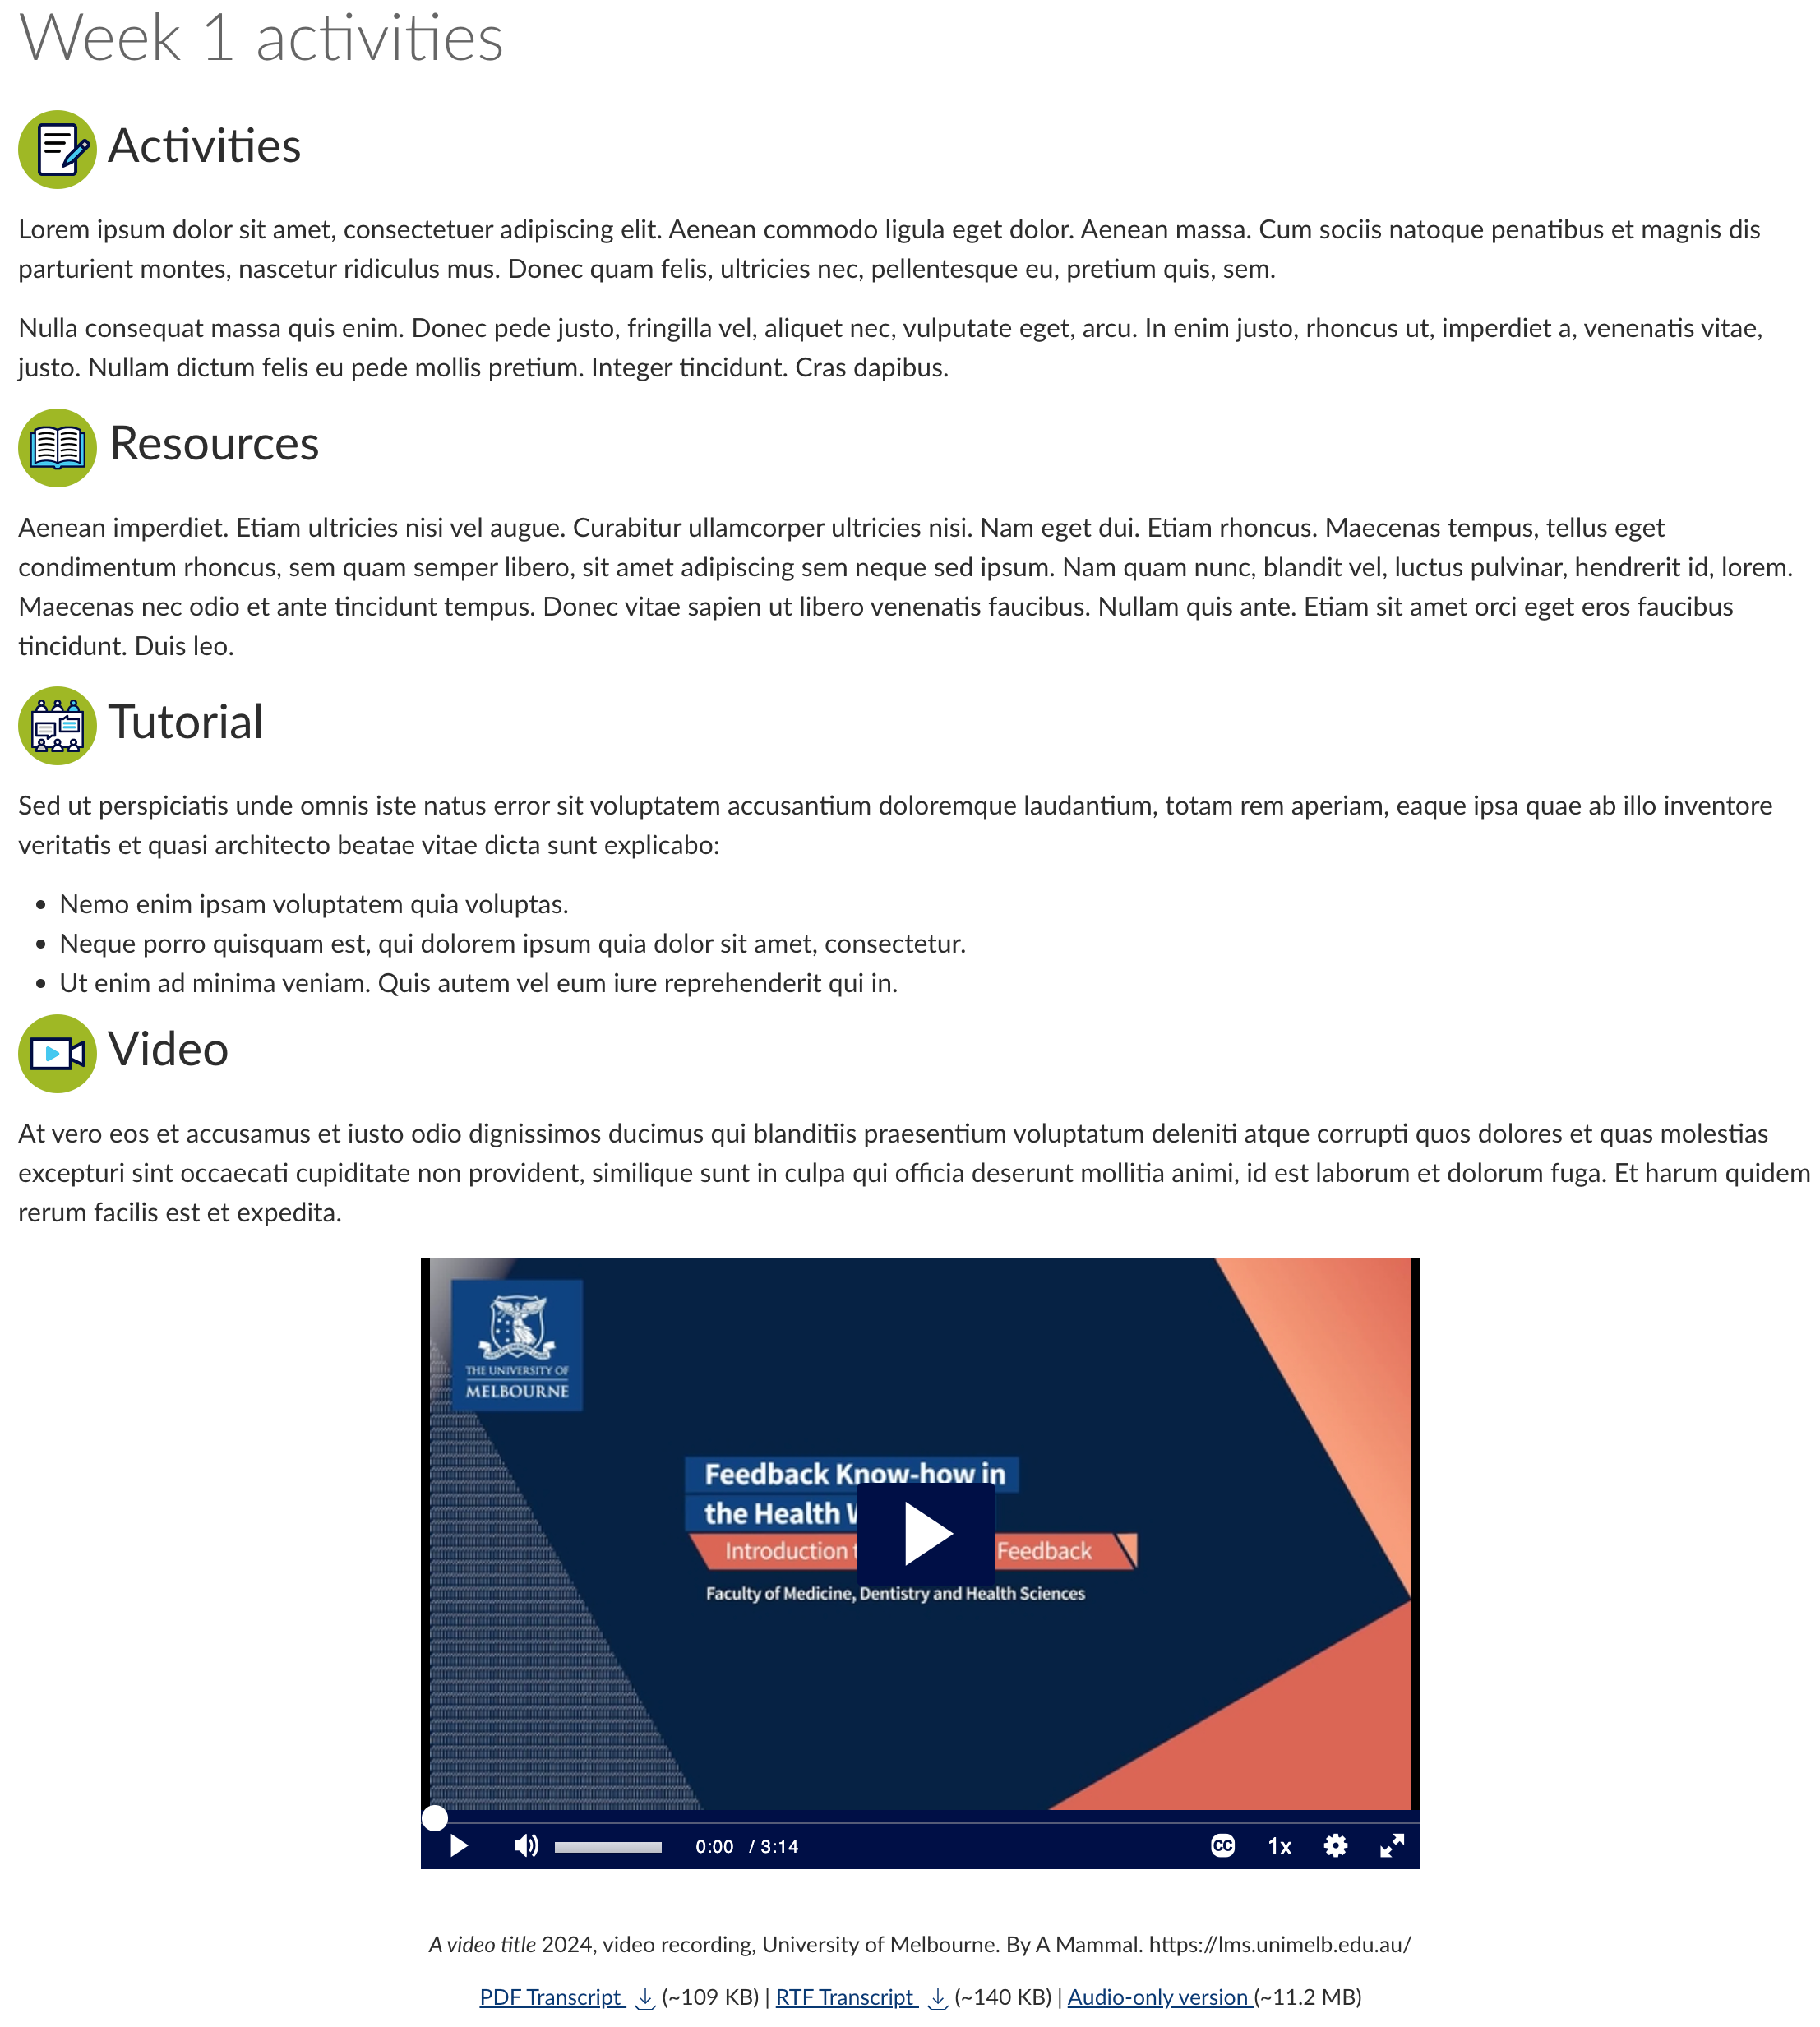
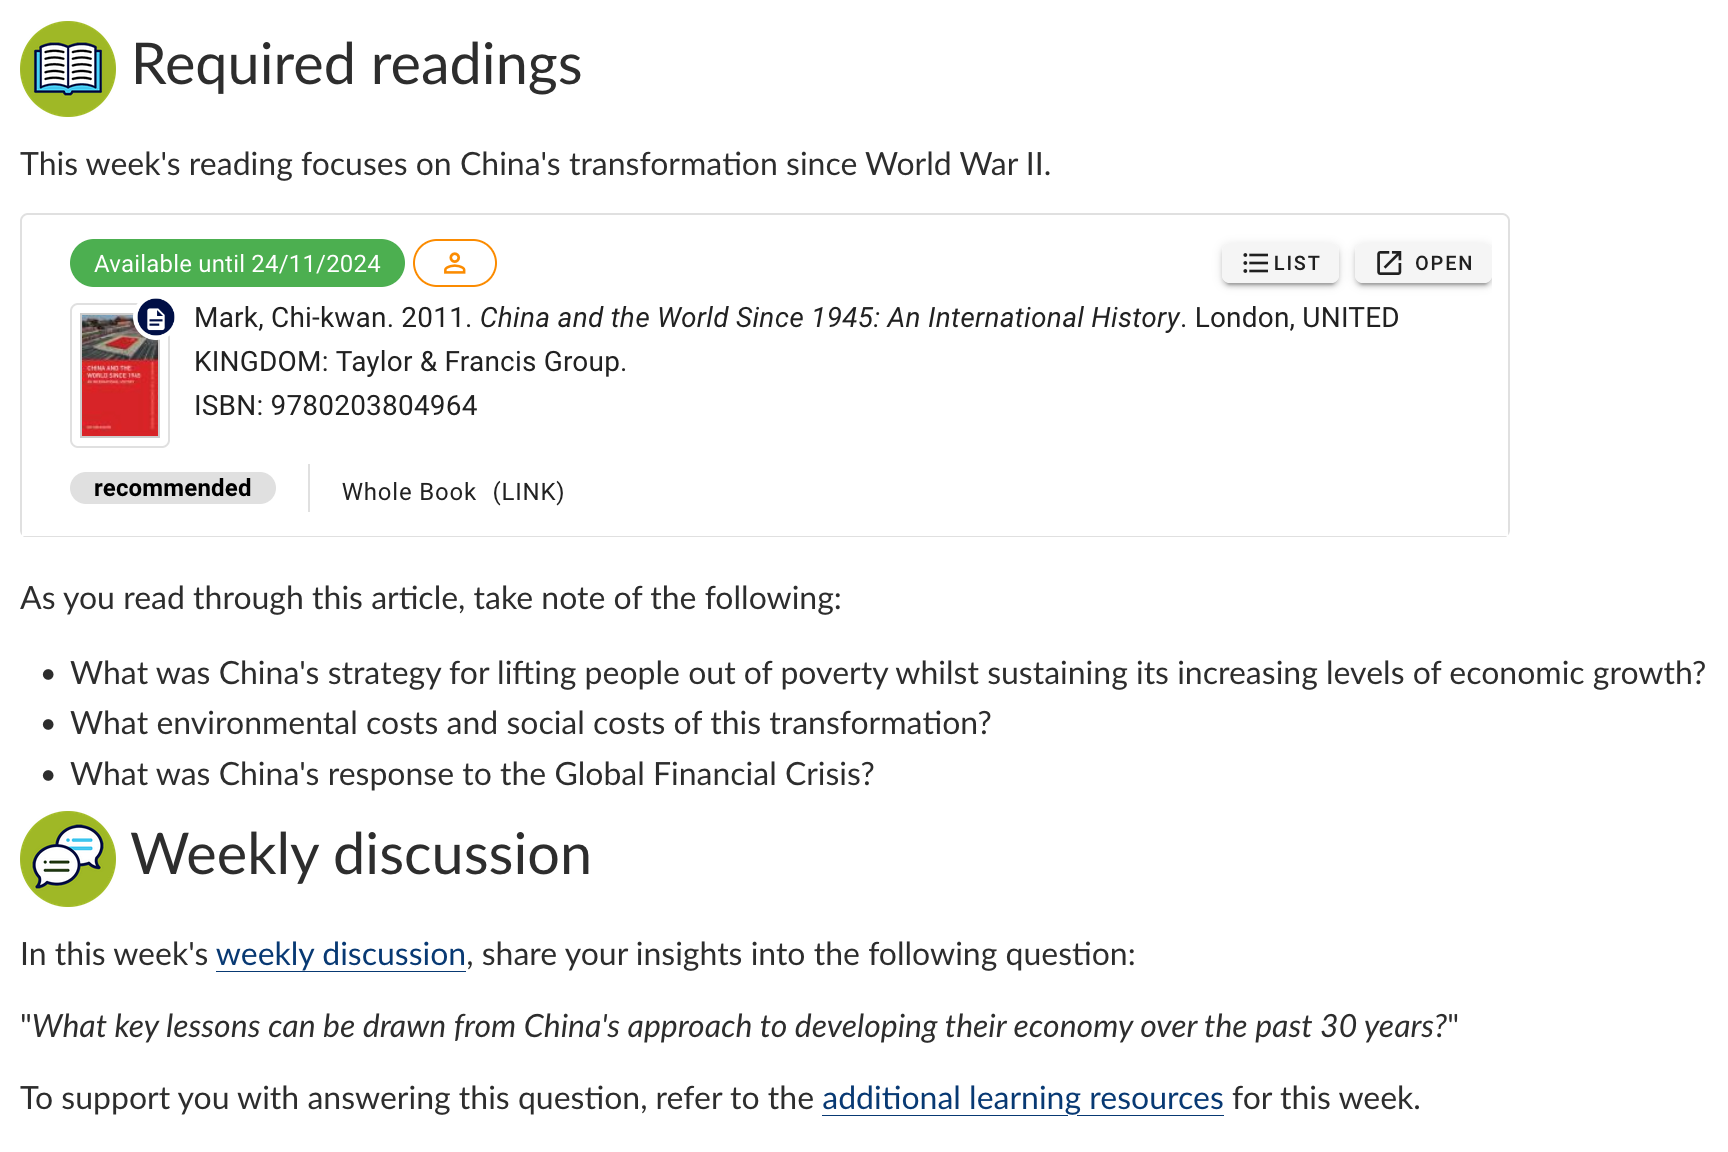
The LMS makes it easy to embed a variety of multimedia objects into an LMS page. In the example below, you can see how a page includes several activities, with clear instructions guiding students through each step of the activity.
Tips
- Embed images and use dot paragraphs and dot points to help organise content
- Icons and headers can help for navigation and scan ability
- Consider embedding Lecture Capture videos, Readings Online, H5P and other tools that allow you to put activities in context on a page.
- Due the inaccessible nature of PDFs, avoid using PDFs to share content with students
- Instead of creating lecture slides and uploading them to your subject, or attaching files, a better approach is to write content directly in a Canvas LMS page using the text editor.
- Use the Accessibility score icon at the top of the edit box to guide you through any accessibility concerns
Staff resources
- Ten tips: Creating accessible subjects in the LMS
- In the above examples, you can see how content has been separated by shaded background colours and borders. Learn how you can separate content on an LMS page with HTML
- Learn more about linking to individual Readings Online readings
- Downloadable templates that easily implement the suggestions on this page
- Framework for building or improving an LMS site
- Checklist: Launching your LMS subject.
This page was last updated on 16 Apr 2026.
Please report any errors on this page to our website maintainers
How to design an LMS discussion
Discussions in LMS can provide you and your students a space in which to:
- Ask general questions about the subject, assessment or course content
- Contribute thoughts or ideas for learning activity, such as a case study
- Respond to peers
- Work collaboratively through a group discussion.
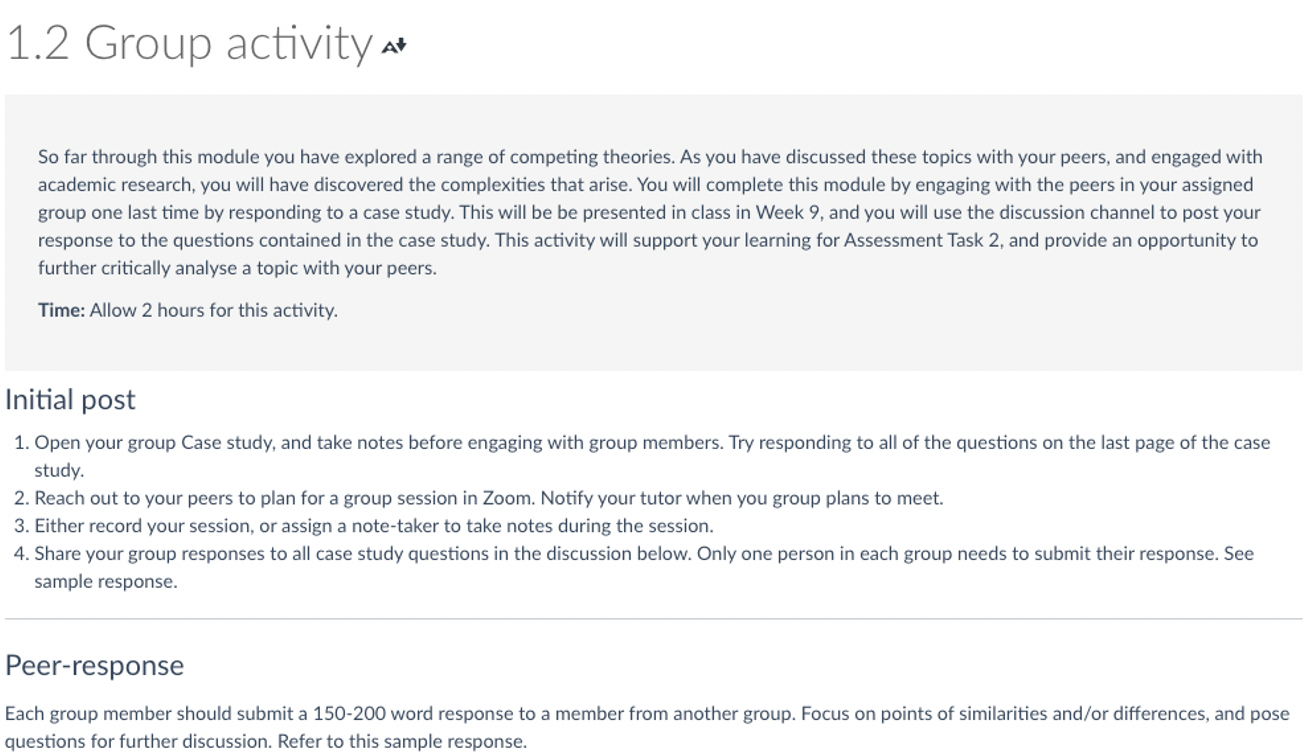
Every discussion page you add to your subject should have a clear purpose, and this purpose should be clearly communicated to students. In the example below, the discussion activity begins by setting the scene, briefly instructing students on what they will do, and how this activity will support their overall learning. This is then followed by more detailed instructions instructing students on what it is they need to submit for their initial post, and how they should respond to their peers.
Notice how content is also broken up on the page by using lightly shaded background colour, heading levels and horizontal bars.
Tips for creating LMS Discussions
- Provide a clear title, and perhaps an indication of whether it is graded or non-graded (for example, Graded discussion 1: Genomics).
- Include a brief description of the discussion activity's purpose.
- Give the students a clear, detailed outline of the task. This includes the initial post that students submit, word limits, as well as posts they submit in response to other students.
- Add any links to any resources that the students may need to respond most effectively to the task.
- Give guidance of the benchmark of what a quality response looks like (this could be presented as an example response, or a few points).
- Consider attaching a rubric for assessed discussions to aid the students.
- Include post due dates. And if applicable a date when a peer-response is due.
- Communication if staff feedback will be provided and by when
- Reminder that discussions don’t just have to be text based
- For online discussions to thrive in a subject, the need staff to monitor and be involved with the discussion
Staff resources
- LMS Discussions
- Ed Discussion
- In these examples, you can see how content has been separated by shaded background colours and borders. Learn how you can separate content on an LMS page with HTML
- Downloadable templates that easily implement the suggestions on this page
- Framework for building or improving an LMS site
- Checklist: Launching your LMS subject.
This page was last updated on 17 Apr 2026.
Please report any errors on this page to our website maintainers
How to design your LMS assignments
Assignments play an important role in any subject, so it’s important to take special care with how you communicate all your assessment information. Your goal should be to present all this information clearly, so students understand what they need to do without confusion, and know where to turn if they have any questions.
Creating assignments
The Assignments link in the subject navigation menu is where you can create all assignments for your subject. This means students access their assignments using a single assignments link in the subject navigation menu, providing a consistent place for the submission of assignments.
It is also possible to provide links to these assignments in other areas of the LMS.
In the Assignments section you will find pre-populated Assignment groups imported from the Handbook. These will already have the weighing of the assignment as defined in the handbook.
You can rename these assignment groups, and add as many assignments as you need to each assignment group.
Canvas LMS also offers a range of other learning technologies that can be used for assessment purposes. This includes Cadmus, Gradescope and Feedback Fruits.
If you are using other integrated platforms for any of your assessments, it is also important that you provide detailed instructions that outline how students should use these platforms, and where they should go for assistance if they need it. You can do this by providing links to support resources for students.
When creating an assignment ensure you include:
- The due date
- The points, or percentage the assignment is worth
- The submission method
- A detailed assignment brief to explain your assessment expectations (see assignment brief section below).
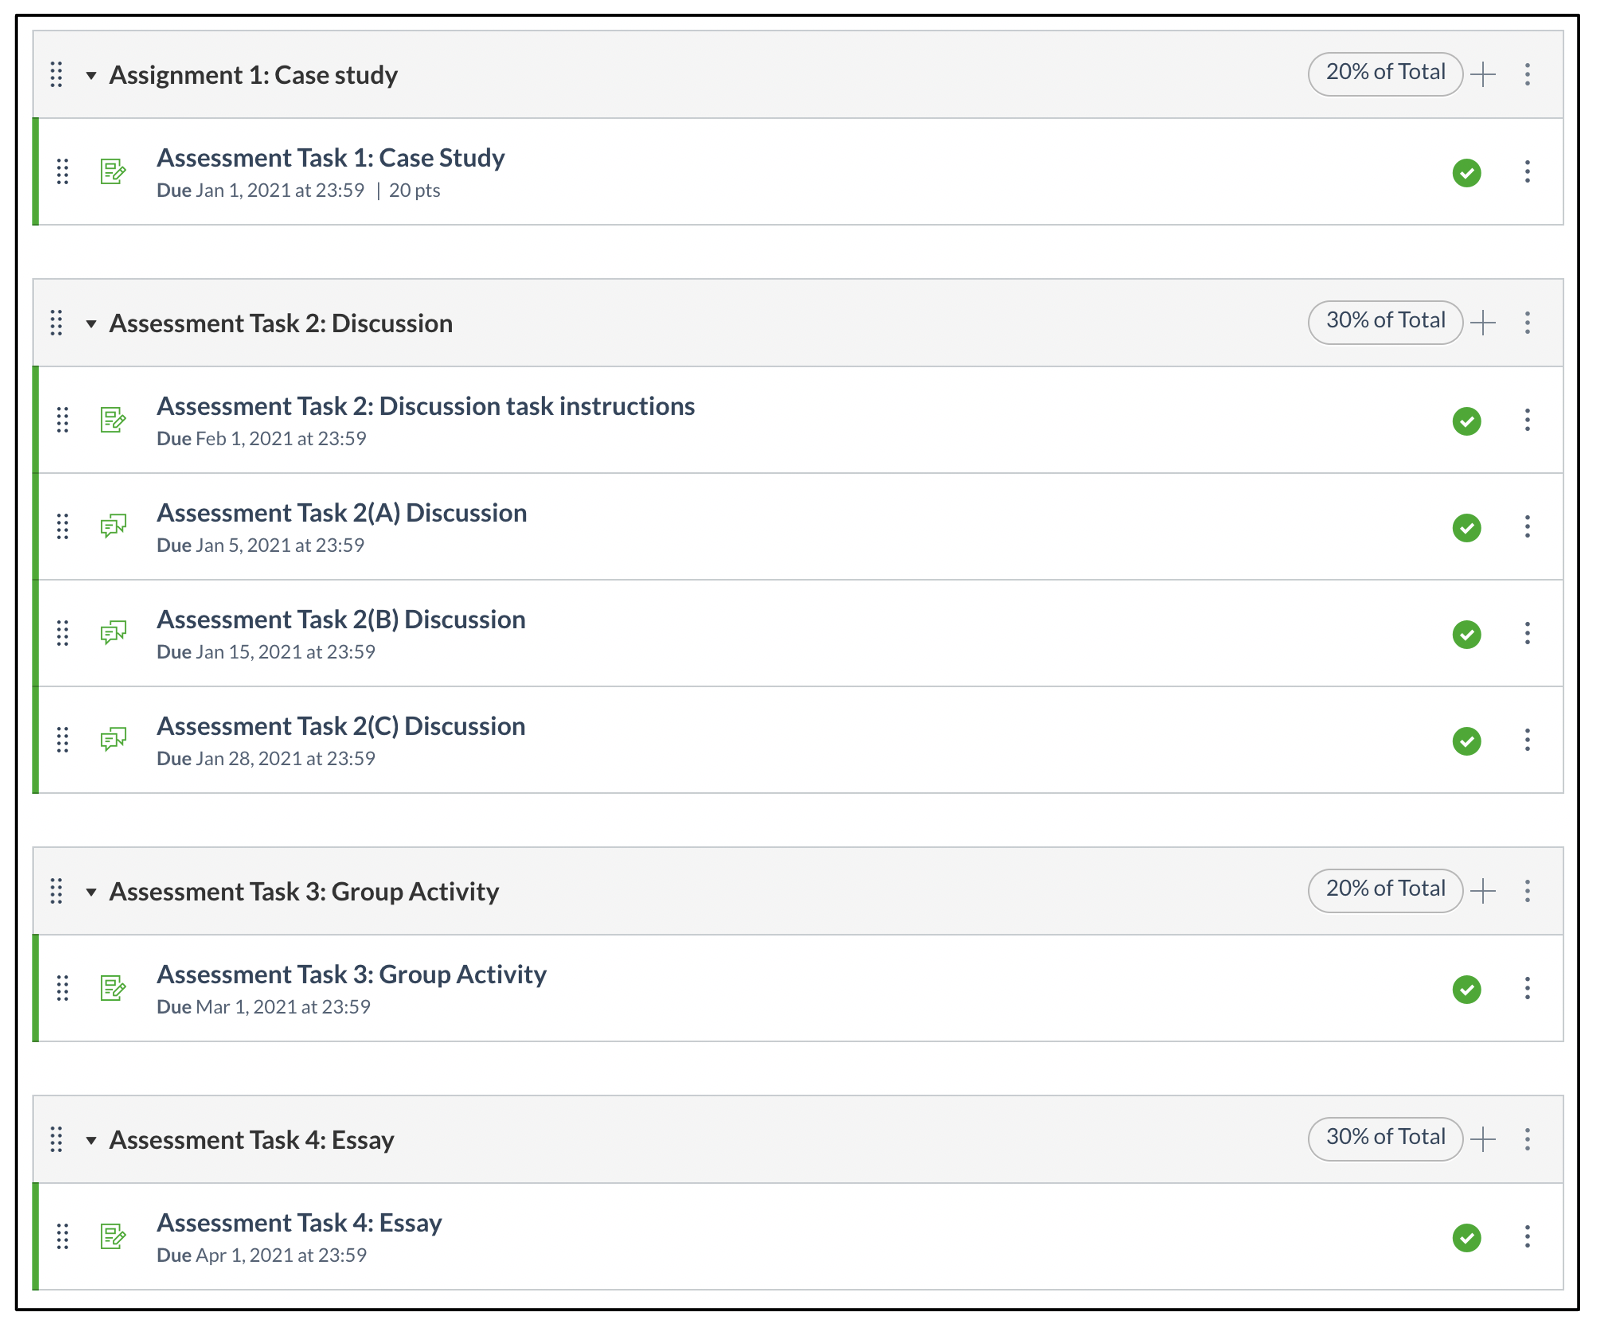
Assessment overview
To help students understand the assessment in your subject, it is good practice to provide an assessment overview. The subject overview link is a suitable place to do this. Here, you would provide general information such as due dates and percentage grade for each assessment item.
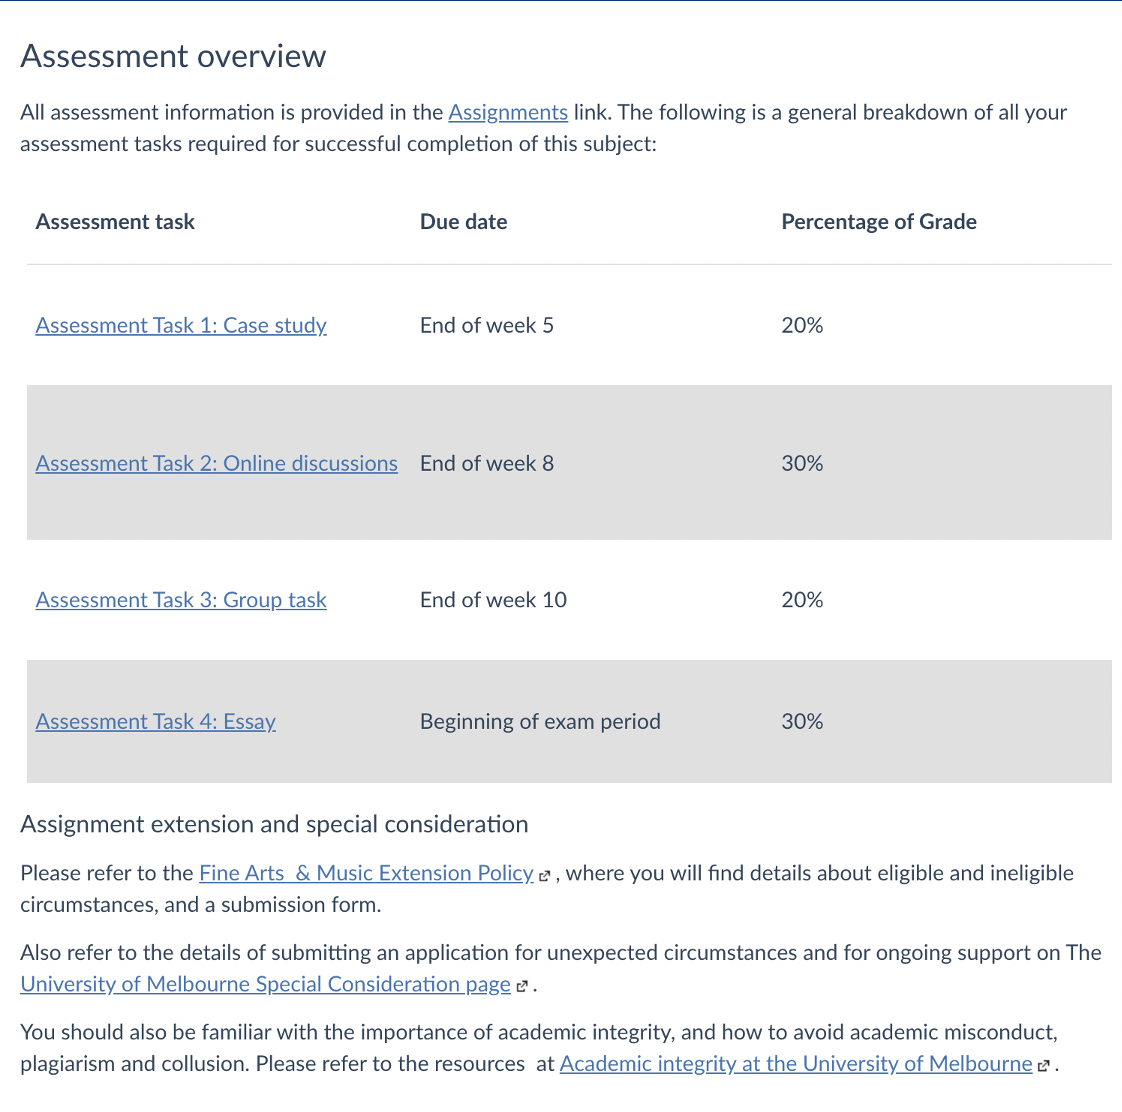
Notice in this example how links are presented for each assessment item. This would lead students to an assessment brief where they can then the assignment instructions.
In addition, notice the support links which direct students to extension policies, academic integrity, special consideration, academic skills and library support and other relevant pages. It is advised that you link directly to this information, rather than copy this information into your LMS subject, so that when policies change, the information you present to your students is not outdated.
Assessment brief
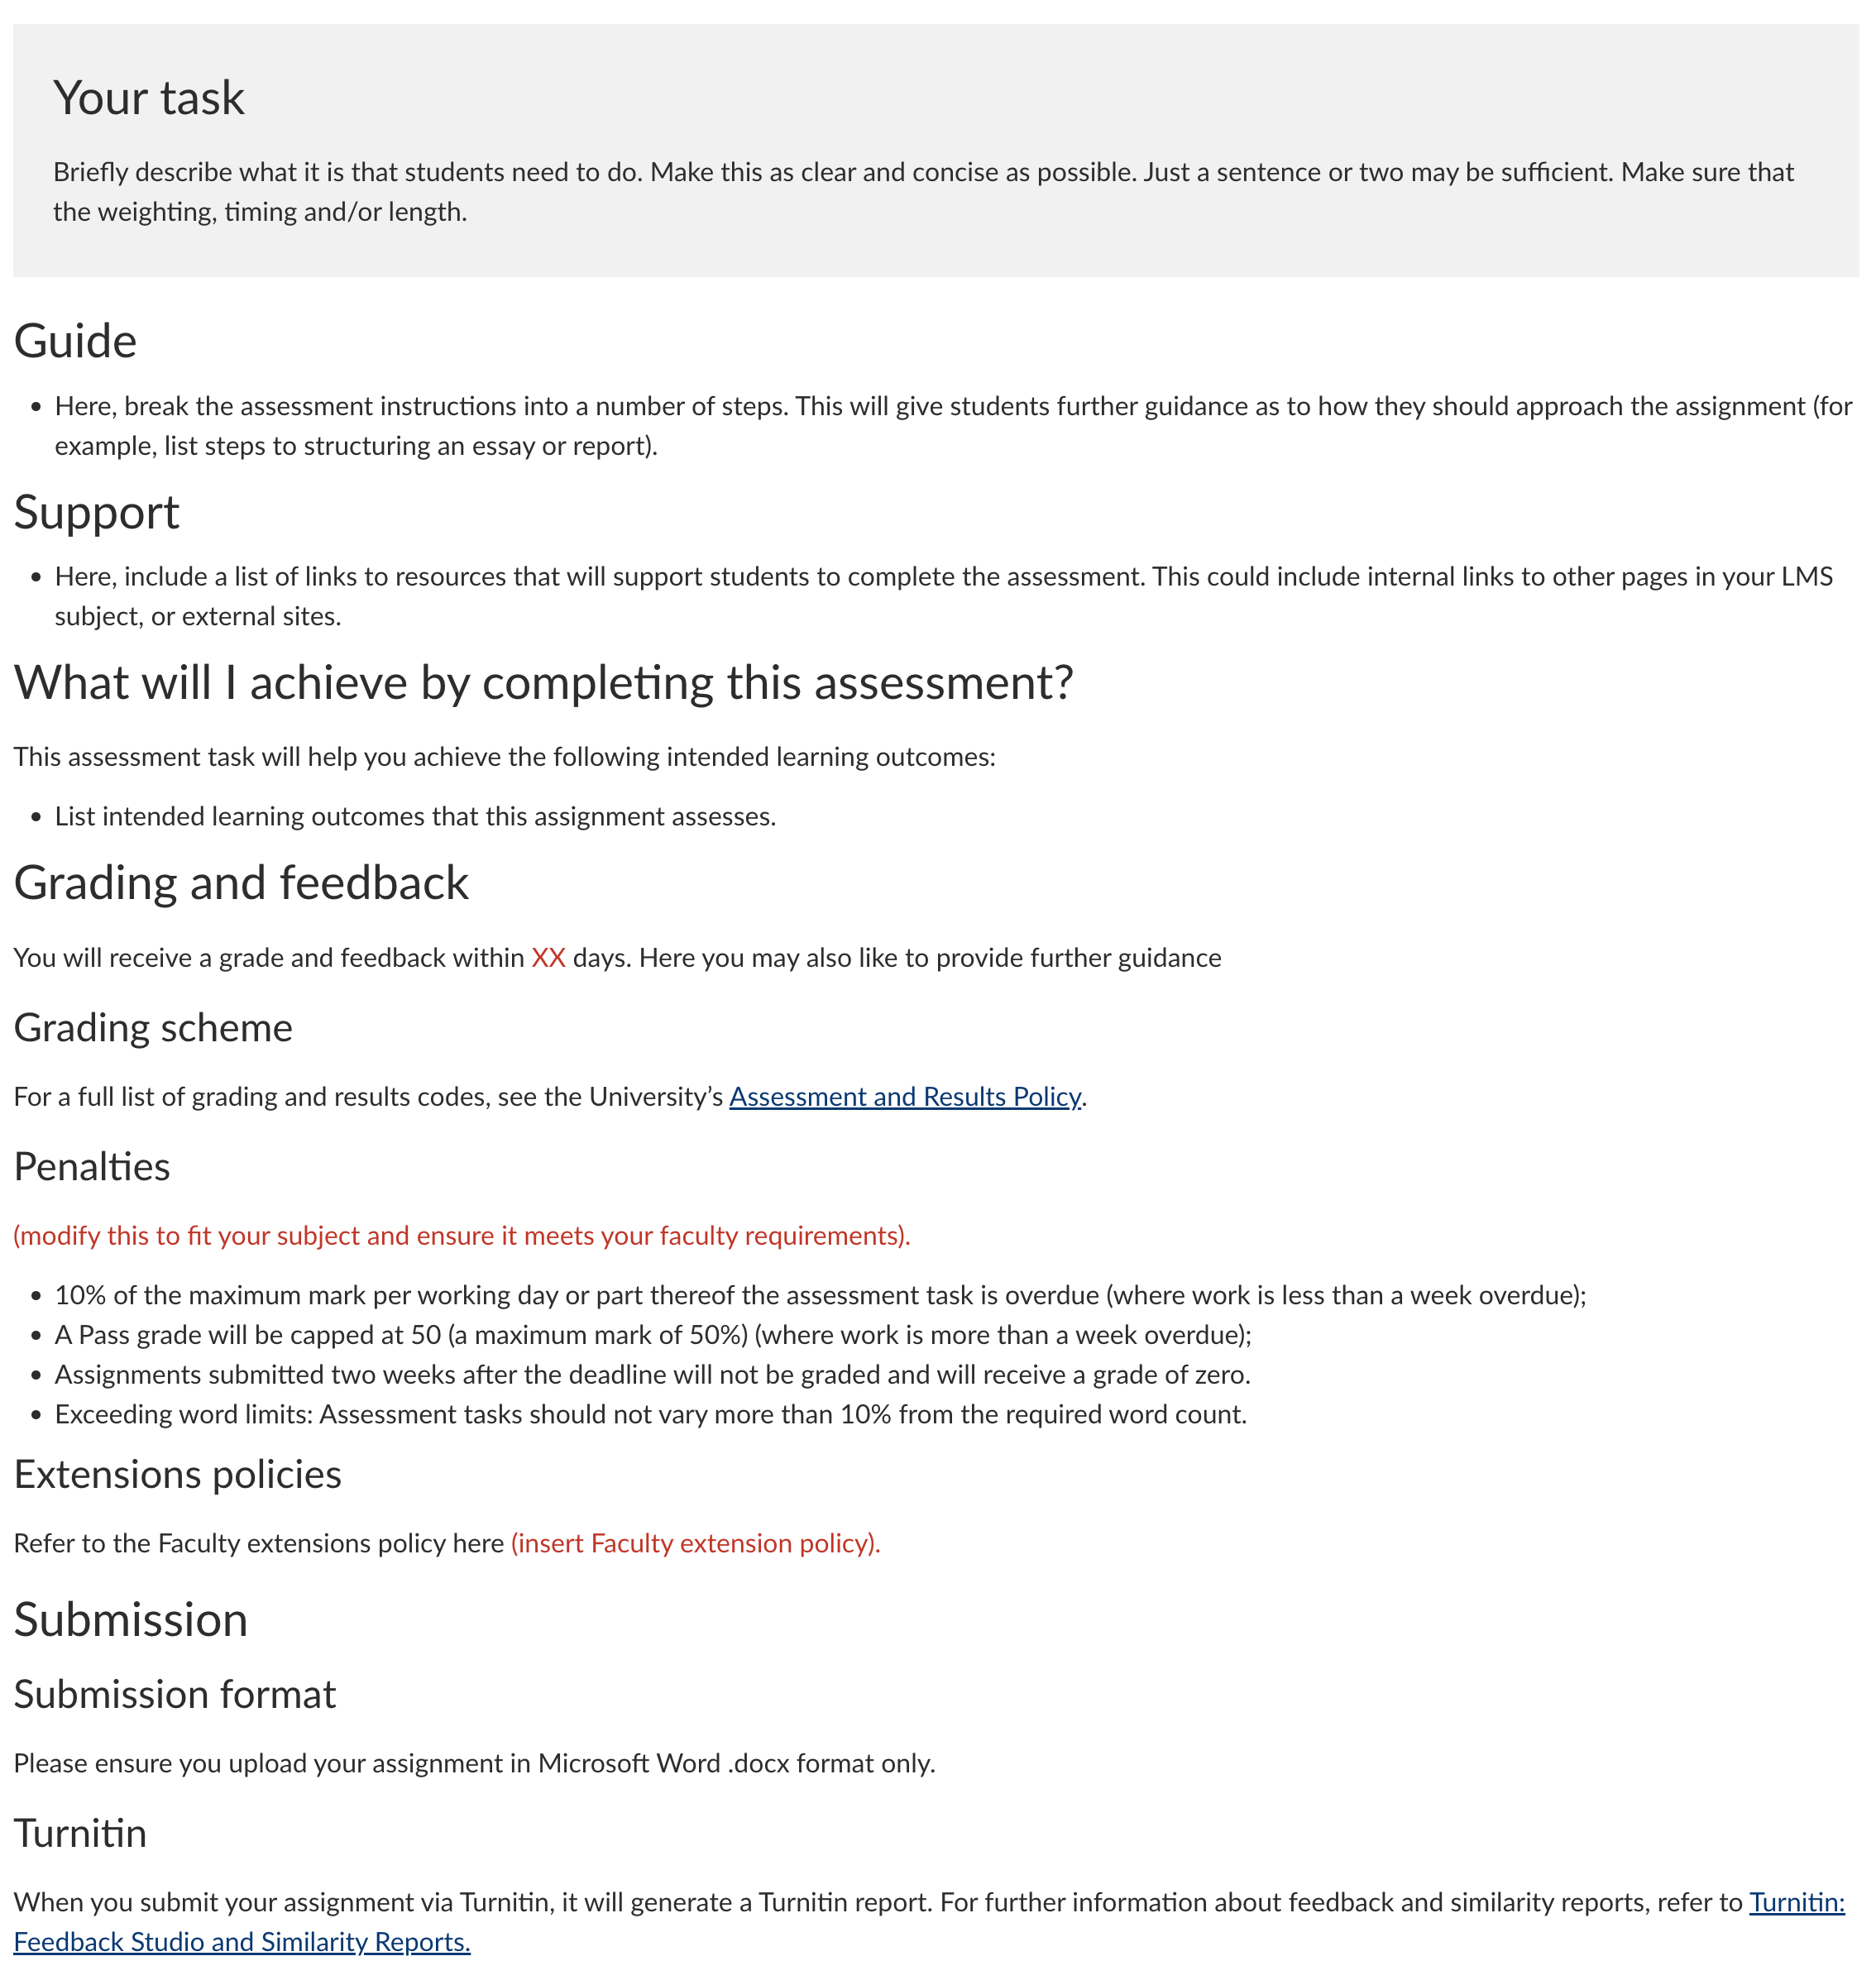
In the image below, you can see an example of an assessment brief. It includes:
- Task description
- Word limits
- Guide that lays out the steps of the assessment task
- List of intended learning outcomes
- Submission information
- Information regarding grading and feedback
- Penalties
- Links to support guides and support resources
- Include expectations about to what extent students can use AI in their assessment creation.
The aim is to be consistent with how you present information across all your assessment tasks.
Rubrics
We recommend you also include a rubric with your assessment brief, making it easier for students to locate information they need on how they will be assessed. You can create a rubric within the LMS, using the rubric editor. This will be visible for students. Or, if the rubric editor does not suit your needs, you could attach Word document within your assessment brief. The benefit of using the LMS rubrics, however, is that you are able to then mark with it using SpeedGrader. See the adding rubrics to an assignment guide.
Tips for creating an LMS assignment
- Use the assignment groups that have been imported into your subject from the Handbook with the correct assignment group weighting
- Write a well written assessment brief for each assignment
- Include rubrics with your assignments
- Check your assignments and assignment groups are set up well and make sense to students in the subject overview link in the ‘Assignments are weighted by group’ area
Staff resources
- Canvas LMS assignment and rubric guides
- In these examples, you can see how content has been separated by shaded background colours and borders. Learn how you can separate content on an LMS page with HTML
- Downloadable templates that easily implement the suggestions on this page
- Framework for building or improving an LMS site
- Checklist: Launching your LMS subject
- For help with writing assessment briefs or rubrics lodge a support request with Teaching and Learning Innovation.
This page was last updated on 17 Apr 2026.
Please report any errors on this page to our website maintainers
How to use HTML to enhance the look and feel of your LMS subject
This advice is for teaching staff that feel more confident with technology. Please consider this aspect before deciding to work in HTML.
Downloadable LMS page templates are available. Use these templates as a quick way to get started building your subject.
When working in an LMS page, you have the option to use the Rich Content Editor (RCE) or the HTML editor. The RCE works in a similar way to a Word document, where you can change the style and size of font, embed images and videos and so on. But if you want to add more styling to your LMS page, and know a basic level of HTML, then you may find the HTML editor helpful.
Adding tiles to an LMS page with HTML
If you have some knowledge of HTML you can use tiles to provide a visually appealing way to navigate between pages in an LMS subject. In the example you see below, each tile includes an image, a title, a description, and a button. When students click on the button, this will take them to another page in the LMS subject.
Creating and maintaining an LMS page that uses tiles requires a basic knowledge of HTML. This example requires knowledge of HTML elements, attributes, tables, images and links .
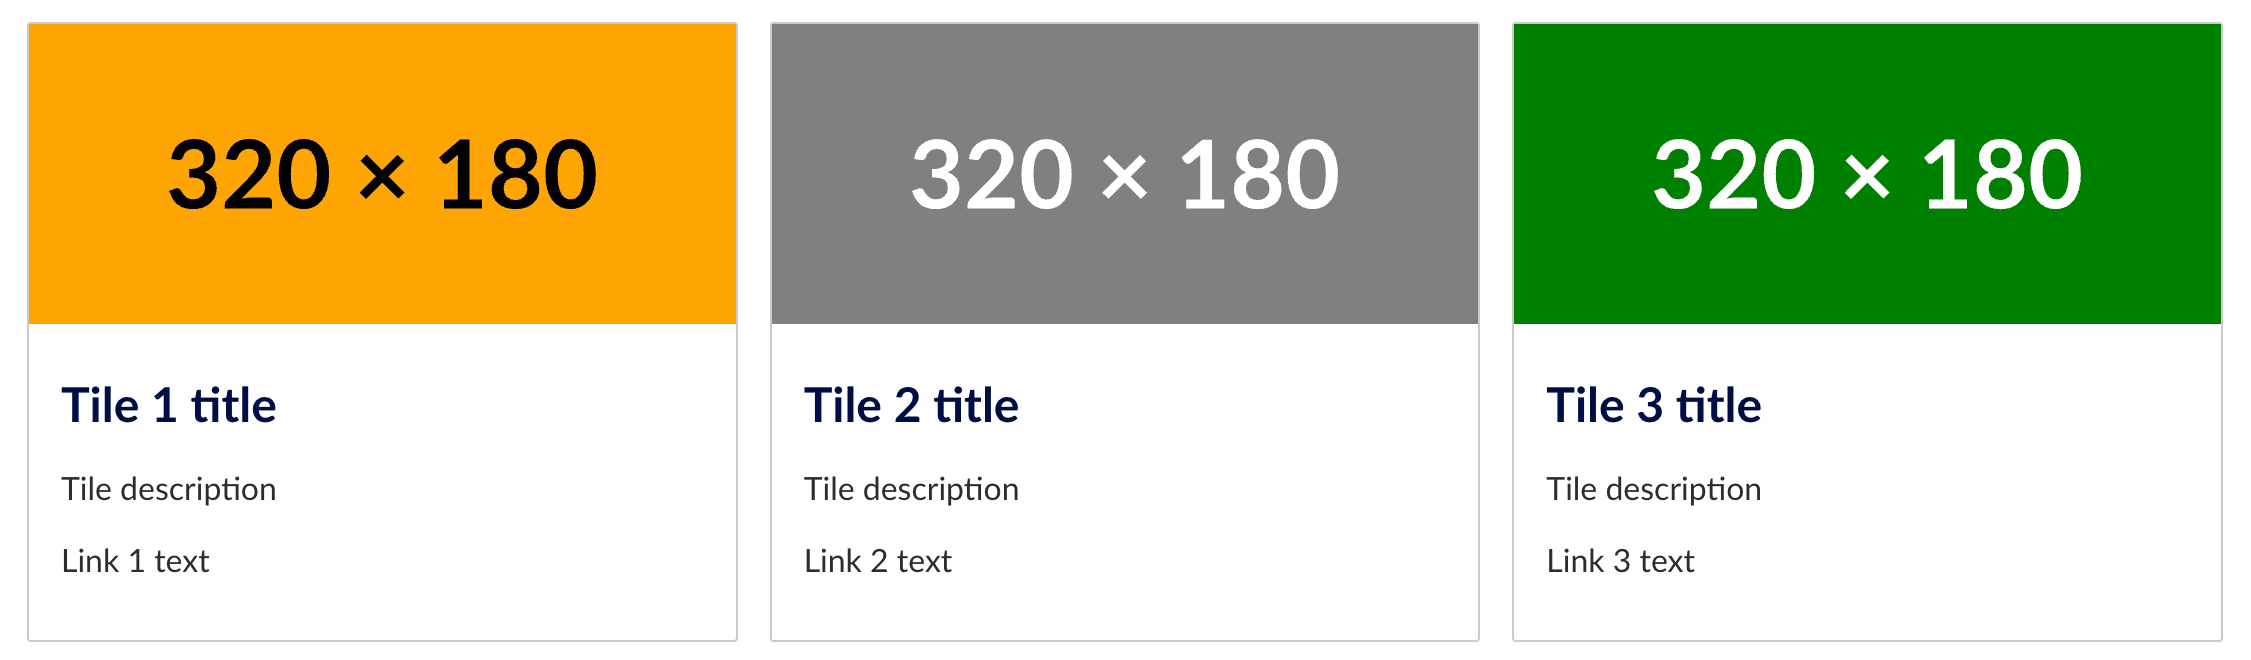
To add tiles to a page in your own subject, follow these steps:
- Navigate to the LMS page you would like to add the tiles to.
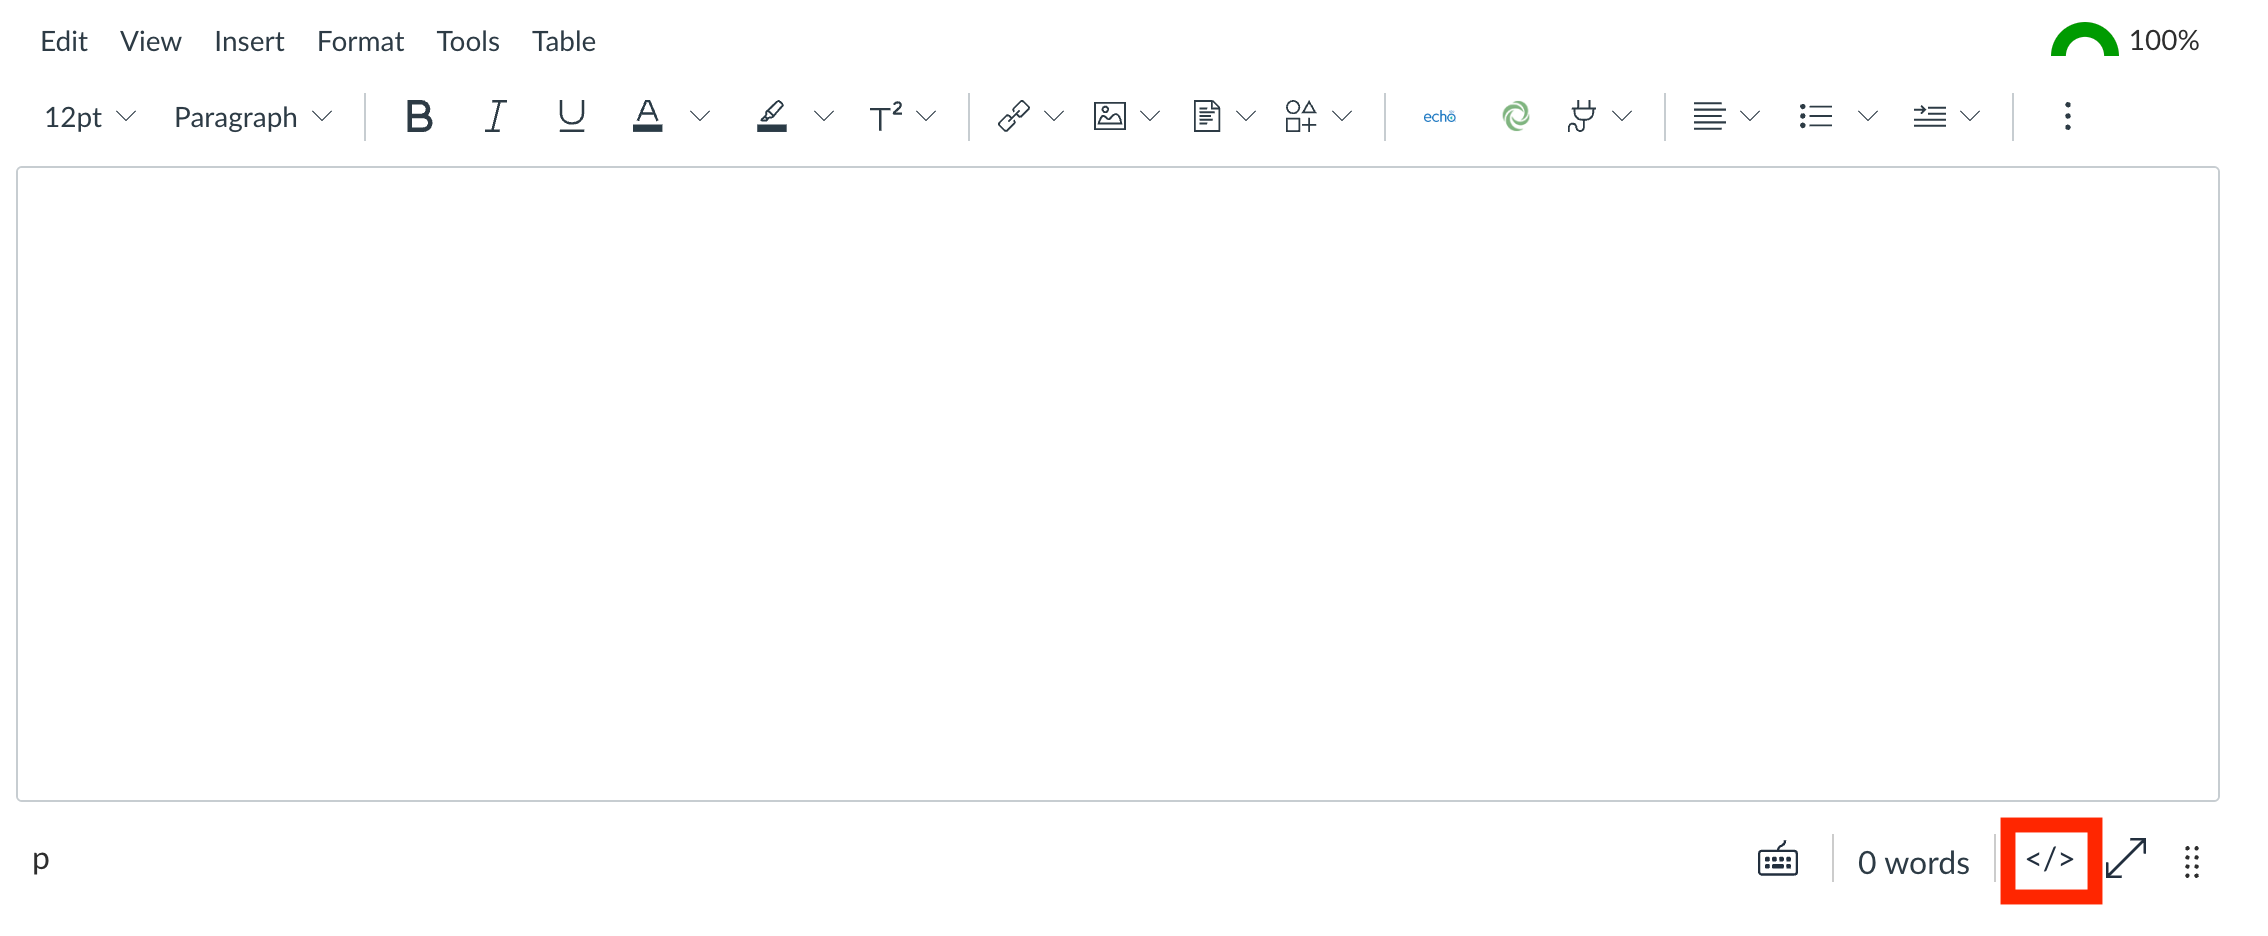
- Switch from the RCE to the HTML editor by clicking the HTML editor icon.
- Copy the code below by clicking the Copy code button.
<table class="uom-ui-tiles uom-with-border uom-ui-tiles-tight">
<tbody>
<tr>
<td><img src="https://placehold.co/320x180/orange/black" alt="Decorative image only" width="320" height="180">
<h3>Tile 1 title</h3>
<p>Tile description</p>
<p>Link 1 text</p>
</td>
<td><img src="https://placehold.co/320x180/grey/white" alt="Decorative image only" width="320" height="180">
<h3>Tile 2 title</h3>
<p>Tile description</p>
<p>Link 2 text</p>
</td>
<td><img src="https://placehold.co/320x180/green/white" alt="Decorative image only" width="320" height="180">
<h3>Tile 3 title</h3>
<p>Tile description</p>
<p>Link 3 text</p>
</td>
</tr>
</tbody>
</table>- Paste the copied code into the HTML editor of your Canvas page.
How can I edit the text content of a tile?
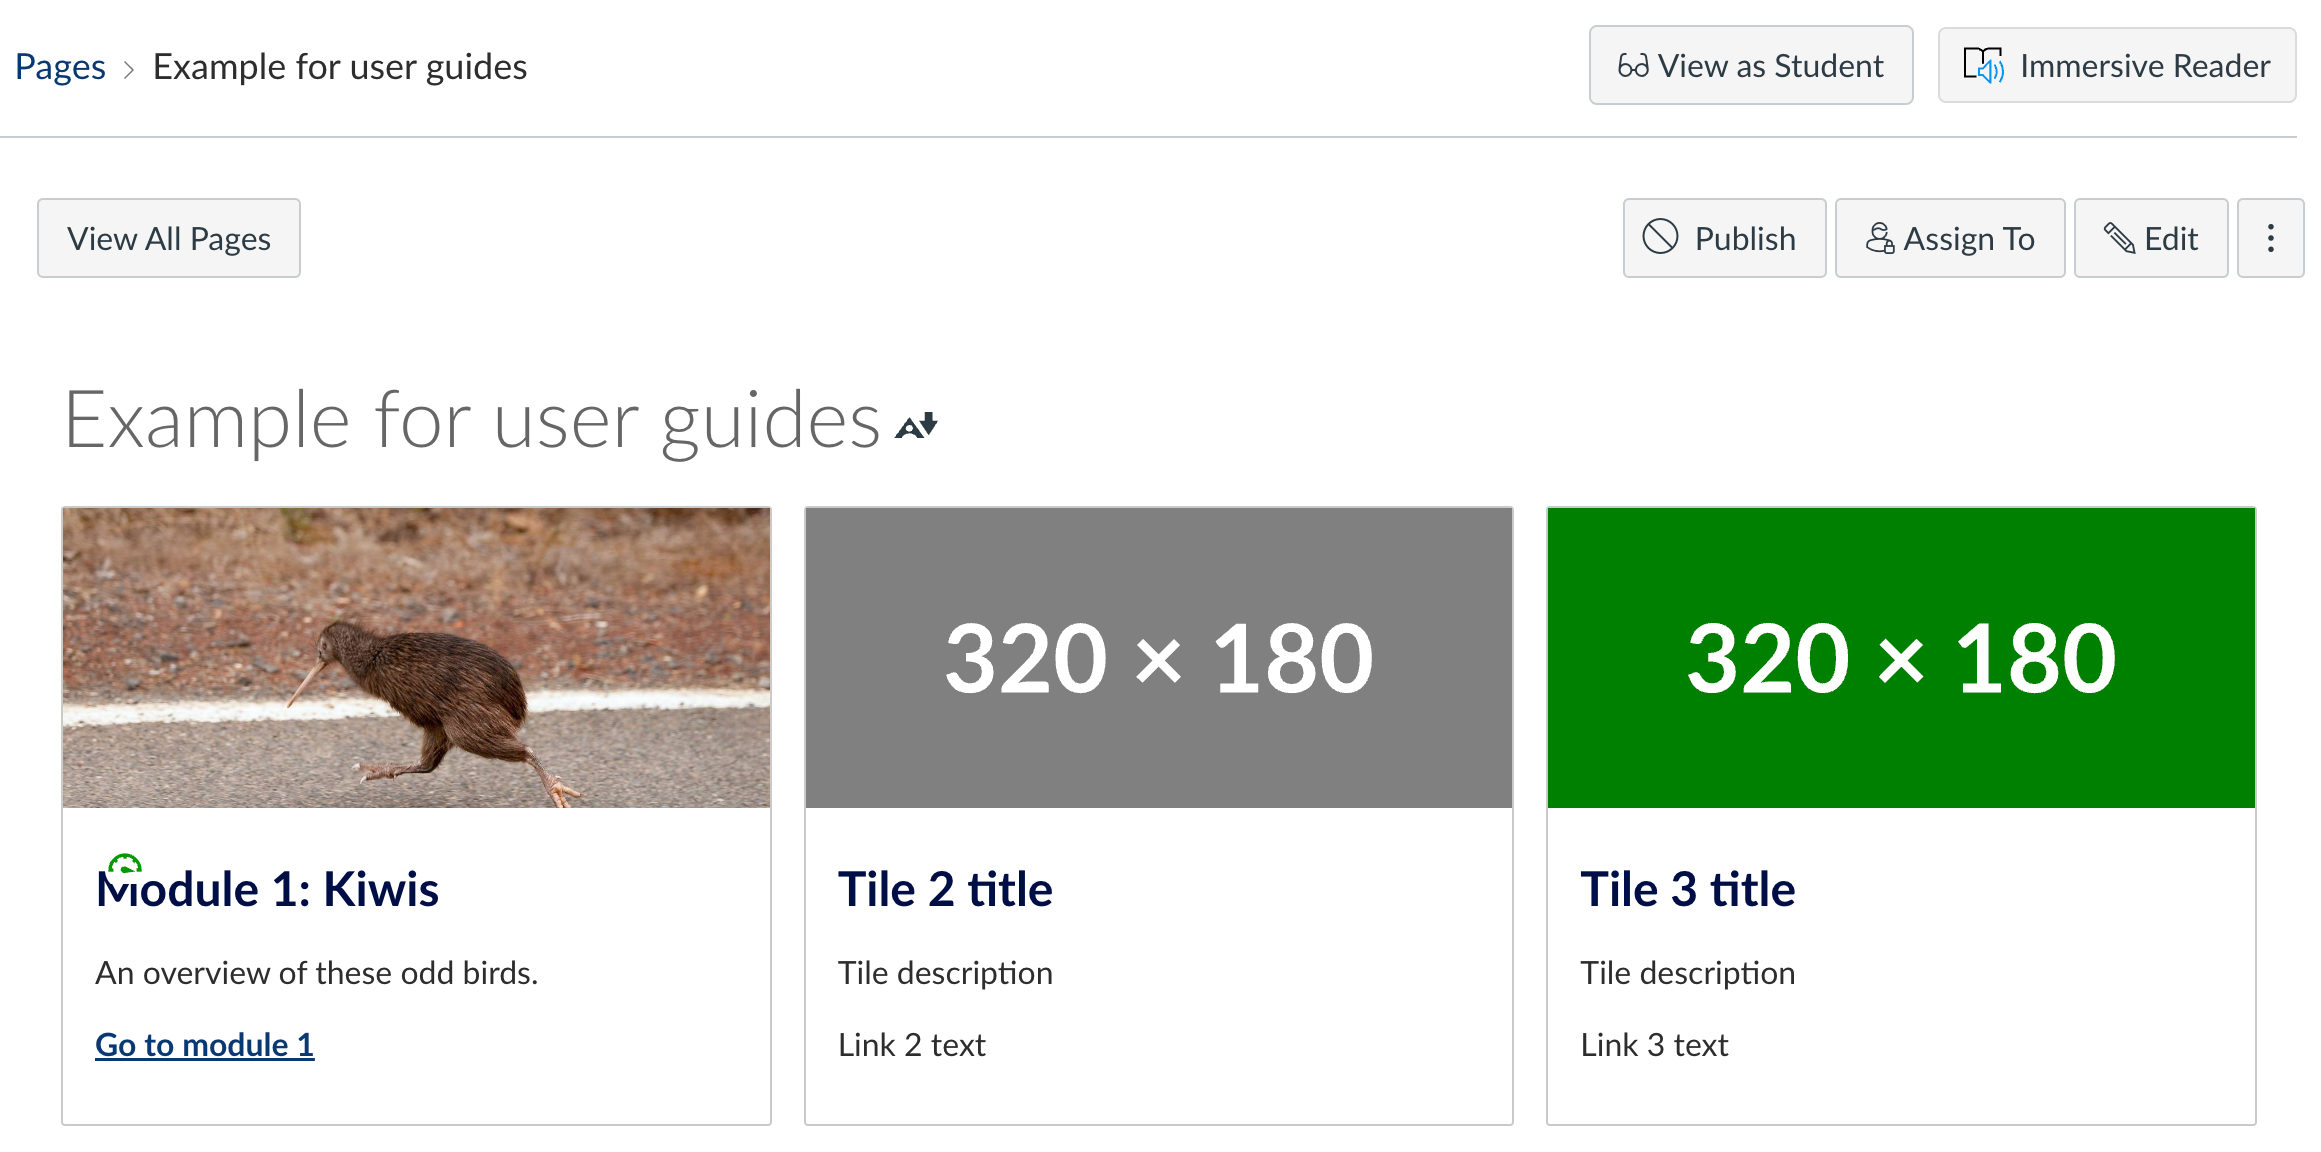
Tiles are a table that has had an HTML class attribute added to it. We use Javascript to render the table code into tiles when your web browser loads the page. This means that while you are editing the page, you will see a regular table, but after you save and view the page you will see the tile version.
The lines of code between the <td> tags define the contents of each tile:
<img>tag for the image<h3></h3>heading tags for the the heading<p></p>paragraph tags for the tile text.
<table class="uom-ui-tiles uom-with-border uom-ui-tiles-tight">
 <tbody>
  <tr>
   <td>
   <img>
   <h3>Tile 1 title</h3>
   <p>Tile description</p>
   <p>Link 3 text</p>
   </td>
  </tr>
 </tbody>
</table>
To update the text content of a tile, update the text between the heading and paragraph tags by replacing the existing text. For example:
- Replace <h3>Tile 3 title</h3> with <h3>Module 1: Name of the module</h3>
Be careful when changing the text - if you modify the tags you may break the page!
You can safely switch between the HTML editor and the RCE when working with tiles. Remember that this content will not display as tiles in the RCE while editing - for example, images will look much bigger in the RCE when editing.
To preview your tiles, save the page. You can restore an earlier version of the LMS page if you need to undo any of your changes.
How can I add a link in a tile to another page in my LMS subject?
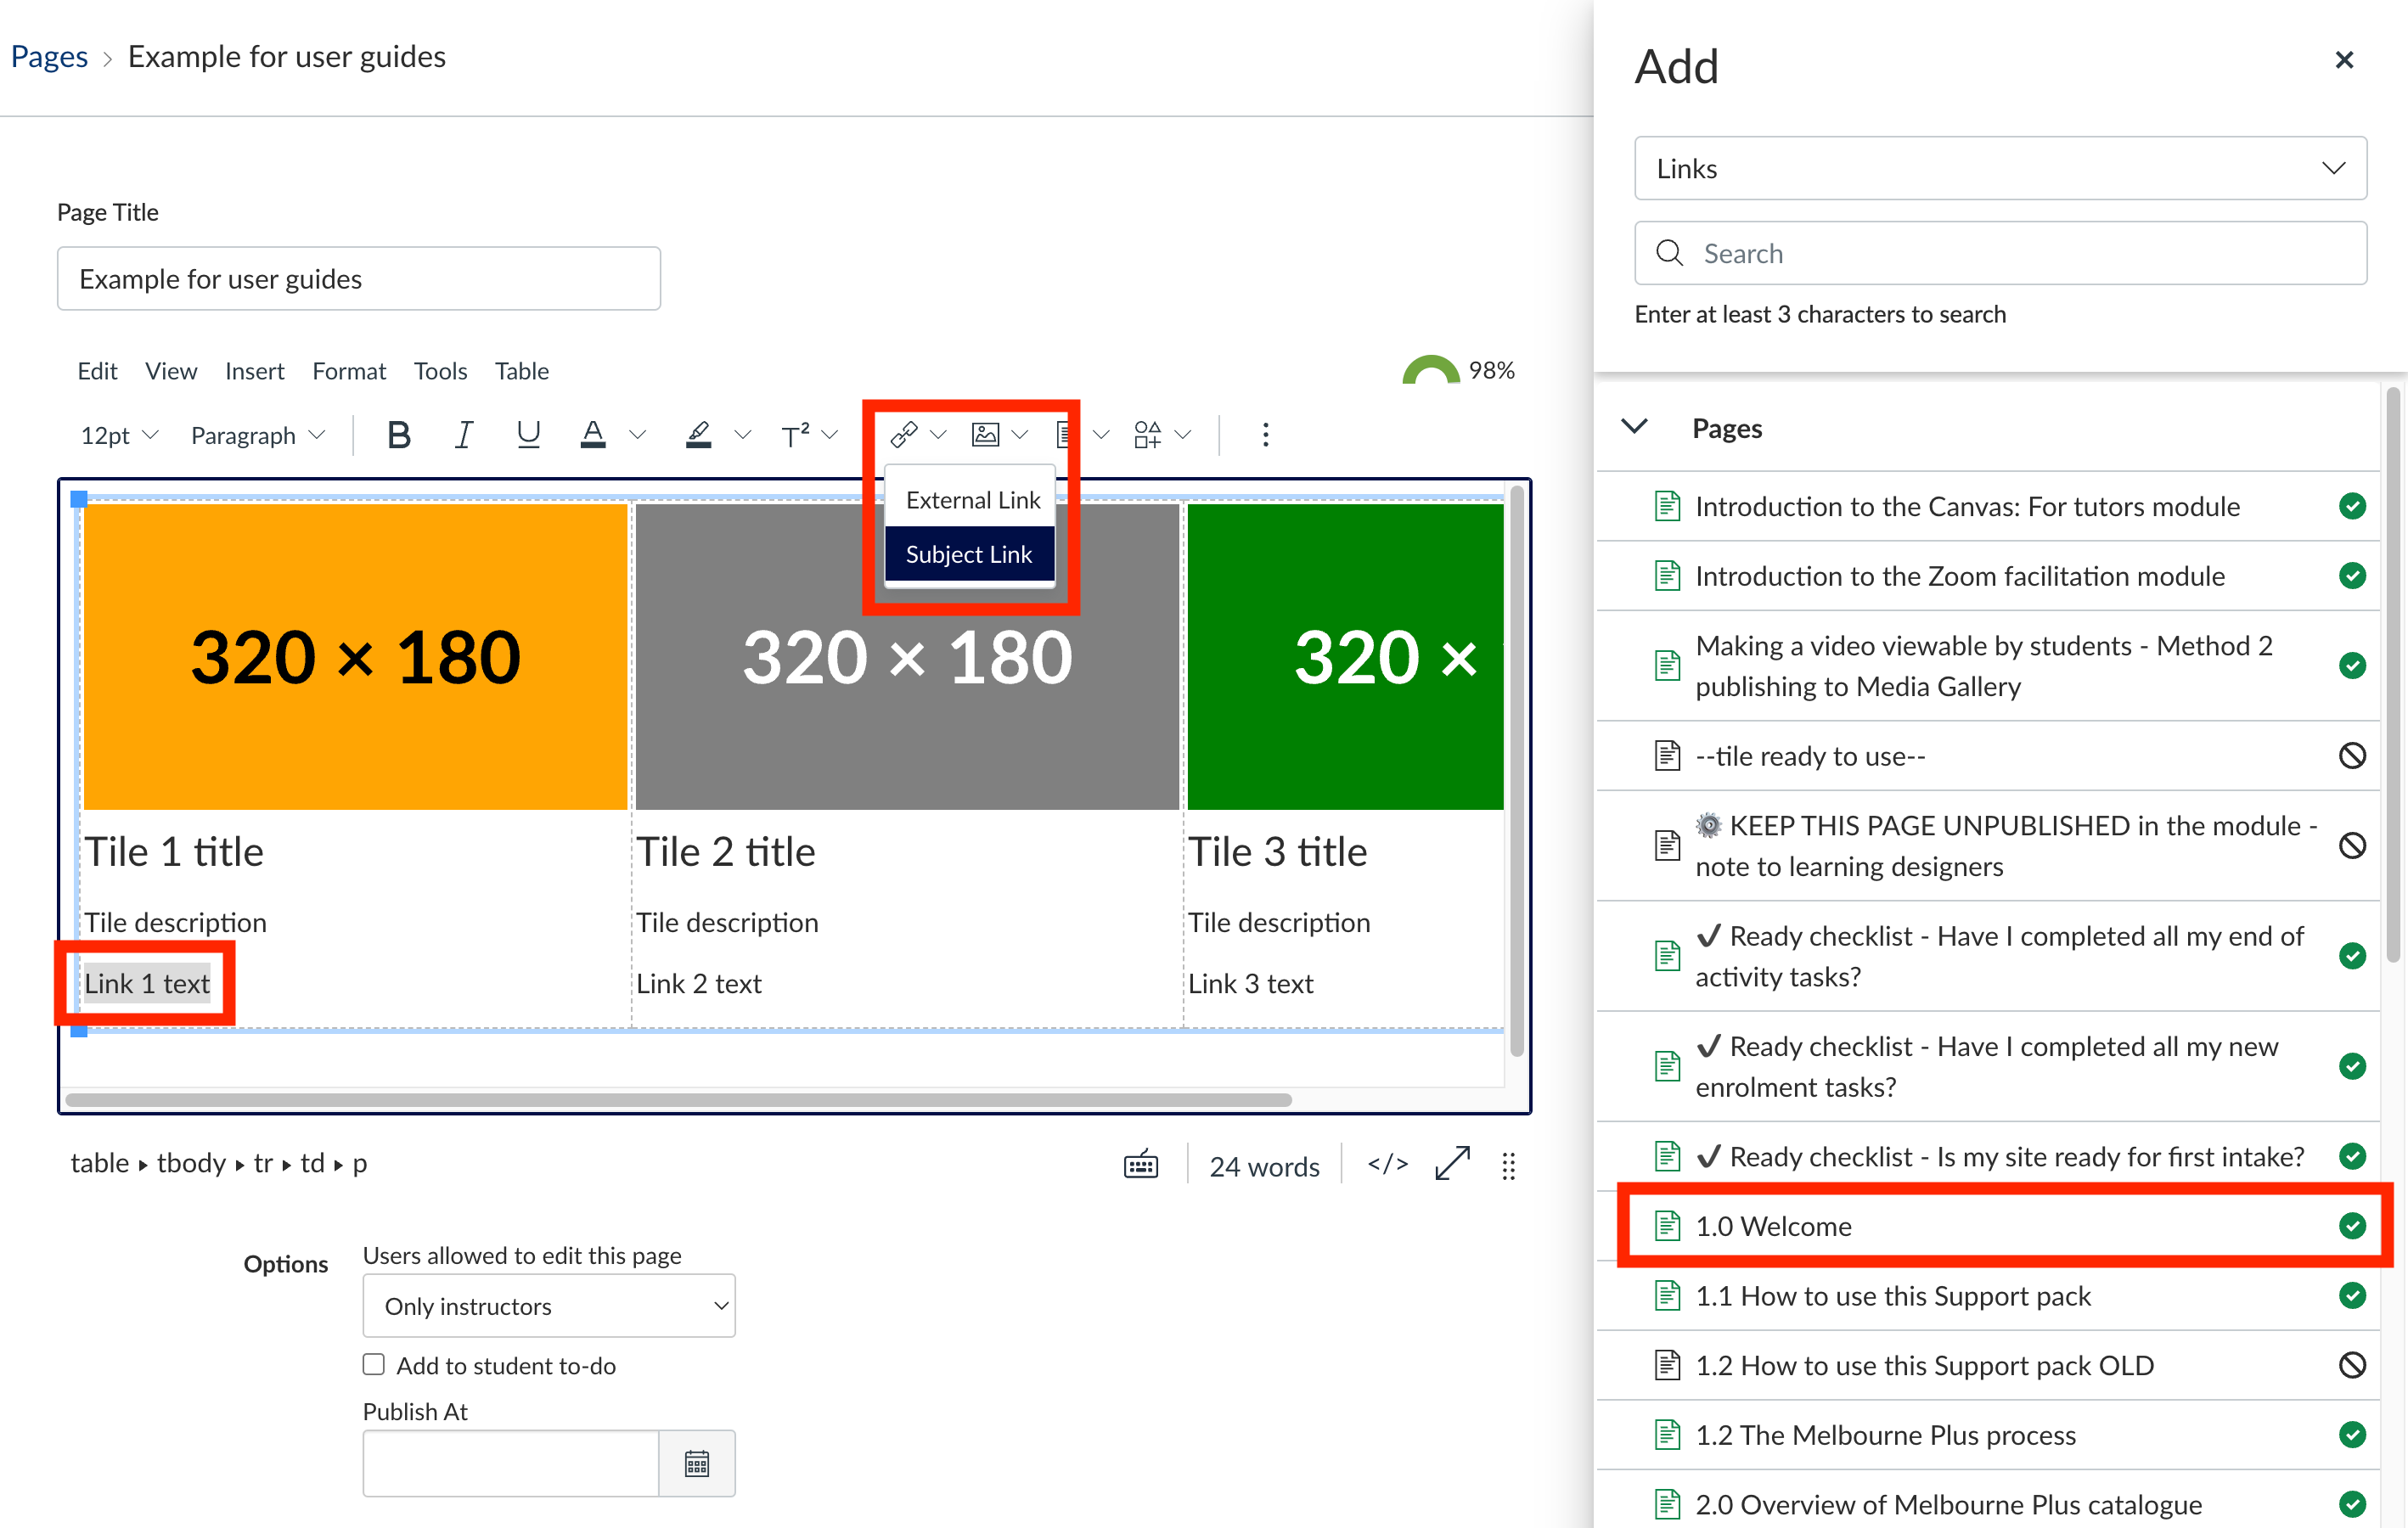
Once you have added text to your tiles, you can link to any section of your LMS subject. In the example below we are adding a link to the Link 1 text tile text:
- In the RCE, select Link 1 text.
- Click the Links menu, then select Subject Links.
- From the Add menu, click the arrow next to a section (Pages, Assignments, Quizzes etc) to expand the menu, then select the content you want to link to.
- In Figure 8.3 below we are selecting 1.0 Welcome from the Pages menu.
How can I link a tile to an external page?
Similar to the approach shown in Figure 8.3 above, you can add links to external websites by selecting External Links from the Links menu.
How can I replace the image of a tile?
Once you have added your own text to the tiles, you can easily replace an image. To do this,
- Select the image by clicking it once.
Screenshot of Canvas interface - rich text content editor with paragraph text, links menu and the 1.0 Welcome page highlighted
- Delete the image, making sure you do not click your cursor anywhere else in the RCE.
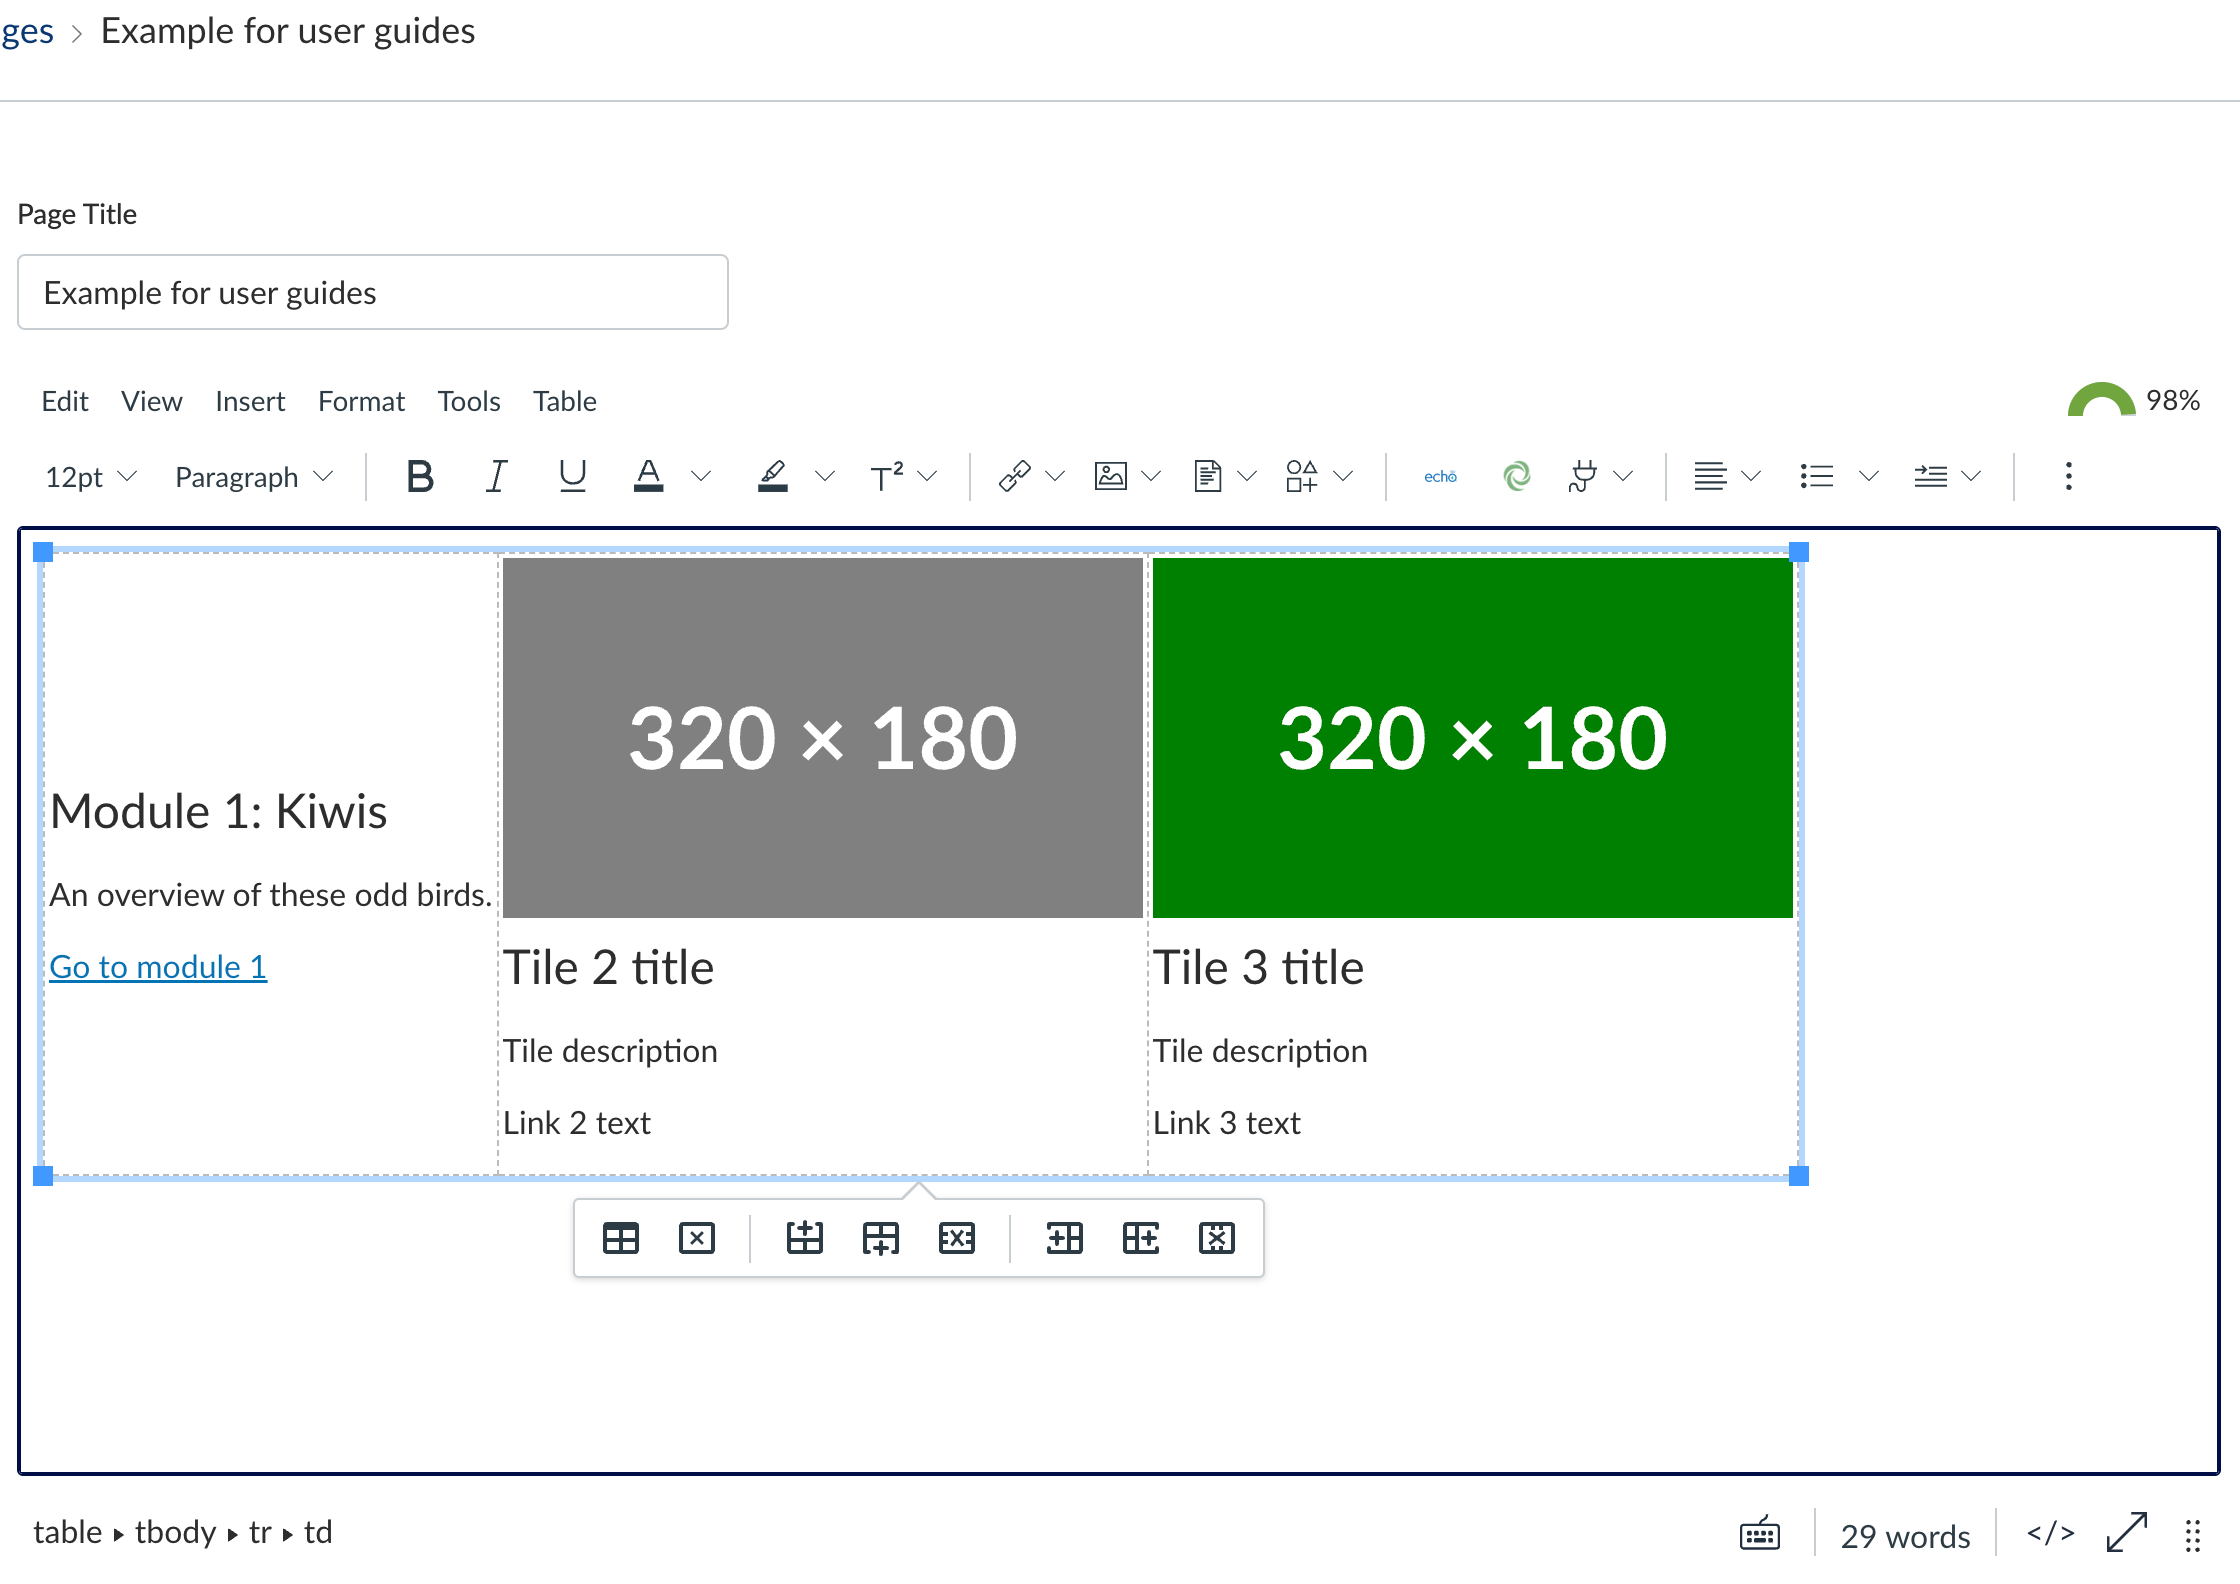
- Leaving the cursor where it is, click the Images menu, then select one of the 3 options:
- Upload Image to add an image from your computer.
- Subject Images to add an image from your Canvas subjects Files section.
- User Images.
- In this example, we will use the Upload Image option.
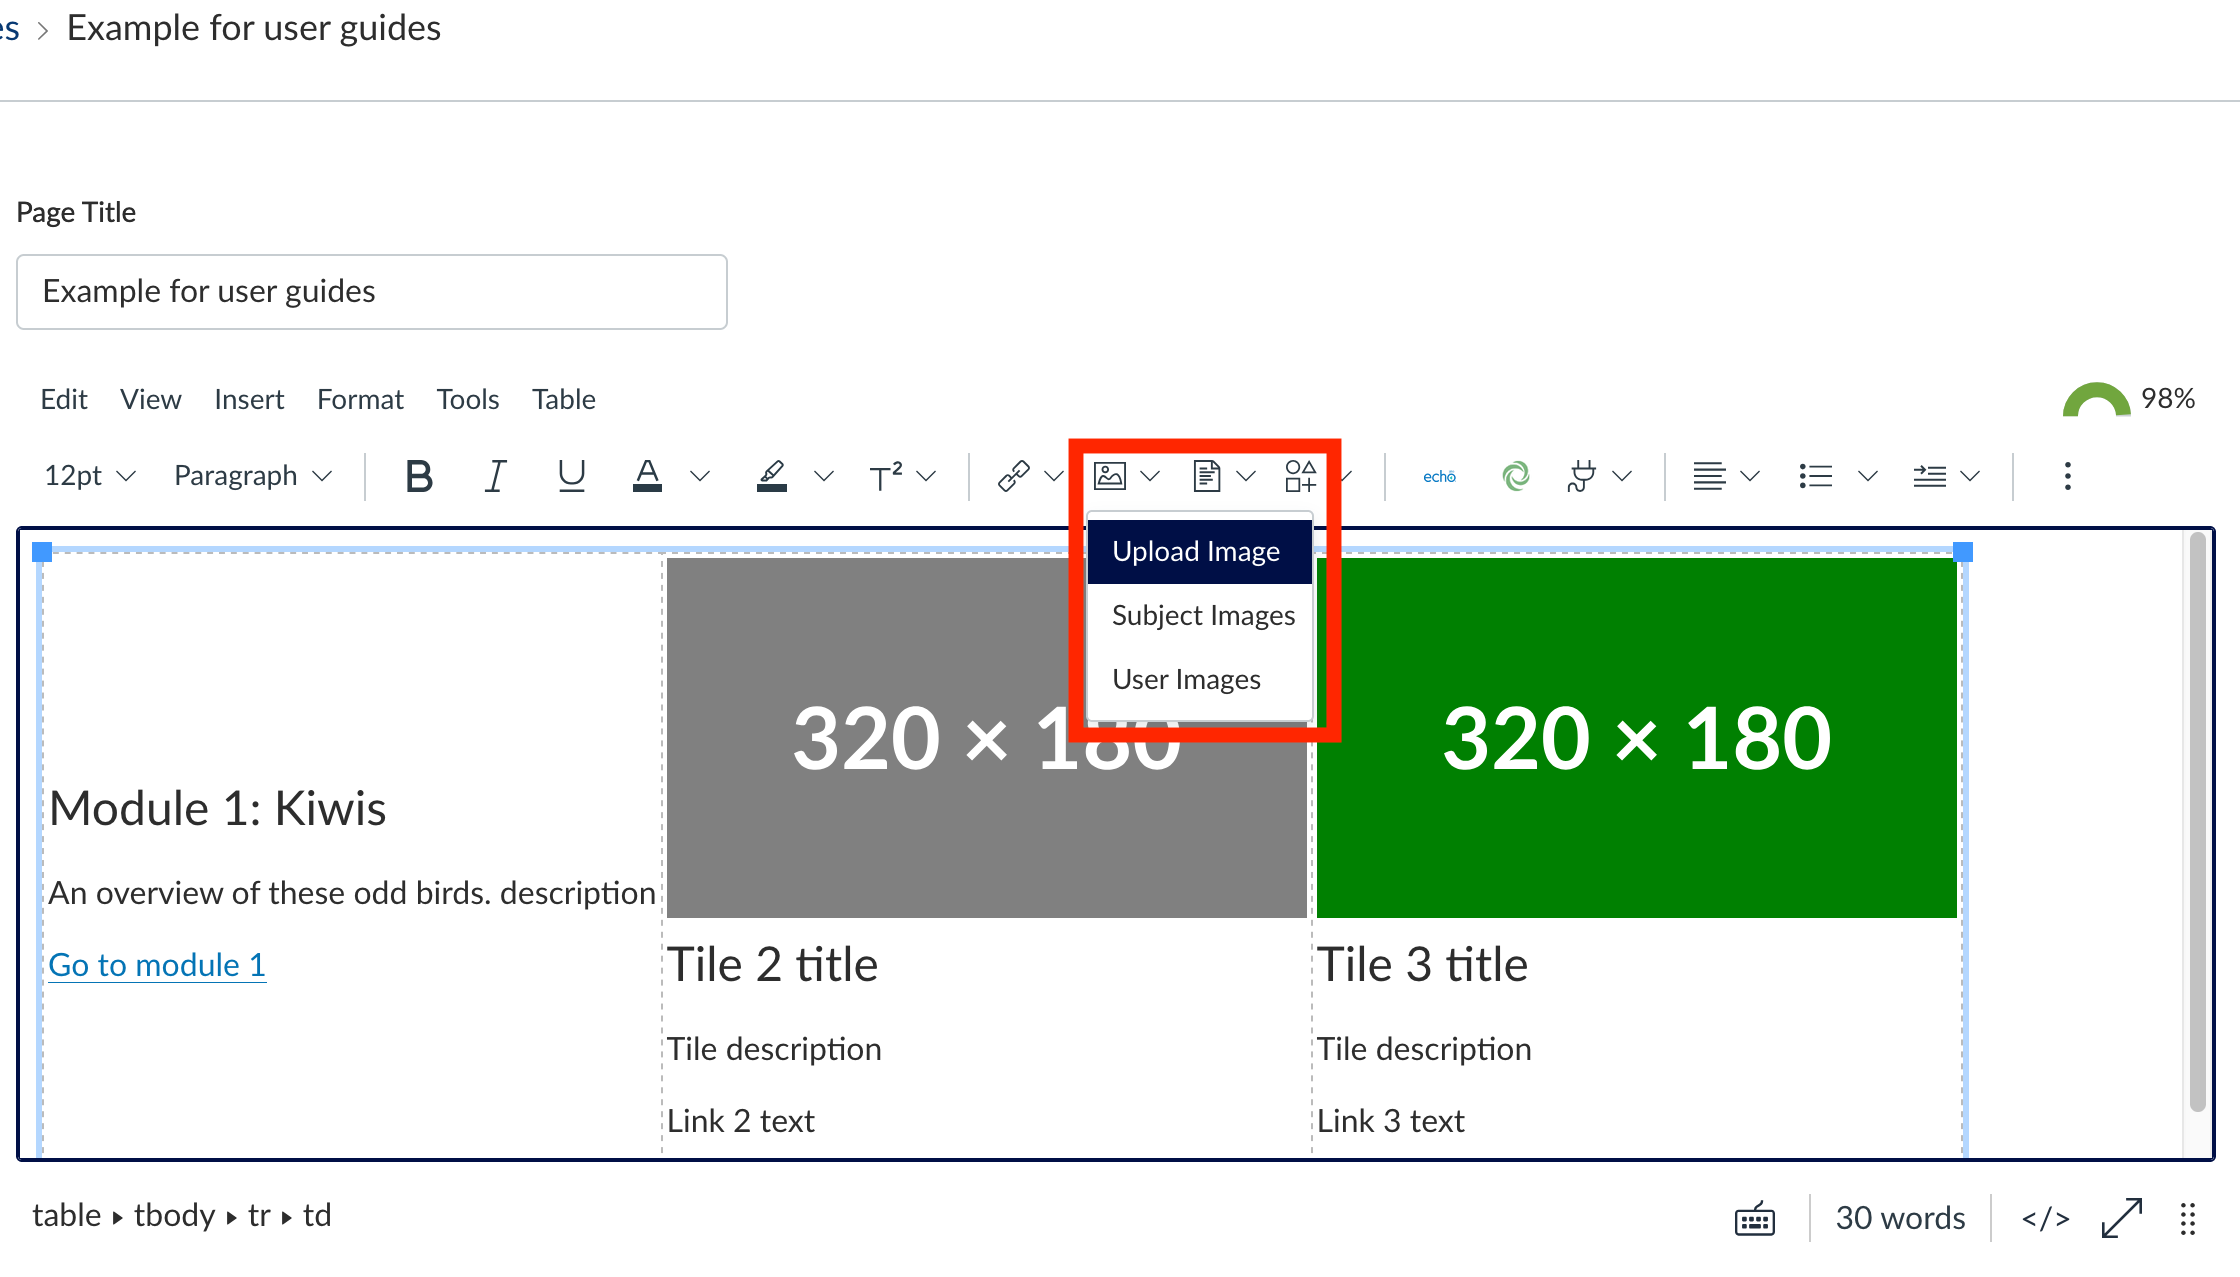
- Select Upload Image then browse to your image and add to Canvas.
- Add alt text to the image. This allows screen reader users to know what the image is.
- Click Submit.
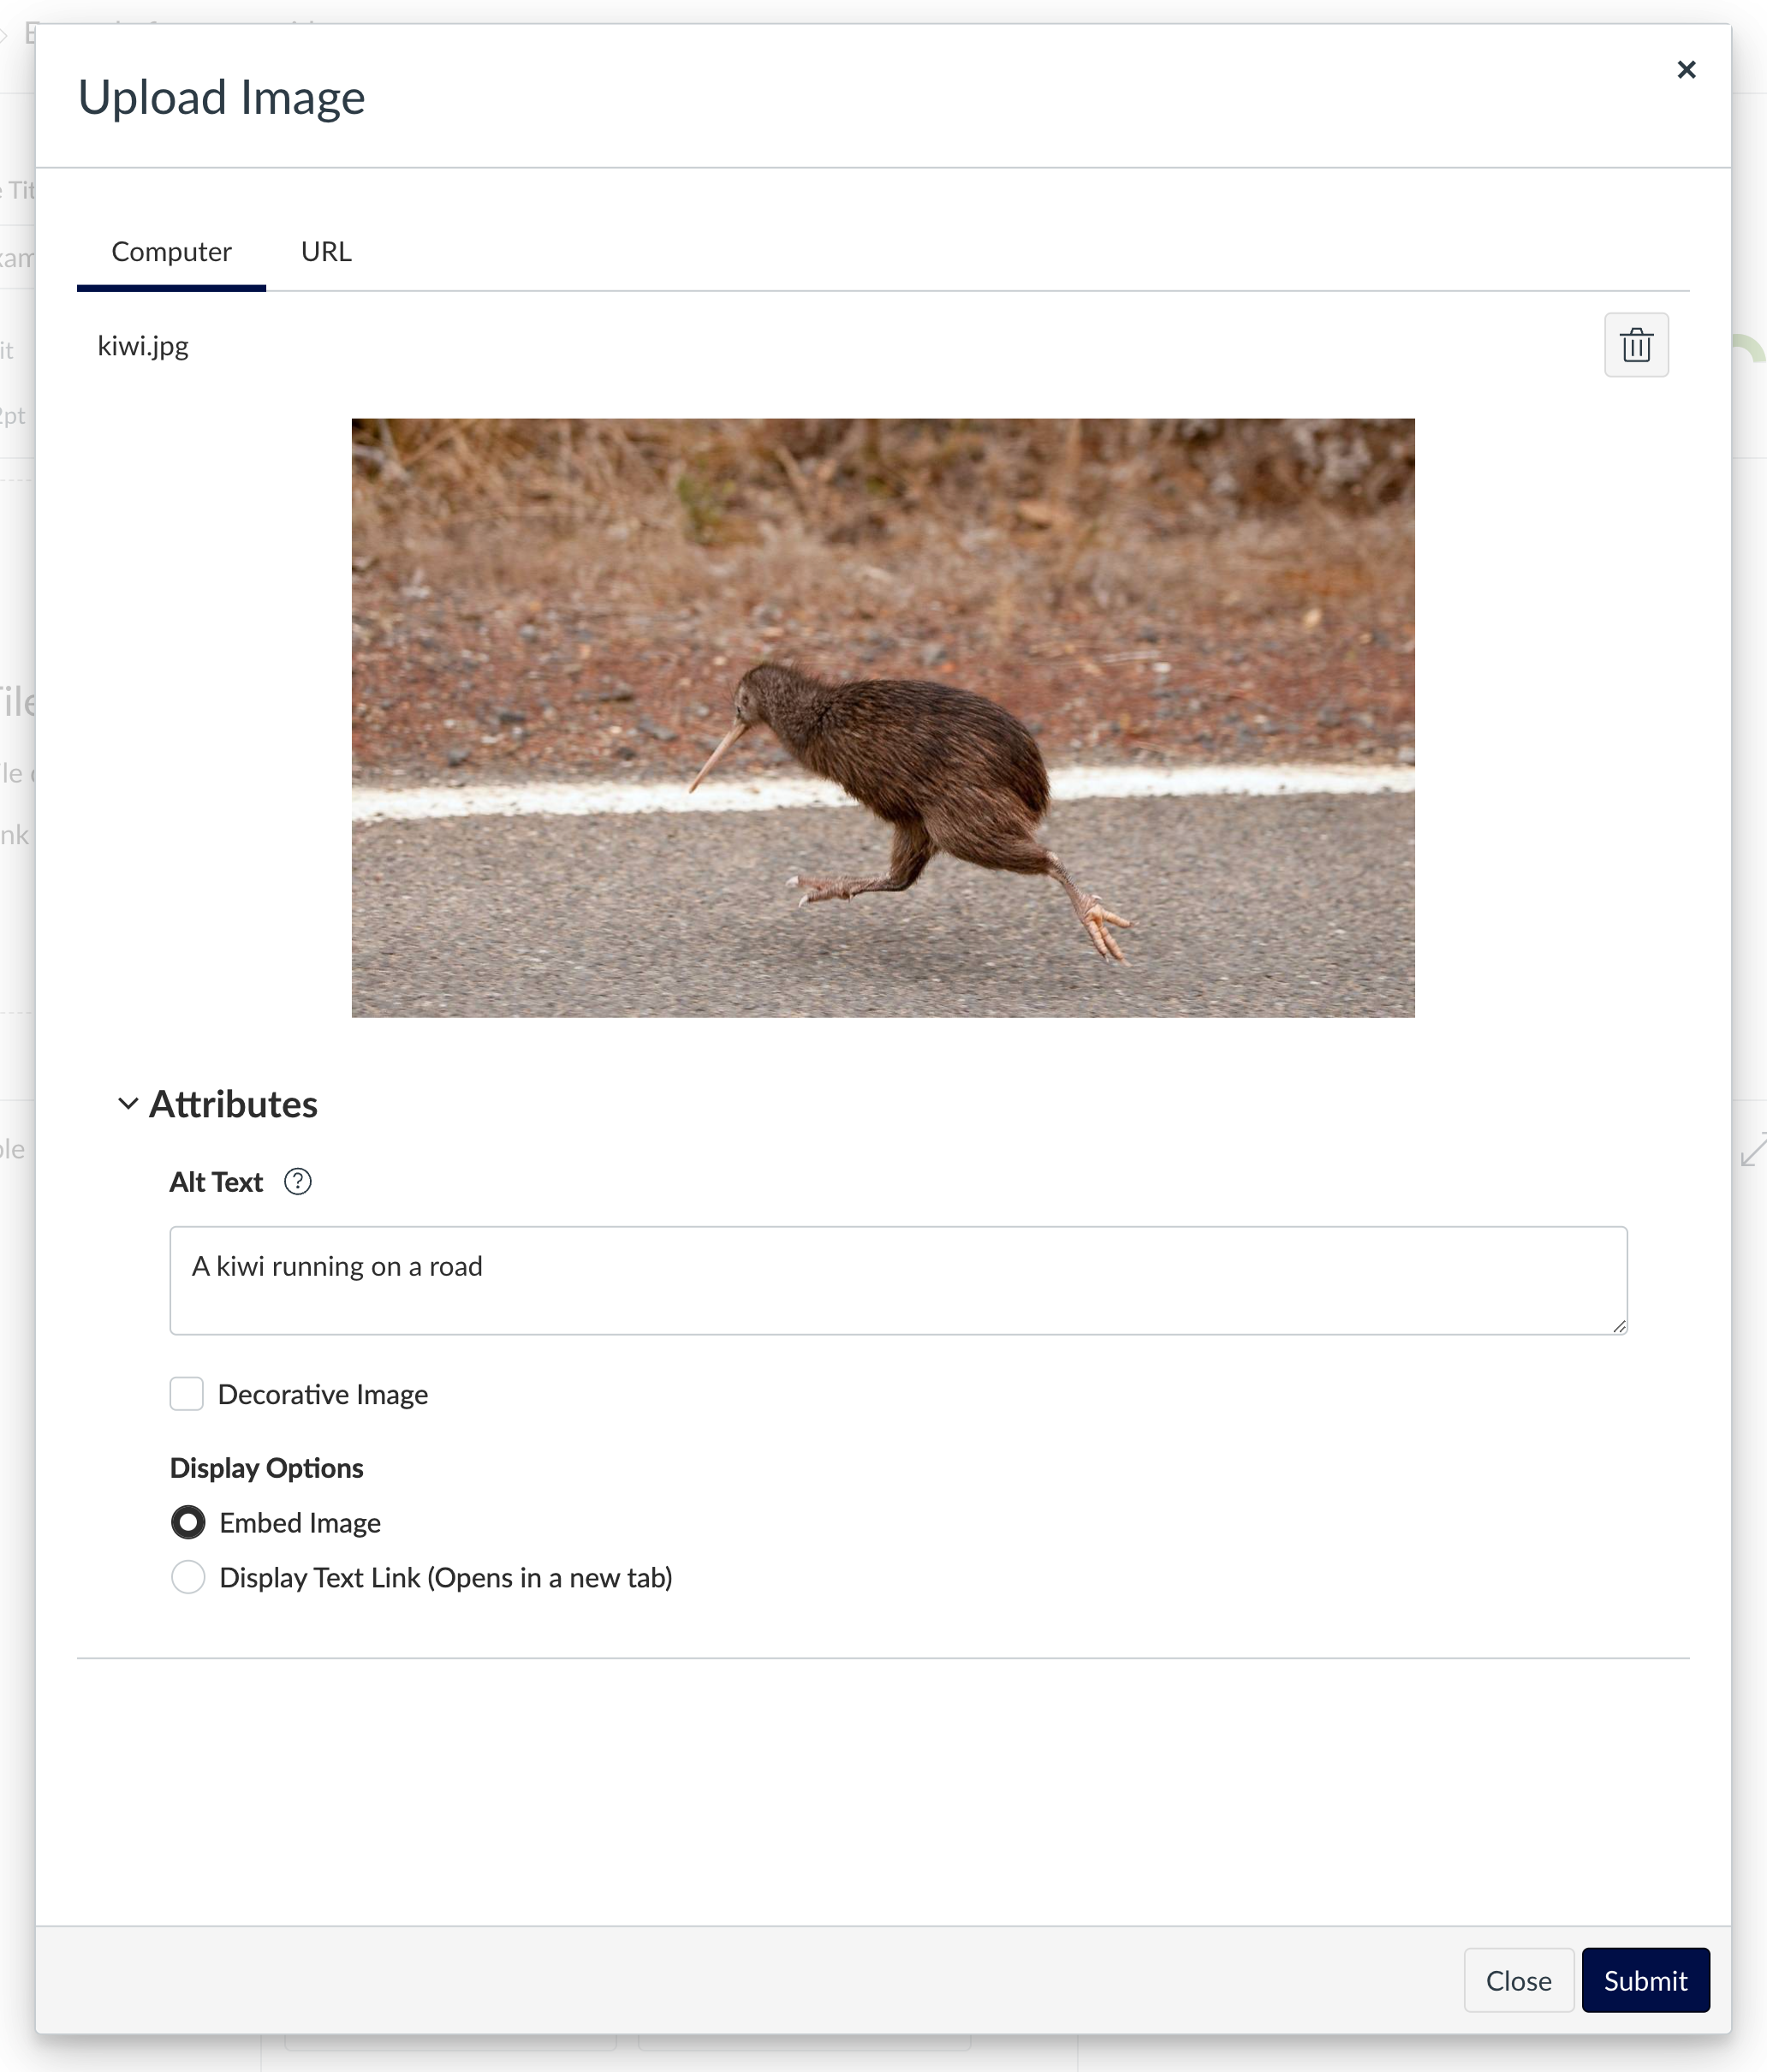
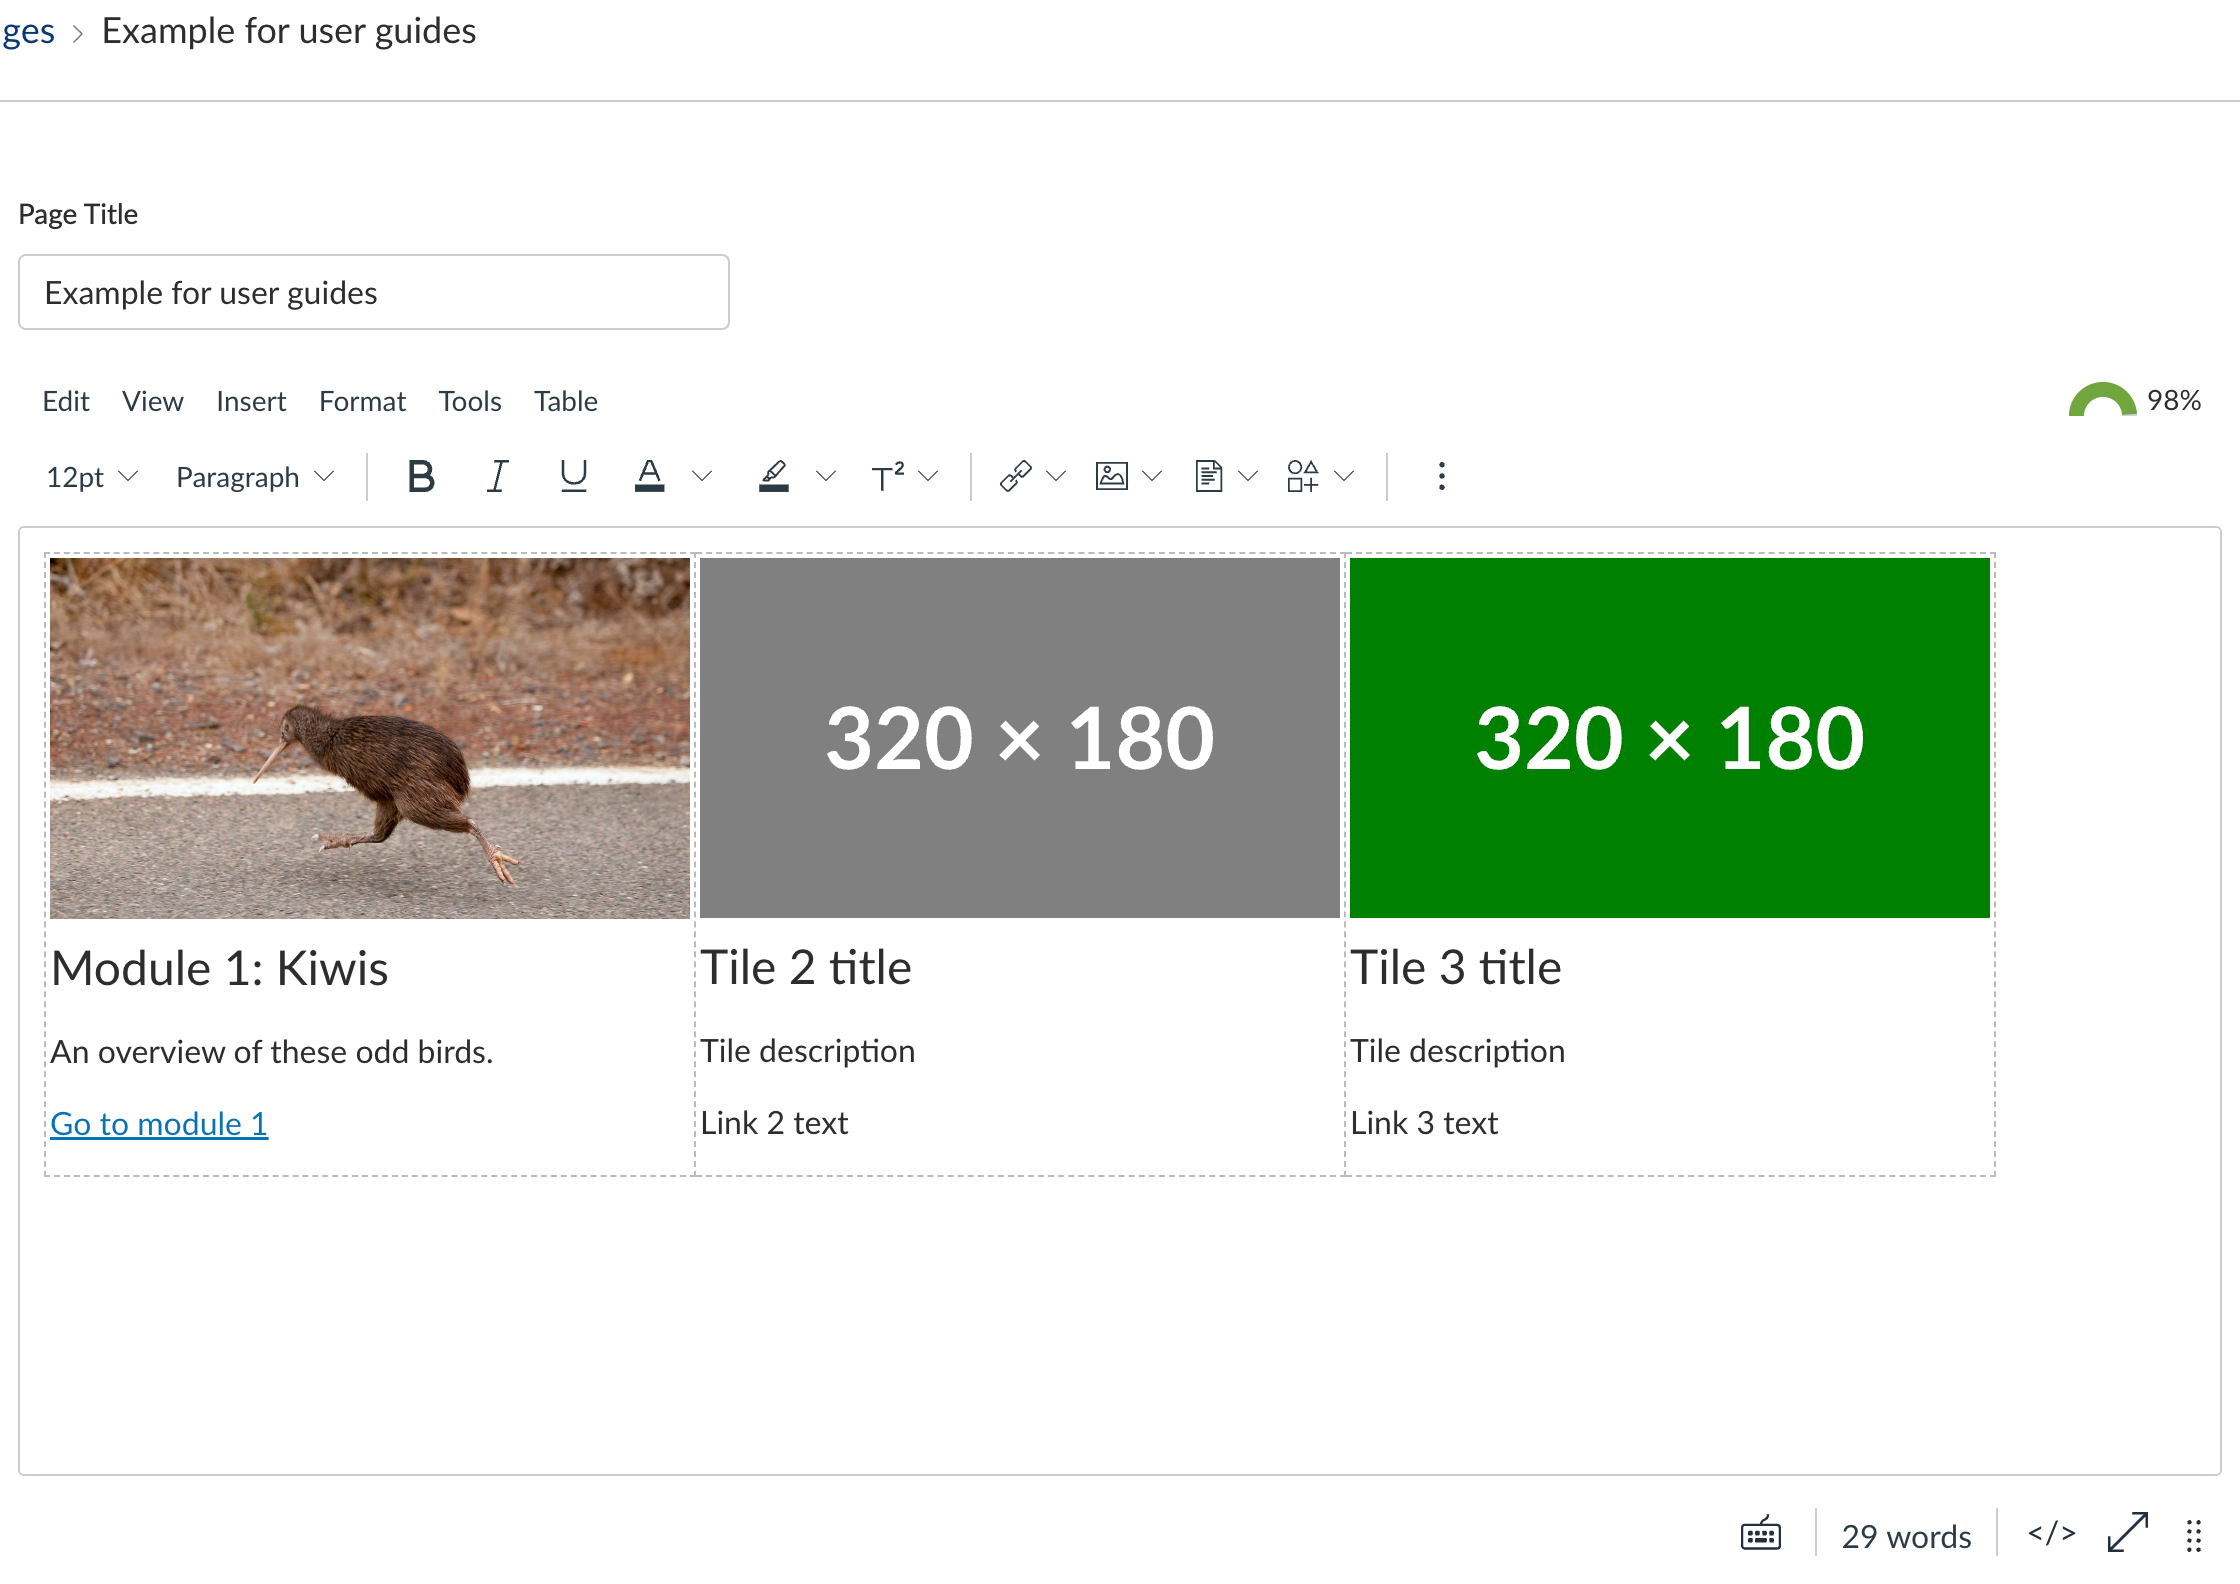
- The image should now appear in the table. Click Save to preview.
Images scale in proportion to the size of the tile after saving. We recommend not adding image files that are too large in size. We recommend an aspect ratio of 16x9 with a width of 400 to 600 pixels.
How can I add more tiles?
Tiles are basically content within a table cell.
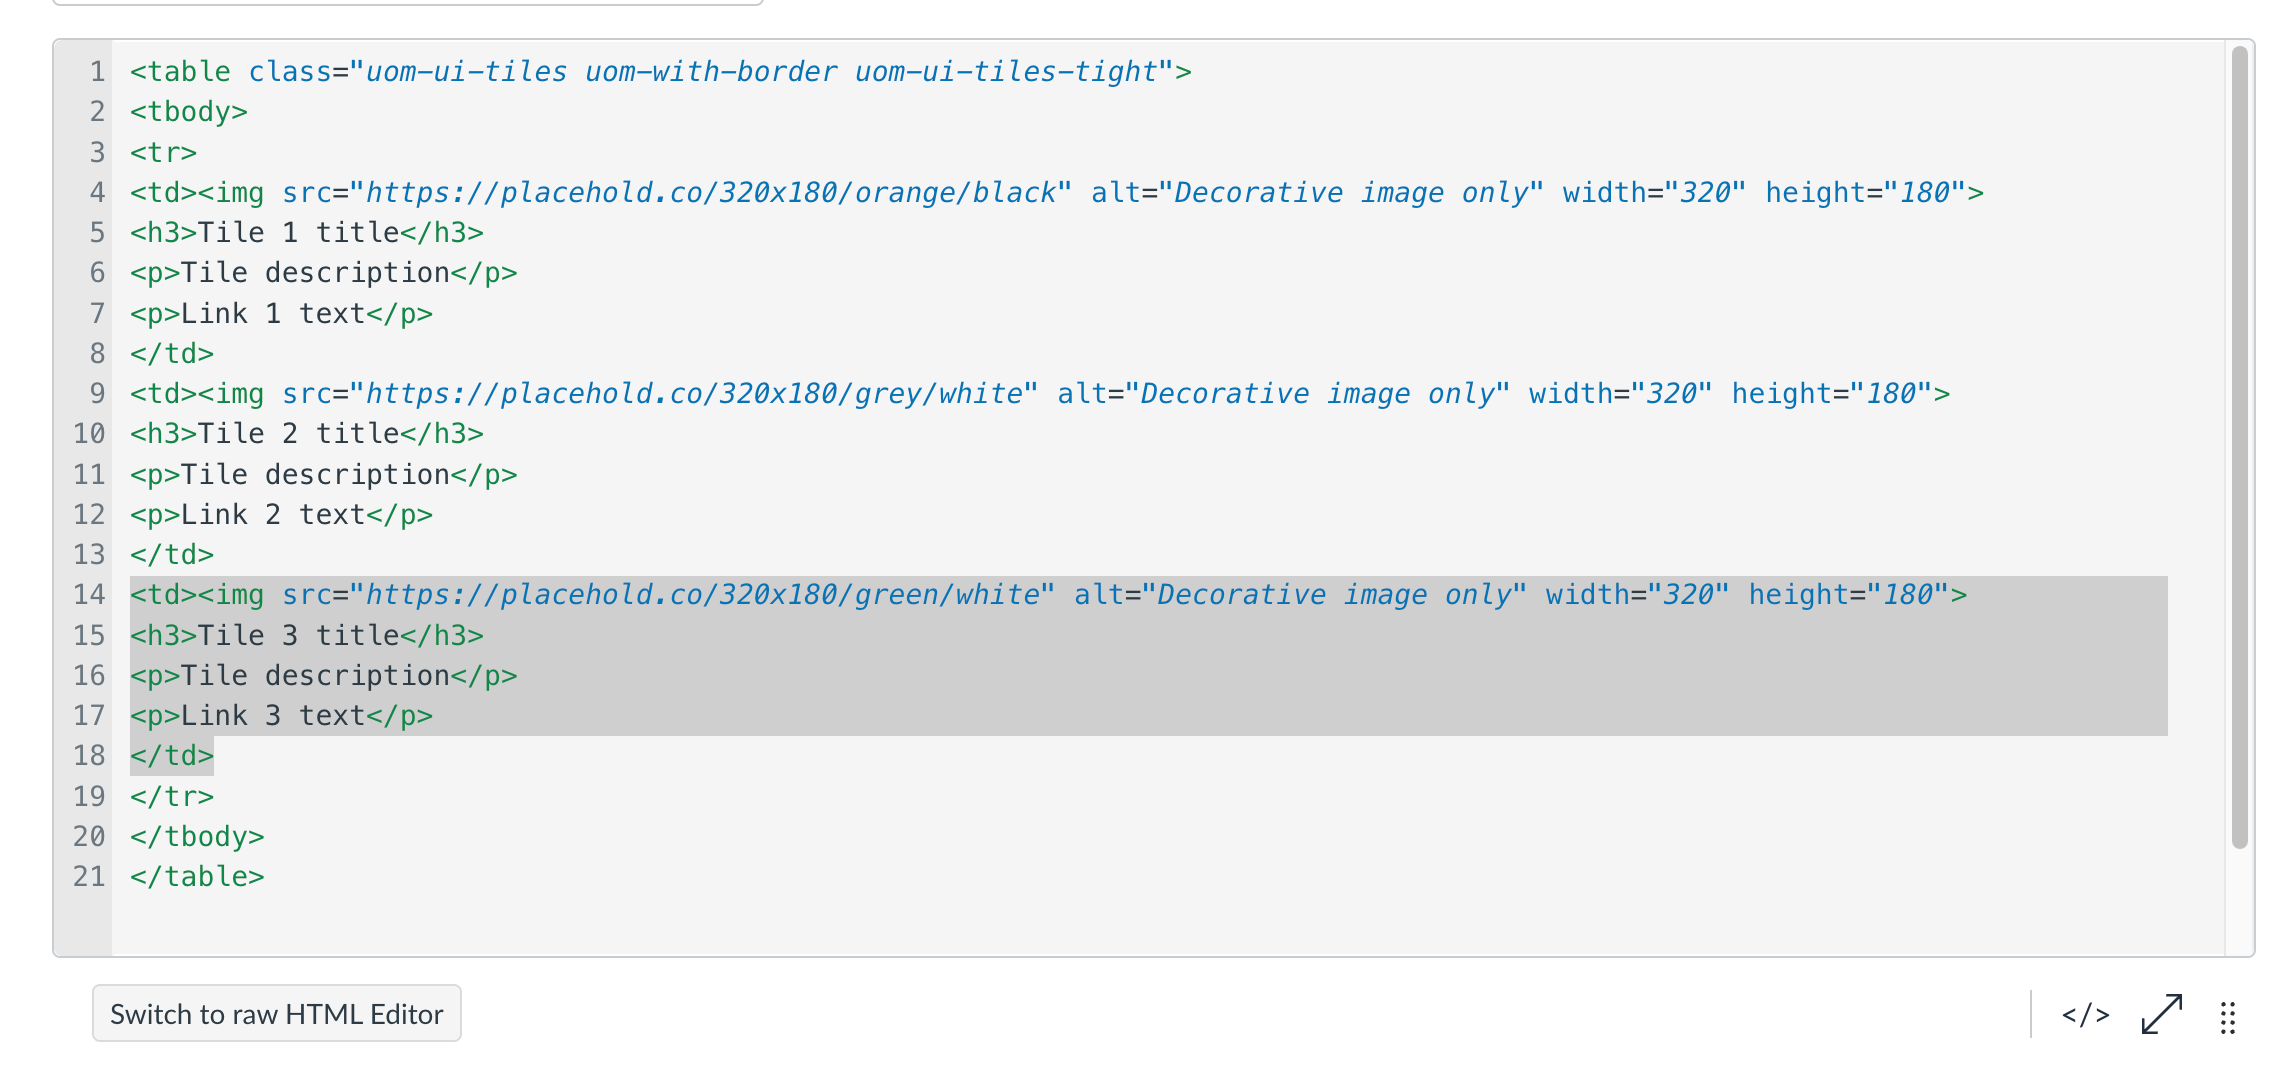
To add an additional tile, copy and paste the HTML code within the table cell tags <td></td> as highlighted in the example below.
How can I remove a tile?
Find the HTML <td></td> tag for the element you want to delete. Make sure you select the opening <td> tag and the closing </td> tag (see figure 8.9), then delete.
Formatting content on an LMS page
Formatting helps provide structure to a page. The RCE allows you to apply some basic formatting, or you can use the HTML editor.
Basic formatting with the RCE
We suggest you start simple, and aim to be as consistent as possible with formatting content in your subject.
- Use heading styles for headings (for example, Heading 2 for the main content heading, Heading 3 for subheadings). Don't change the size or weight of body text so it looks like a heading! The built in heading styles are used by screen readers to help users navigate the page.
- Use bold and italics to emphasise inline text
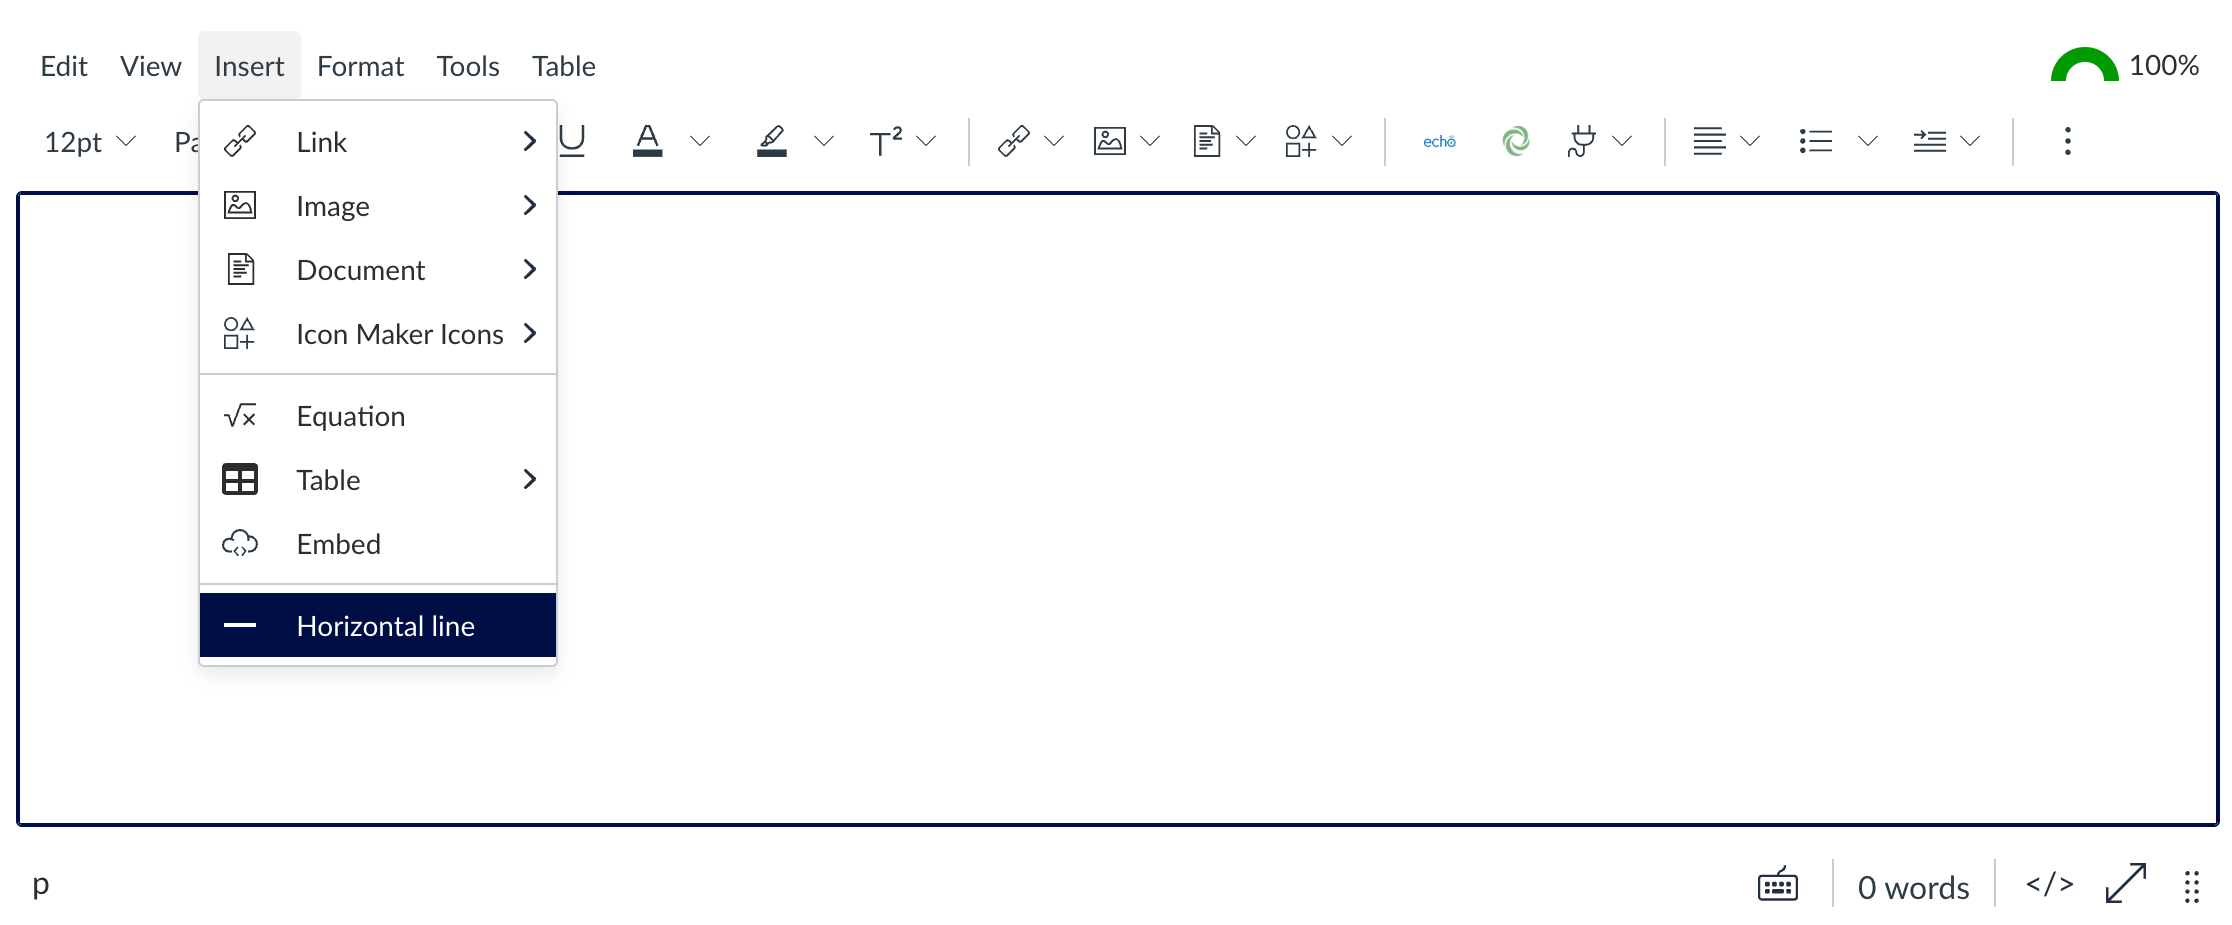
- Use horizontal lines to separate blocks of content. To add a horizontal line, from the RCE menu, click Insert > Horizontal line.
Notice, emphasise and border boxes
If you are confident editing in HTML, you can create a shaded background or border to a block of text so it stands out from the rest of the page's content. The example below uses our custom emphasise class.

To create this effect, copy and paste the HTML below into the HTML editor and change the text between the paragraph tags ( <p></p> ) There are other style choices available in the Canvas custom interface elements Community.
<div class="uom-ui-emphasise">
<p>Add text here</p>
</div>
Staff resources
- Interested in learning HTML? There are many free online course you can take to learn HTML. Check out:
- Downloadable templates that easily implement the suggestions on this page
- Framework for building or improving an LMS site
- Checklist: Launching your LMS subject
- For advanced HTML users, self enrol in the Learning design and assessment Canvas Community, Canvas custom interface elements.
This page was last updated on 17 Apr 2026.
Please report any errors on this page to our website maintainers